On Friday we published a new version of BatchPatch. In addition to numerous smaller fixes and improvements (you can view them in the app under Help > Check for updates > View change log), we added more grid encryption options which are all available under File > Protection Options. For those of you using the BatchPatch ‘Run-As-Service’ feature, you can now use it with grids that are encrypted with any of the key-based encryption options.
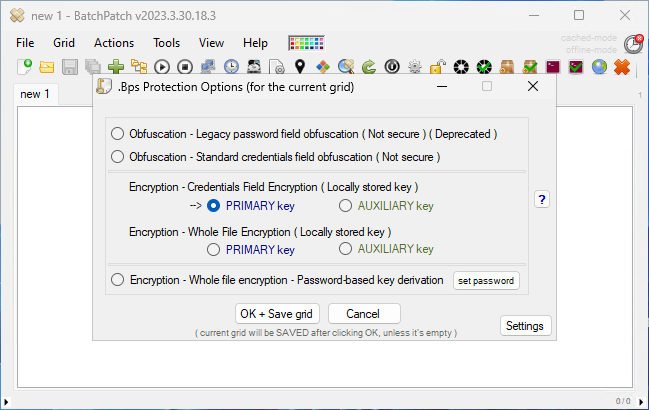

The protection options in this form control how the grid file is protected when it’s saved to disk. These protection options are particularly relevant for users who are specifying ‘Alternate Credentials’ in their grids.
The most secure way to operate BatchPatch is with ‘Integrated Security’, where the account that is used to run BatchPatch is the same account that is granted permissions on target computers for BatchPatch to perform actions. When integrated security is used there are no credentials involved because the BatchPatch application will run in the context of the permissioned user, so no credentials have to be specified in the application for it to work. However, for BatchPatch users who are specifying alternate credentials for any rows in their grids, those credentials are saved in the .bps grid file when you save the grid file to disk (using File > Save), so when using alternate credentials it’s very important to protect those files.
To read more about ‘Integrated Security’ vs ‘Alternate Credentials’, as well as the security ramifications of using ‘Alternate Credentials’ please see:
Using Alternate Logon Credentials in BatchPatch
==================================================================================
Grid Protection Options:
Obfuscation – Legacy password field obfuscation ( Deprecated ):
This legacy mode is deprecated and is only available now for backward compatibility with older versions. In this mode each password in a grid’s password column is individually obfuscated when saved to a .bps/.bpt file. This obfuscation mode does NOT provide any meaningful security. Proceed with caution. Use encryption over obfuscation whenever possible.
=============================================
Obfuscation – Standard credentials field obfuscation:
In this mode each username and password in a grid’s credentials columns are individually obfuscated when saved to a .bps/.bpt file. This obfuscation mode does NOT provide any meaningful security. Proceed with caution. Use encryption over obfuscation whenever possible.
=============================================
Encryption – Credentials field encryption:
In this mode each username and password in a grid’s credentials columns are individually encrypted with AES-256 when saved to a .bps/.bpt file. The encryption/decryption key is randomly generated by BatchPatch per-user, per-computer and stored locally on this BatchPatch computer, encrypted, using the Windows Data Protection API (DPAPI). Files saved in this mode are tied to both the user and the computer where they are created. That is, these files’ credentials fields cannot be decrypted/loaded into a BatchPatch instance that’s running under a different user account or on a different computer (unless you first export the encryption key from this instance of BatchPatch and then import the key into the other user’s/computer’s BatchPatch instance). Despite any encryption applied to the credentials in grids saved with this mode, we still always recommend exercising care and caution when handling files that contain sensitive passwords. Consider using additional layers of encryption as well as limiting access to these files. Also, consider making a backup of the encryption key and storing it securely (NOT on this computer). If there is a failure or accident of some kind that causes the stored key to be lost or corrupted, you will not be able to decrypt the credentials saved in the grid. Of course this isn’t necessarily critical since re-populating the passwords in the grid or creating a new grid will always be possible, but it may cause a loss in time and productivity. Proceed accordingly.
=============================================
Encryption – Whole file encryption:
In this mode the entire grid is encrypted with AES-256 when saved to a .bps/.bpt file. The encryption/decryption key is randomly generated by BatchPatch per-user, per-computer and stored locally on this BatchPatch computer, encrypted, using the Windows Data Protection API (DPAPI). Files saved in this mode are tied to both the user and the computer where they are created. That is, these files cannot be decrypted/loaded into a BatchPatch instance that’s running under a different user account or on a different computer (unless you first export the encryption
key from this instance of BatchPatch and then import the key into the other user’s/computer’s BatchPatch instance). Despite any encryption applied to the grids saved with this mode, we still always recommend exercising care and caution when handling files that contain sensitive passwords. Consider using additional layers of encryption as well as limiting access to these files. Also, consider making a backup of the encryption key and storing it securely (NOT on this computer). If there is a failure or accident of some kind that causes the stored key to be lost or corrupted, you will not be able to decrypt the grid. Of course this isn’t necessarily critical since creating a new grid will always be possible, but it may cause a loss in time and productivity. Proceed accordingly.
=============================================
PRIMARY vs AUXILIARY key / Sharing encrypted grids
When BatchPatch is first launched it randomly generates a PRIMARY encryption key plus an AUXILIARY encryption key. There is no functional difference in behavior between the PRIMARY and AUXILIARY versions of the same mode. However, we include an AUXILIARY key option for each encryption mode so that users who want to share encrypted grids can do so without sharing their PRIMARY keys. If you want to regularly share encrypted grids with a co-worker, you can do this by sharing your AUXILIARY key. Export it and then have your co-worker import it into his/her BatchPatch instance as his/her AUXILIARY key. After that you’ll both have identical AUXILIARY keys, and thus you’ll be able to share grids that you have encrypted with your AUXILIARY key. Grids that are intended to be kept private should be encrypted with your PRIMARY key so that they are only decryptable by your own logon account.
=============================================
Encryption – Whole file encryption – Password-based key derivation:
In this mode the entire grid is encrypted with AES-256 when saved to a .bps/.bpt file. The encryption/decryption key is derived per grid, using PBKDF2, from the password that you set for each grid that is saved in this mode. Despite any encryption applied to the grids saved with this mode, we still always recommend exercising care and caution when handling files that contain sensitive passwords. Consider using additional layers of encryption as well as limiting access to these files. Note, in this mode since the encryption key used to encrypt/decrypt the file is derived from a password that you specify, it’s important to choose a password wisely. Password-based encryption usually does not provide the same level of security as key-based encryption since the average person tends to create and/or use relatively weak passwords that are more easily guessable by brute-force (attempting a large number of passwords until finding the correct one that successfully performs decryption of the encrypted data). Since the strength of the encryption in password-based encryption is limited by the strength of the password, choosing a unique, long, unpredictable/random password provides the most protection against brute-force.
=============================================
Export/import key:
When using the PRIMARY/AUXILIARY key modes, consider exporting the encryption key as a backup and storing it securely (NOT on this computer) because if any situation arises where the locally stored key becomes damaged or lost (BatchPatch computer dies or is replaced, corruption occurs, user profile is deleted from this computer, etc) you won’t be able to decrypt anything that was encrypted with the key. In many environments this might not be critical since creating a new grid from scratch will always be an option, but it may cause a loss in time and productivity, so proceed accordingly. In the case of ‘Credentials field encryption’, only the credentials fields will be unable to be decrypted, but the rest of the file will remain as clear text. However, in the case of ‘Whole file encryption’, the entire file will be unable to be decrypted and will therefore be completely unusable.
=============================================
Windows Data Protection API (DPAPI):
BatchPatch uses the DPAPI to protect the locally stored keys on disk. The DPAPI provides a reversible form of encryption that is used to store secrets on disk. These secrets are generally protected by the credentials of the user logon account under which they are stored. If an attacker is able to run code in the context of a user that stored secrets using the DPAPI, the attacker will then also have the ability to decrypt those secrets if A, the attacker locates those DPAPI-protected secrets on disk, and if B, the attacker has enough prior technical knowledge of the specific application that performed the DPAPI-protect operations in order to be able to successfully decrypt those protected secrets.