We have done our best to make sure that all of the typical commands a Systems Administrator might need to run on computers in his/her network have been included in BatchPatch, so that it’s very easy to get information from remote computers with just a couple of clicks. That said, if there is a command that you would like to be in the menu that isn’t currently in the menu, we’ve provided a way for you to add your own commands to BatchPatch such that they will appear in the Actions menu, just like the factory-commands that we have included. If you believe that we should add a command (or feature) that isn’t already included in the default setup, please contact us or post in the forum with your request, and we will respond as soon as possible. However, if you simply want to add your own custom commands that might be unique to your environment, see below for steps on how to do that.
What Types of Custom Commands Can You Add to BatchPatch?
Virtually any command that you would run at the command line is a command that you can incorporate into BatchPatch. Maybe you need to get some information from a remote computer, or maybe you want to start or stop a service, or perhaps you need to kill a process. BatchPatch does provide built-in menu options for starting/stopping services as well as killing processes, but maybe you regularly have to start/stop a very specific service, and you don’t want to keep typing in the name of the service every time you need to restart it. In this case it would be very convenient to simply add the specific command to BatchPatch. Here are a list of examples. These are just some of the many commands that someone could add to BatchPatch, if he/she was so inclined:
- WMIC SERVICE list brief
- WMIC SERVICE where caption=’DNS Client’ CALL startservice
- WMIC SERVICE where caption=’DNS Client’ CALL stopservice
- WMIC SERVICE where state=’running’ GET name, displayname, pathname, processID
- WMIC SERVICE where (state=’stopped’ and startmode=’auto’) GET displayname, name
- WMIC SERVICE where (state=’stopped’ and startmode=’auto’) CALL startservice
- WMIC SERVICE where (DisplayName=’DNS Client’) CALL ChangeStartMode Manual
- WMIC PROCESS list brief
- WMIC PROCESS where name=’hungProcess.exe’ call terminate
- WMIC PROCESS where name=’hungProcess.exe’ delete
- WMIC USERACCOUNT list brief
- WMIC CPU get name, caption, maxclockspeed, systemname
- WMIC OS GET caption,servicepackmajorversion,version
- WMIC PATH Win32_ComputerSystem GET model
- WMIC PATH Win32_BIOS GET caption
- WMIC PATH Win32_ComputerSystem GET systemtype
- WMIC PATH Win32_DiskDrive where “model like ‘%OCZ%'” GET deviceID, model
- WMIC PATH Win32_DiskDrive where “not model like ‘%OCZ%'” GET deviceID, model
- WMIC PATH Win32_LogicalDisk where “drivetype=3” GET deviceid, volumename, freespace, size
- TASKLIST
- TASKKILL /F /IM “hungProcess.exe”
- PATHPING google.com
- REG QUERY “HKLM\Software\Microsoft”
- REG QUERY “HKLM\Software\Microsoft\.NETFramework” /v InstallRoot
3 Different Locations in BatchPatch to Incorporate Custom Commands
You can add your own commands under any of the 3 following menus:
- Get Information
- Remote Process/command
- Local Process/command
There is only one subtle difference to be aware of when deciding where to add your commands. If you choose to add a command under the Get Information, then when you actually execute that command, it will not prompt you to confirm the execution. It will simply execute straight-away, right after you click the command in the menu. However, for both the Remote Process/command and Local Process/command menus, any commands stored in these menus will require you to confirm “Yes” or “No” after clicking on the command to execute.
How to Add Your Custom Commands to the BatchPatch Menu
The process for actually hard-coding your custom commands into the BatchPatch menu is very simple. We’ll use the Get Information menu for this example.
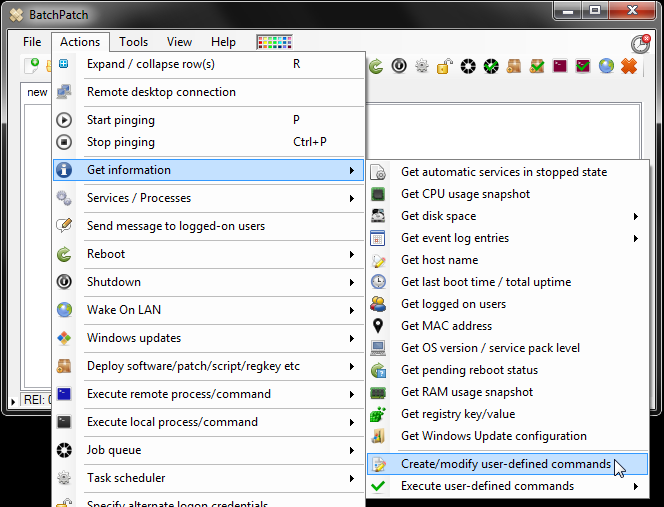
- Select Actions > Get information > Create/modify user-defined commands
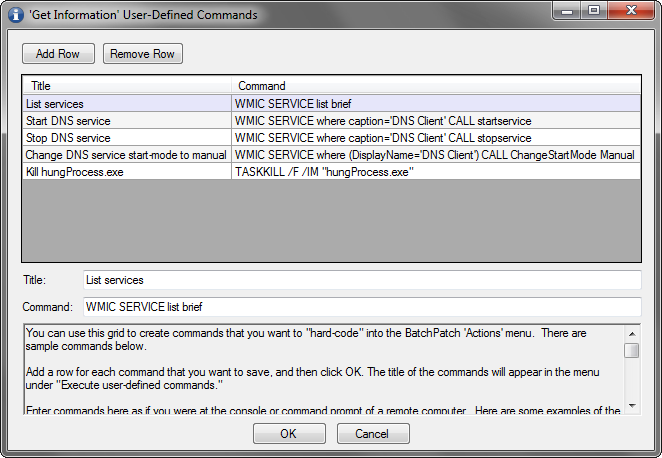
- In the dialog that appears, in the left-hand column add the name/title of the command (this name/title is what will appear in the BatchPatch menu), and in the right-hand column add the corresponding command to execute. There is no limit to the number of commands that you can add. Simply create a new row for each command that you want to appear hard-coded in the BatchPatch menu.
- Finally, when you’re ready to execute the command, simply highlight the hosts that you want to send the command to, and then select Actions > Get Information > Execute user-defined commands and then select the specific command that you want to execute