BatchPatch Deployment Stuck Executing

There is generally only one reason why a deployment hangs indefinitely, stuck in the ‘Executing’ phase in BatchPatch: You did not use the correct silent/quiet installation parameter for your deployment. As a result, the deployment appears to get stuck, hanging indefinitely. This is because the deployment is actually waiting for user input on the target computer (it might be stuck at a screen that prompts you to click ‘Next’ or click ‘OK’ to continue, for example), but since all deployments run hidden, the user input cannot be provided after execution has begun. Instead the user input has to be provided in the form of a silent or quiet installation parameter. In all cases, we recommend the following:

Determine the proper silent/quiet installation parameter

1: Determine the proper silent/quiet installation parameter for your deployment. This might require consulting the vendor’s documentation for the installer that you are deploying, or it might just require running the installer with a ? or /? switch to see the available options, or even just some good old fashioned experimentation. The screenshot below is just for illustration purposes. Your installer’s help parameter may be different or nonexistent.

Test at the command prompt

2: Test the deployment at the command line WITHOUT using BatchPatch. Run your deployment manually/directly in the cmd.exe prompt on a given test computer so that you can ensure that it works to completion WITHOUT requiring any additional input from you. This means that it needs to run to completion without popping up a window that requires you to click OK or Next or fill out any information before it can proceed. The screenshot below is just for illustration purposes. Your installer’s quiet/silent installation parameters will likely be different.

Test your deployment in BatchPatch

3: AFTER you have confirmed that your command syntax works correctly to completion at the command line without ever requiring any additional user input, you may then run the deployment inside of BatchPatch, utilizing the same syntax for a quiet/silent installation that you ran successfully outside of BatchPatch. The screenshot below is just for illustration purposes. Your installer’s quiet/silent installation parameters will likely be different.

Posted in Blog, General, Tutorials | Tagged , , , , , | Comments closed

Scheduling an Email Report to be Sent for the Entire Grid

To schedule a report of the entire grid’s activity to be emailed at a specific time, such as when your Windows updates or patching maintenance window comes to an end on a given day, here’s what to do.

Configure Your Default Email Settings

  1. Go to Tools > Settings > Email Notifications
  2. You can use my screenshot below as a template, but substitute your own email server and address settings.
  3. Use the Send test email with current settings button to ensure that your username, password, SMTP server, port, and other settings are configured properly for your email server.
  4. Set the Body content and HTML attachment content to $grid. When BatchPatch sends an email notification with the default settings, the $grid value instructs it to send a copy of the entire grid’s contents
  5. Finally, click OK to save the settings.

Create a BatchPatch Scheduled Task

  1. In my BatchPatch grid I have 5 target hosts, but I also created a separate row with a fake host name REPORT. It will be used strictly to schedule and send the email notification. I don’t actually have a target computer with the name REPORT. Feel free to create a bogus host entry just like I did. Give it any name that makes sense for your situation.
  2. Highlight the bogus host row that you created, and then click on Actions > Task scheduler > Create/modify scheduled task to open the Task Scheduler form window.
  3. From the Task drop-down menu, select Send email notification with default settings, and set the desired run time by modifying the Reference: field. Then click OK to apply this task to the selected row in the grid.
  4. The only thing left to do is enable the scheduler by clicking on the red clock icon in the upper right corner of the BatchPatch main form window. Clicking the red icon will turn it green, which signifies that it’s enabled. Note in the two screenshots below the change from red to green. Once the icon is green, any scheduled tasks that are configured in the grid will be executed at their scheduled times.

Optionally Create and Save Email Notifications for Other Recipients or with Other Settings

Above we used the default email notification values for our email notification. For most users, this will probably be sufficient. However, some users will want to be able to create multiple different email notifications so that in some cases a notification and/or report can be sent to one recipient group, and in other cases a notification and/or report can be sent to a different recipient group. Here’s how to do that.

  1. Select Actions > Email notifications > Create/modify email notifications.
  2. In the Email Notifications form, set any values that you’d like for your new email notification configuration. Then use the double-right arrow button to save it. The values that you set here will override the default values if you ever use the Task Scheduler or Job Queue to send an email using this new configuration instead of using the default configuration.
  3. After an email notification configuration has been saved, you’ll find that it’s an available option in your Task Scheduler drop-down menu in the Task Scheduler form window. If I create a scheduled task with this new email configuration, it will be used instead of the default email configuration that we used previously.

Optionally Using the Job Queue to Send Email Notifications and Reports

    The above example shows how to send emails from the BatchPatch Task Scheduler. However, you can also send emails from the BatchPatch Job Queue. In the same way that you were able to use Send email notification with default settings as well as your custom email notification template from within the Task Scheduler task drop-down menu, in the Job Queue you can similarly select either of those to add an email notification step to your job queues.

  1. Select Actions > Job Queue > Create/modify job queue
  2. If you want to use the default email configuration values to send your email, then select Send email notification with default settings from the Special items menu. Double-click it to add it to your job queue.
  3. Or if you want to use the other email configuration that you created and saved, you’ll find that located in the Saved User-Defined Commands and Deployments menu grid in the lower-left area of the job queue window. You can double-click the entry that you created/saved previously to add it to a job queue.
  4. Now you can add any other desired steps to your job queue and save it with the double-right arrow button.
  5. Once saved, you’ll be able to launch the job queue at any time for a given host/row on-demand by selecting the desired host/row and clicking Actions > Job Queue > Execute saved job queues > Your custom job queue title
  6. Alternatively, you can schedule the job queue to run for a given row by selecting the desired row and then clicking Actions > Task scheduler > Create/modify scheduled task. Select your custom job queue in the task drop-down menu, and set the desired run time.
  7. Finally, as illustrated in previous steps, make sure to enable the scheduler by clicking the clock icon in the upper-right part of the main BatchPatch window. Green is enabled. Red is disabled. Make sure it’s green so that your scheduled job queue task will execute at the run time that you configured for it.
Posted in Blog, General, Tutorials | Tagged , , | Comments closed

Deploying Windows Feature Update 25H2 Remotely to Multiple Computers

Standard Deployment Method for Windows Feature Update 25H2 (and other feature updates/upgrades such as 24H2, 23H2, 22H2, 21H2 etc) in BatchPatch

If Microsoft has already made the update available to your computer, then unless you are using an old version of BatchPatch (released prior to April 2020), you can deploy Windows Feature Update 25H2 using the standard built-in Windows Update actions in BatchPatch under Actions > Windows updates.

However, there are cases where you might want to deploy the update to your computers after Microsoft has published it for public consumption but before it has been designated for deployment to your individual computers (this can happen because Microsoft does not make the update available to every Windows computer on the planet at the same time– they make it available over a period of time). In the case where the update is publicly available but not yet being offered to your computer, you can still deploy it but you’ll need to use the alternate method that’s explained lower down in this tutorial.

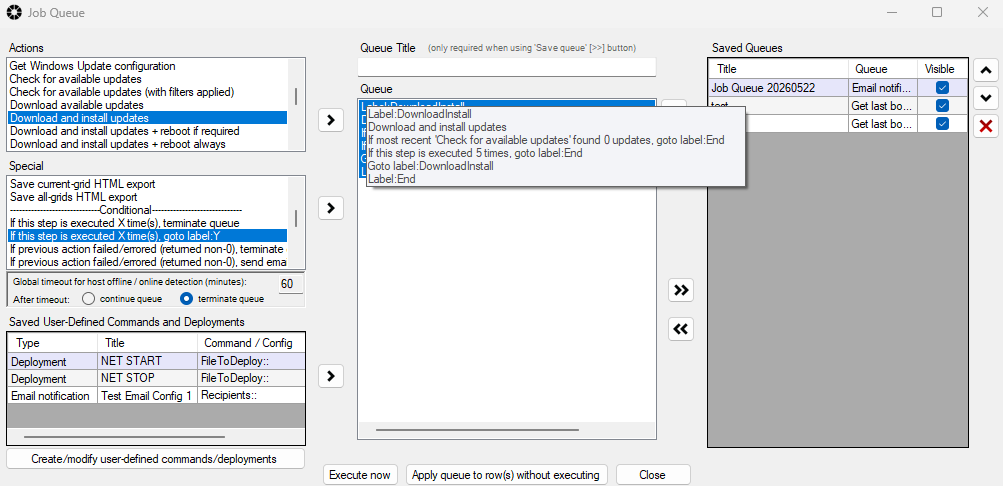
For the typical deployment method, the primary requirement is that the feature update that you wish to install must be offered to the machine and be showing as an available update when you use Actions > Windows updates > Check for available updates in BatchPatch. If you see the 25H2 feature update in that list of available updates for the target computer or group of target computers, then you can just download/install the update on those computers by first modifying the classification filtering in Tools > Settings > Windows Update so that the Include “Upgrades” box is checked.

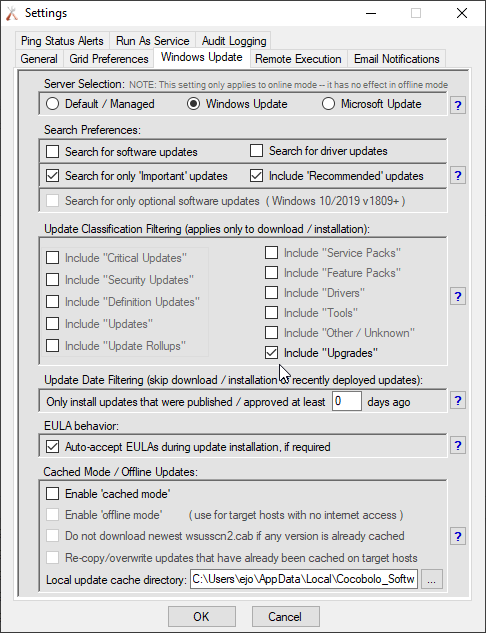
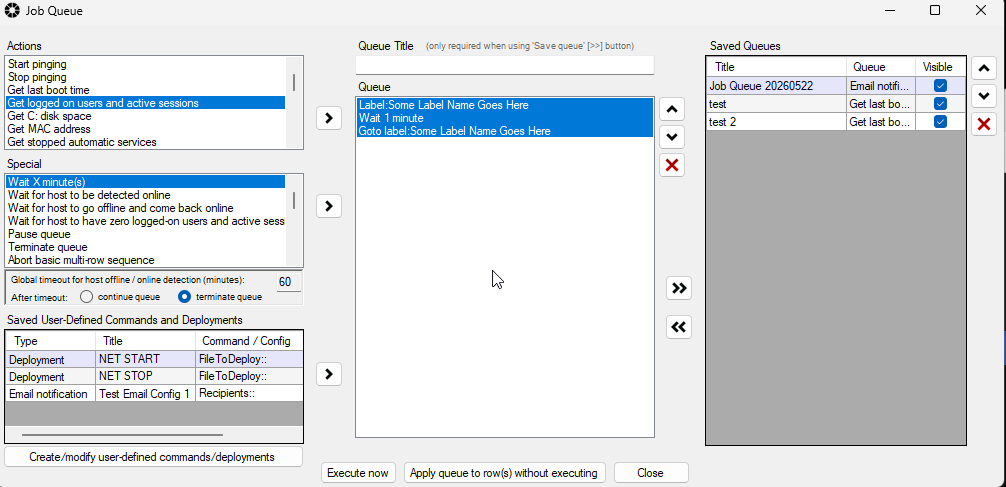
After the Upgrades classification is selected you can then use Actions > Download available updates in conjunction with Actions > Install downloaded updates or you can just click Actions > Download and install updates. As long as you are operating in standard, non-cached mode in BatchPatch (i.e. cached mode is disabled), feature updates will install (assuming, of course, that you currently have a feature update showing in the list of available updates for a given computer). Note, cached mode is enabled/disabled under Tools > Settings > Windows Update.

Feature Update Deployment Considerations – Update deferral policies, and when an update is only available for “seekers”

Please note there are a couple of things to consider when installing feature updates using the standard non-cached mode BatchPatch update method.

First, as mentioned above, the target computer needs to have the desired feature update showing as one of the available updates for the computer. If you’re expecting to see it but you don’t, it could be because the update is not approved on your WSUS yet, or it could be that you have a Group Policy or Local Policy setting configured for the target computer that is set to defer the installation of feature updates for a specified amount of time. Check your Group Policy configuration for any deferral policies enabled under the following locations:

Computer Configuration > Administrative Templates > Windows Components > Windows Update

Computer Configuration > Administrative Templates > Windows Components > Windows Update > Windows Update for Business

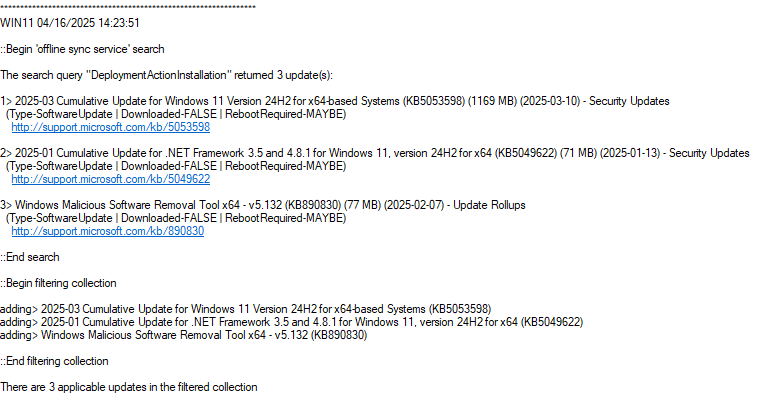
Second, depending at what stage of the rollout Microsoft currently is at the time you attempt to deploy a given feature update, they might not yet be delivering the update through the normal Windows Update channel. They typically begin the rollout with delivery only to “seekers”. This is the name they give to people who manually click on the ‘Check for updates’ button in the Windows Control panel. “Seeker” updates are visible in BatchPatch when you click on ‘Search for only optional software updates

Third, over the past couple/few years Microsoft has made quite a few changes to how Windows Update works, particularly with regard to how feature updates are handled. It’s possible that there is some other reason that I didn’t mention above that is the cause for why you are not seeing the feature update available for installation through the normal Windows Update methods.

Alternate Deployment of Windows Feature Update 25H2 (and other feature updates/upgrades such as 24H2, 23H2, 22H2 or 21H2 etc) with BatchPatch (can be used for deployment to offline target computers)

If you need to deploy feature update version 25H2 (or any other feature update) to target computers that don’t have internet access and don’t have WSUS access and therefore cannot be targeted in standard, non-cached mode (that is to say, you are using either online cached mode or offline cached mode with those target computers, and you are not able to disable cached mode and switch to standard mode for whatever reason), then you may use the method outlined below to deploy the feature update to those computers.

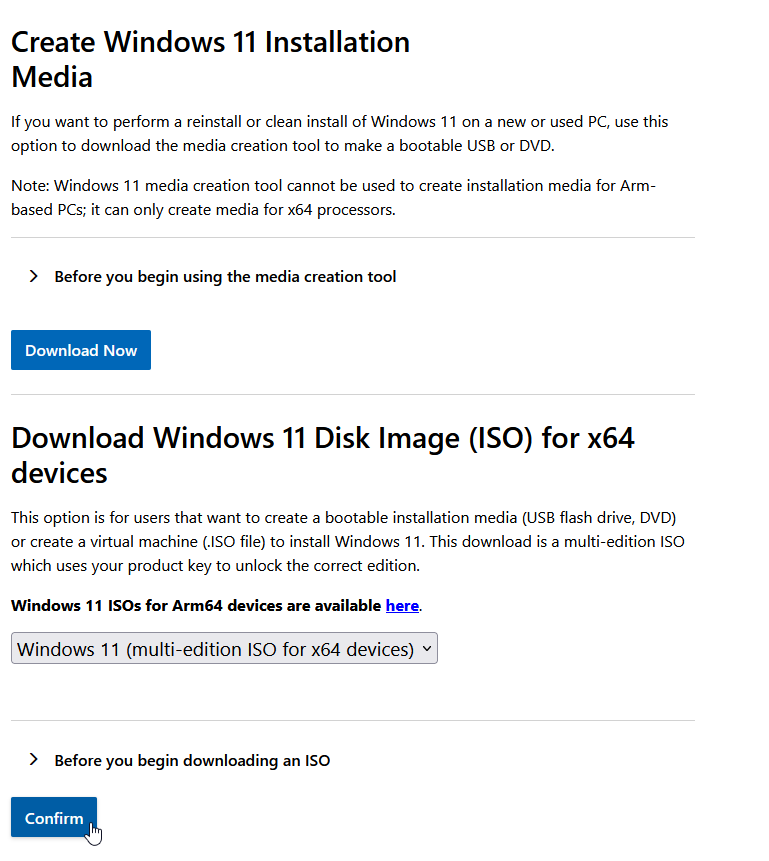
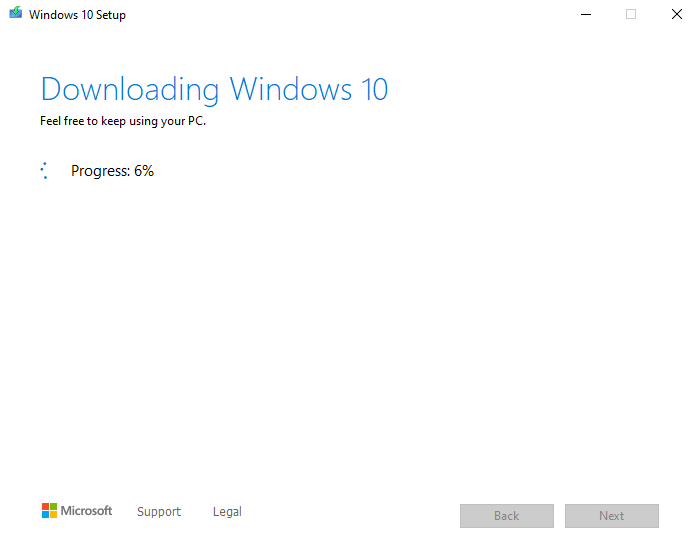
  1. Download (from Microsoft) the Windows 10 or 11 Media Creation Tool. Use this link to download the media creation tool directly from Microsoft. The media creation tool web page contains two options: ‘Update now’ and ‘Download tool now’. Do NOT click on ‘Update now’ because doing so would begin the update process on your computer. Since your goal is to deploy the upgrade to remote computers, instead please click on ‘Download tool now’ to save the tool to your computer. Important: When you run the media creation tool per the next step, you will not have a choice to select which Windows 11 version is used to create the media. This means that if Microsoft releases a new version of Windows 11 when you follow this tutorial, you’ll end up with that version as opposed to the specific version 23H2 that is available today at the time of this writing. If you have another channel for obtaining media for a particular Windows 11 version, such as with a Microsoft volume licensing agreement, you may use that instead of obtaining the media through the steps outlined in this tutorial.
  2. Open the Windows 10 or 11 Media Creation Tool that you saved to your computer a moment ago. IMPORTANT: It is NOT sufficient to run the tool as administrator (using right-click, run-as) from an account that is logged on without admin privileges. For reasons that aren’t fully clear, Microsoft requires that you *must* actually be logged on to the computer with an account that is a member of the local administrators group. Otherwise the tool will not allow you to run it to completion. We don’t know why Microsoft made the tool work this way, but it’s what they did, and presumably it’s for a good reason. So go ahead and log on to your computer as a local administrator, and then launch the tool and follow the rest of this tutorial.
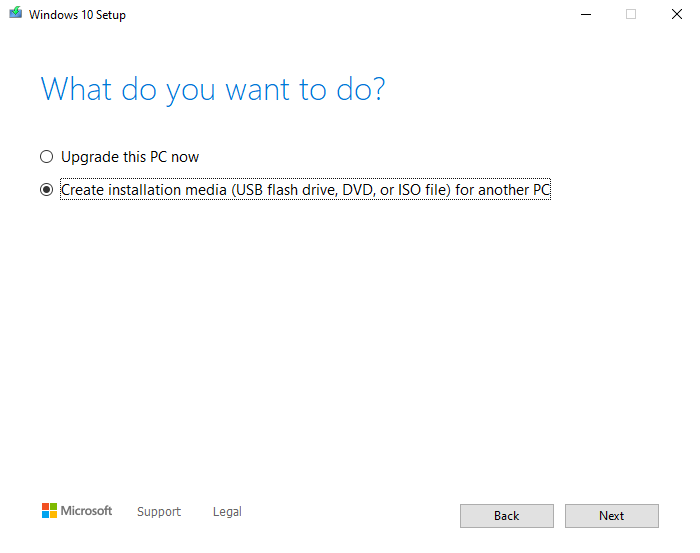
  3. Create installation media with the Windows 10 or 11 Media Creation tool. When the tool is running you’ll have to choose between two options to either ‘Upgrade this PC now’ or ‘Create installation media (USB flash drive, DVD, or ISO file) for another PC. Choose the option to ‘Create installation media…’ and then click ‘Next’.

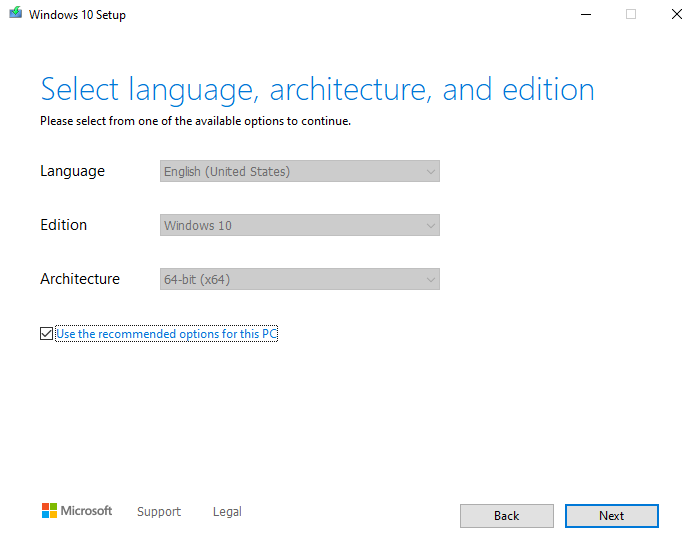
  4. Choose your language / edition / architecture, and then click ‘Next’.
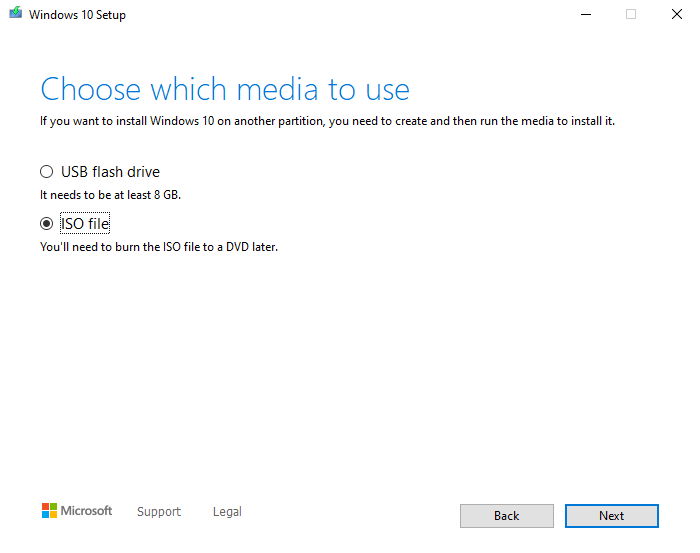
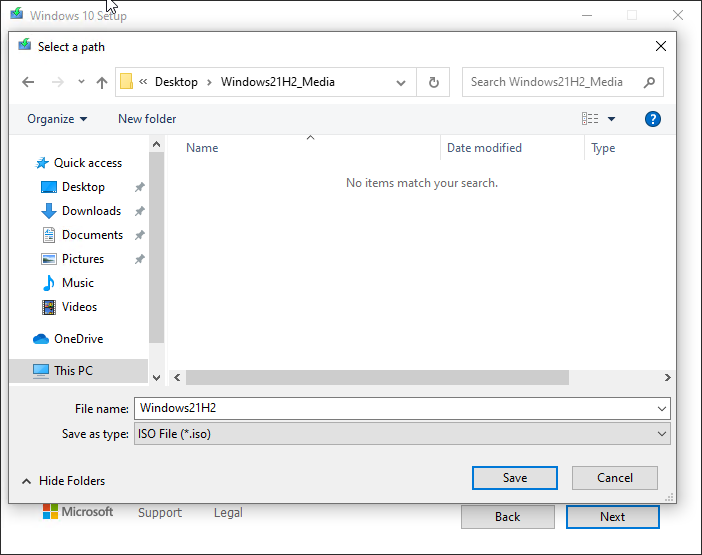
  5. Choose the media type. For the sake of this tutorial please select ISO as the type of media. After clicking the ‘Next’ button you will be prompted to choose a location on your computer to store the ISO file that will be downloaded/created. Select a directory/location to store the file, and then do something else until the download finishes. Depending on your connection speed it could take some time because it’s something like 4GB in size.


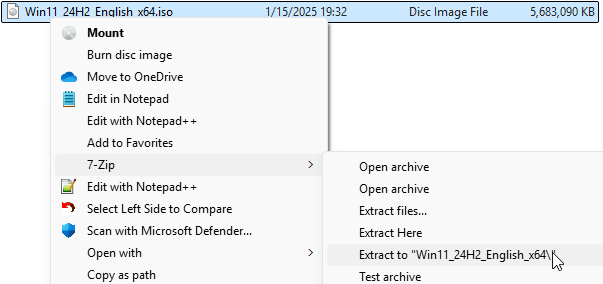
  6. Extract the ISO contents to a location on your local disk. After the download in the previous step is complete you’ll have to locate the file on disk and then extract the contents of the ISO to another folder. I like to use the free 7-zip for this process, but you may use whichever tool you prefer: 7-zip. After the ISO has been extracted you’ll have all of the installation files for the feature update in a single folder.
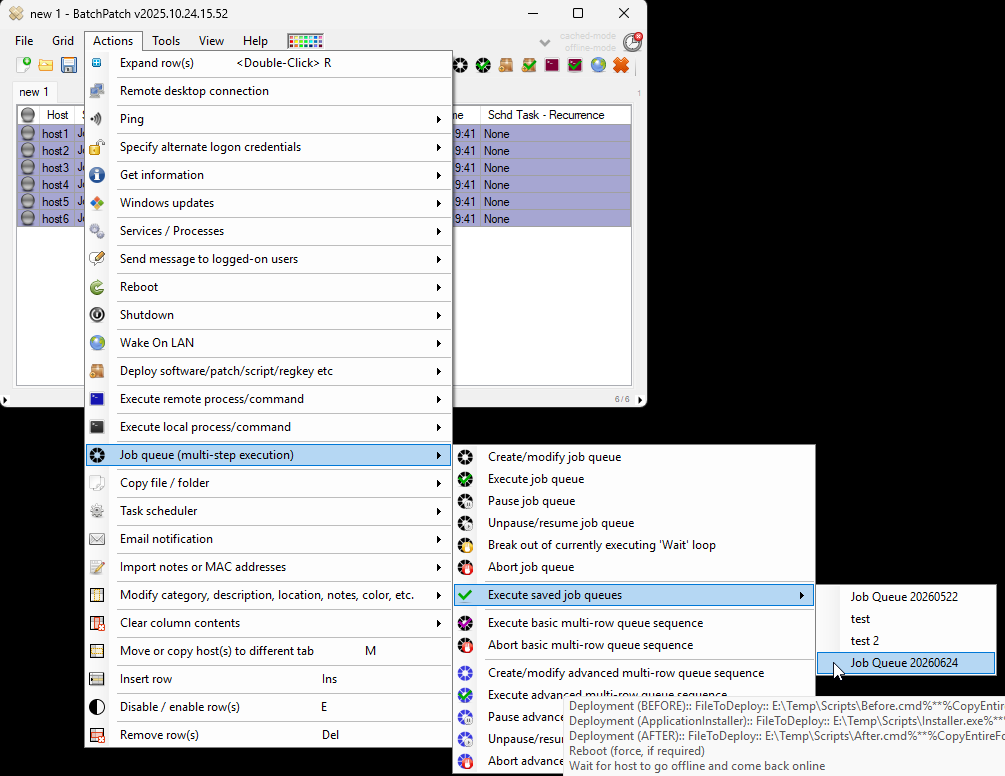
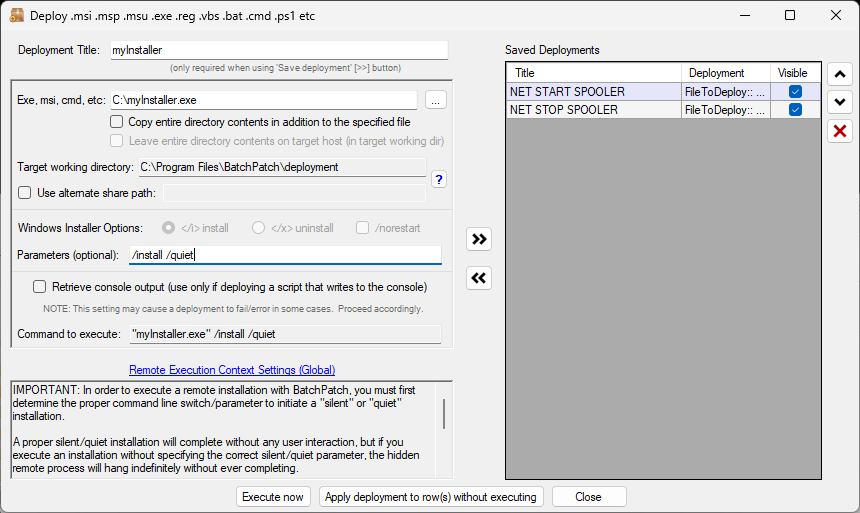
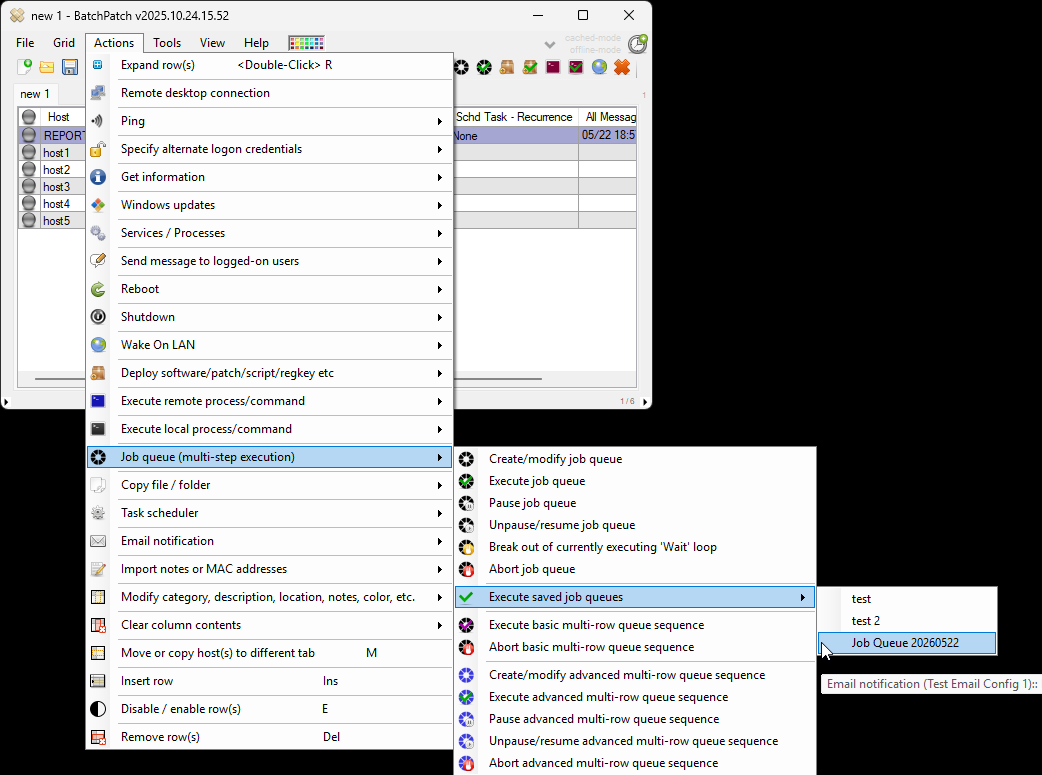
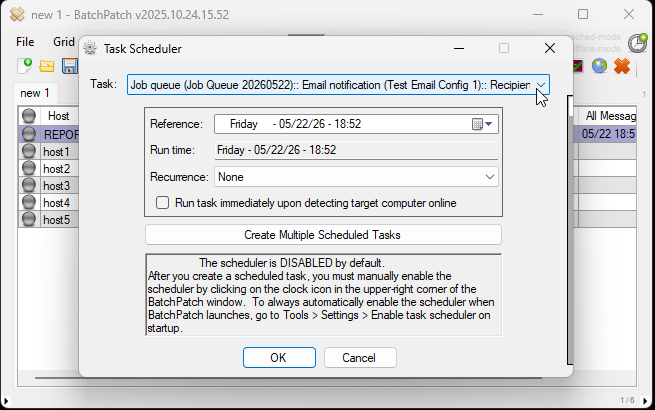
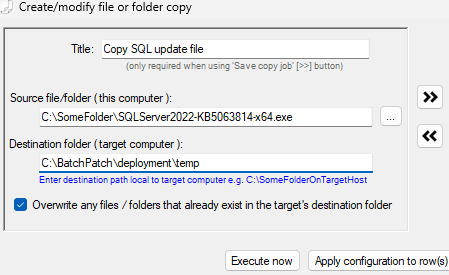
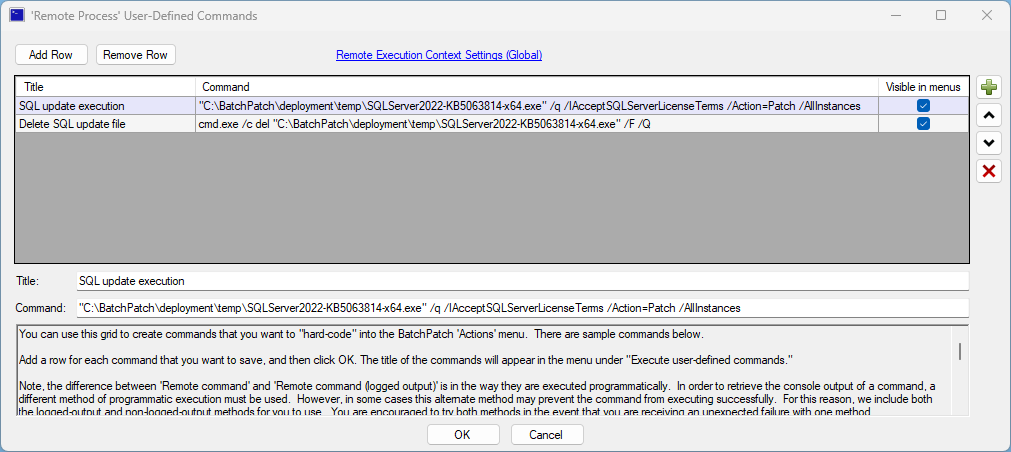
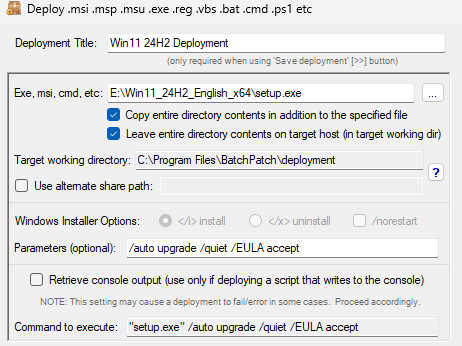
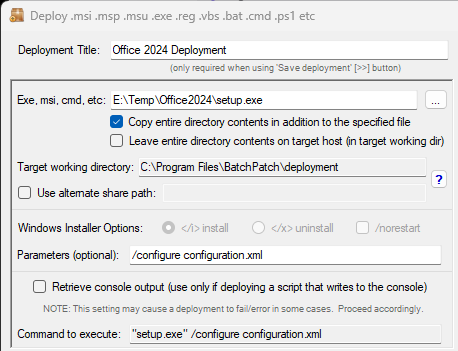
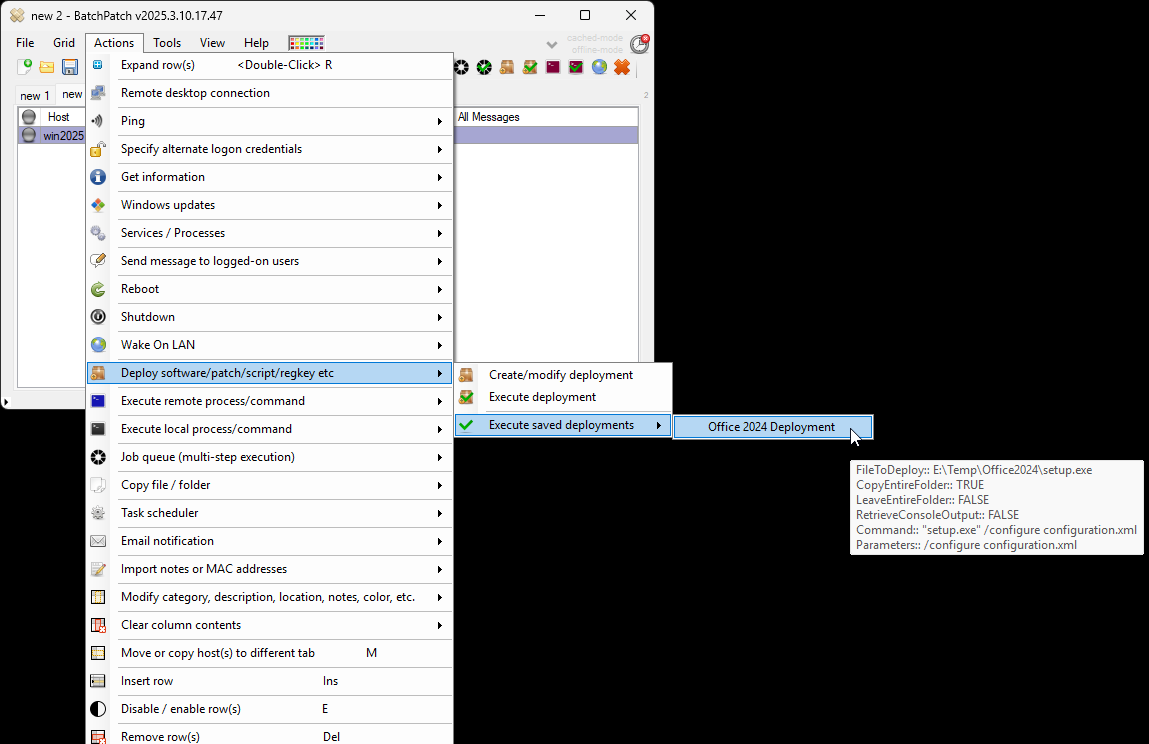
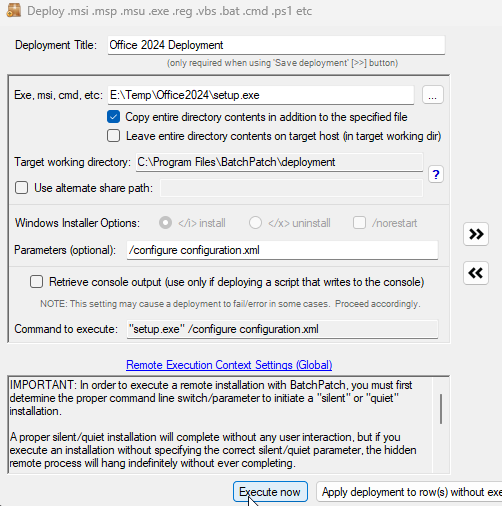
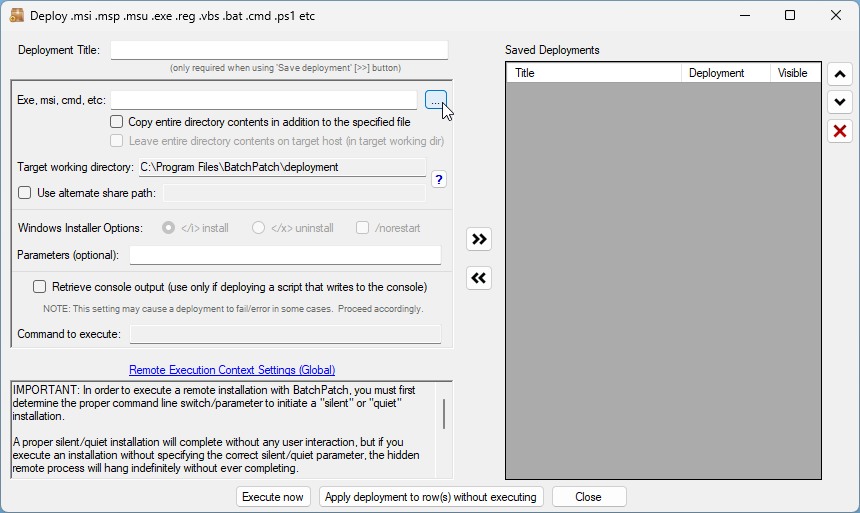
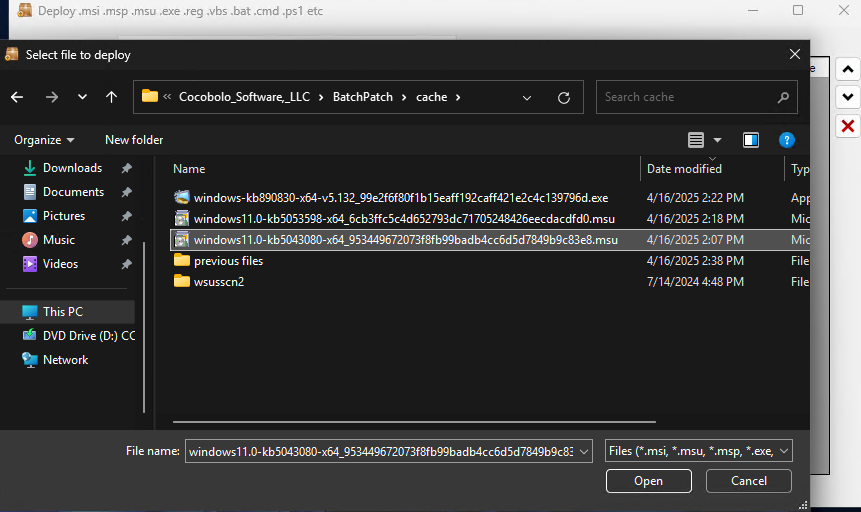
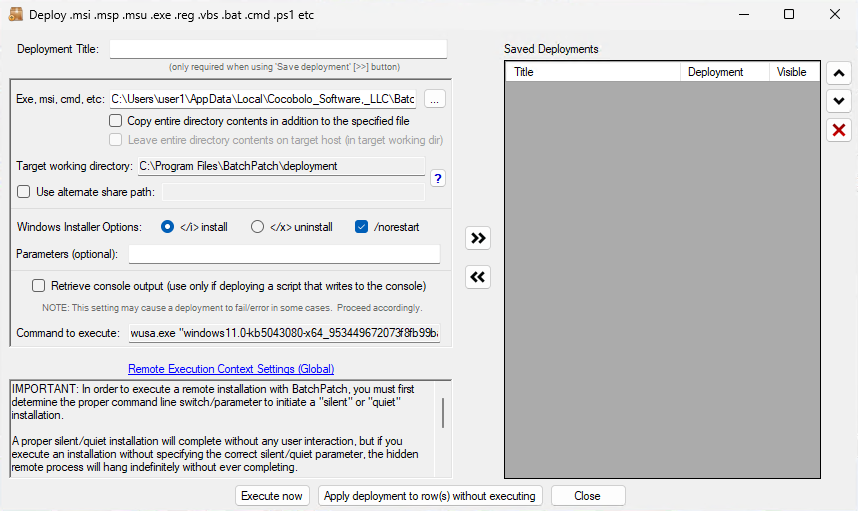
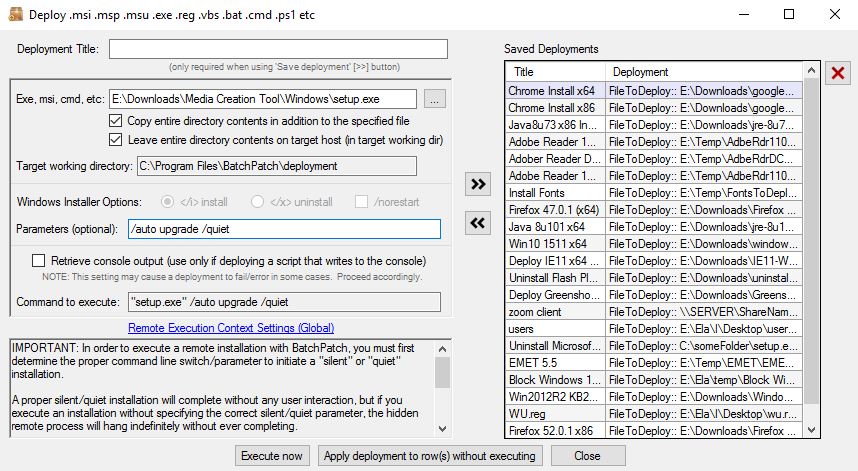
  7. Configure a deployment in BatchPatch. In BatchPatch click on Actions > Deploy > Create/modify. In the window that pops up for the Deployment configuration, click on the ‘…’ button to browse to the location where your ISO contents have been extracted to, and then choose the ‘setup.exe’ file as the file to deploy. Make sure to check the boxes for ‘Copy entire directoryandLeave entire directory. After the initial deployment phase is complete, the target Windows operating system will end up rebooting itself at least once but usually more than once while it completes the setup and installation for the feature update. As the process runs it needs to have access to all of the files that BatchPatch will deploy. Having both of the aforementioned boxes checked will ensure that when the upgrade process runs on the target computer that it has all of the files it needs for the installation. After the feature update has completed 100% you may delete the files from the target computer(s). However, please make absolutely sure that the upgrade process is 100% completed before you delete any files. In your BatchPatch deployment configuration screen you will also need to add the following parameters:
    /auto upgrade /quiet

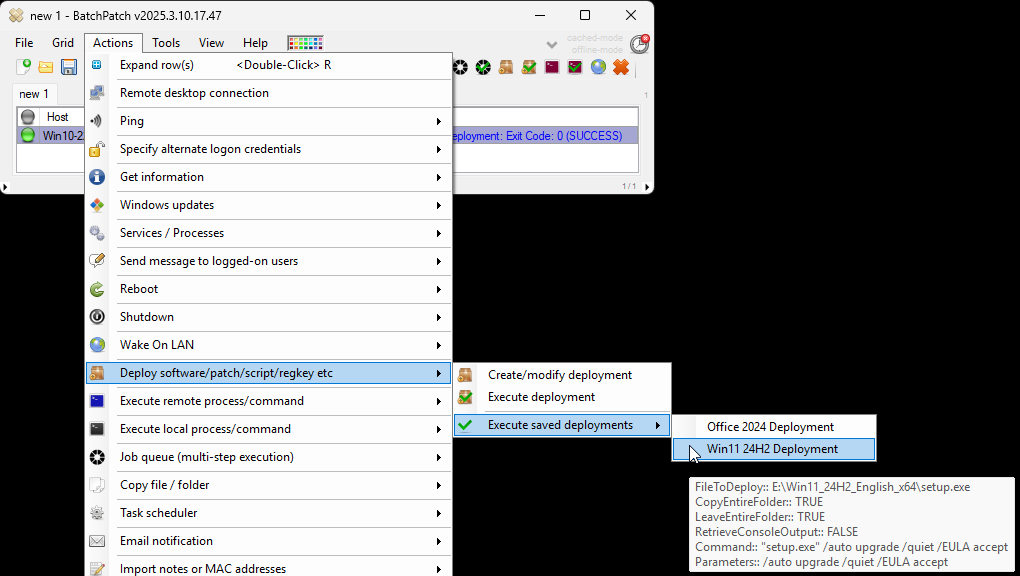
  8. Execute the feature upgrade deployment. In the deployment configuration that you created in the in the previous step you can execute the deployment immediately for the currently selected rows in the grid by just clicking on the ‘Execute now’ button. Alternatively you may save the deployment for future usage by clicking the double-right-arrow button ‘>>’. If you choose to save the deployment instead of executing it immediately, then when you are ready to deploy the feature update to your remote computers, you can begin the process by selecting those computers in the BatchPatch grid and then clicking on Actions > Deploy > Execute deployment, and then choose the deployment that you just created/saved.

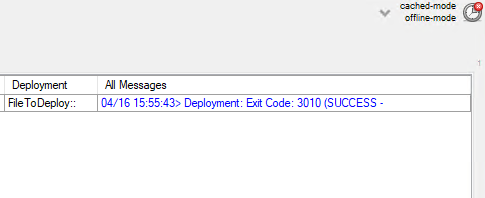
    You should expect that the entire process will take a bit of time to complete. BatchPatch has to copy the whole installation directory to the target computer(s), which contains several gigabytes, before it can execute the upgrade process on the target(s). IMPORTANT: After the BatchPatch deployment completes for a given target computer BatchPatch will show Exit Code: 0 (SUCCESS). However, this just means that the BatchPatch deployment component is finished. The Windows feature update/upgrade process will take additional time. Please be patient and let the target computer continue upgrading and rebooting as many times as is needed. It might take a little while with multiple automatic reboots before everything is 100% finished.

    NOTE: We have had a couple of reports from users who received the following error:

    Deployment: Error: Access to the path '\\TargetComputer\C$\Program Files\BatchPatch\deployment\autorun.inf' is denied.

    We don’t know the exact cause of this issue, but it seems likely to somehow be related to the way that permissions were applied or inherited during the ISO extraction process. If you encounter this error it can be resolved quickly and easily by just deleting the autorun.inf file from the source directory after extracting the ISO contents but before executing the actual deployment for any target computers. This will prevent the problematic file from ever being copied to target computers. As such, the error will not occur.

Posted in Blog, General, Tutorials | Tagged , , | Comments closed

Deploying SQLServer2022-KB5063814-x64.exe with BatchPatch to Multiple Computers Simultaneously

Generally speaking, BatchPatch can deploy nearly all applications and third-party updates through the use of BatchPatch’s Deploy feature ( Actions > Deploy ). We have many examples / tutorials posted here: Software Deployment with BatchPatch. However, recently we came across a very rare example where the update in question simply wasn’t fully compatible with the built-in Deploy feature in BatchPatch.

The update file that gave us problems is SQLServer2022-KB5063814-x64.exe. Although the update would be successfully deployed/executed through the use of the BatchPatch Deploy feature, it would show indefinitely as “Executing” even after it had actually completed. Although this wasn’t the end of the world, it left something to be desired, and it required some manual intervention to both determine completion and manually kill residual processes that weren’t closing on their on.

In order to get around this unexpected behavior, we had to approach the deployment in a slightly different way. The steps are outlined below in case they could help someone else in the future.

  1. Put the SQLServer2022-KB5063814-x64.exe into C:\SomeFolder on the BatchPatch computer
  2. In BatchPatch click on Actions > Copy file/folder > Create/modify file or folder copy Create a file copy configuration just like the one in the screenshot below. Then save it by clicking the >> button. Then close the Create/modify file or folder copy window.
  3. In BatchPatch click on Actions > Execute remote process/command > Create/modify remote commands. Click Add Row and then create a command with the following title and command syntax:

    Title: SQL update execution
    Command:

    "C:\BatchPatch\deployment\temp\SQLServer2022-KB5063814-x64.exe" /q /IAcceptSQLServerLicenseTerms /Action=Patch /AllInstances

  4. Click Add Row a second time to create a second command with the following title and command syntax:

    Title: Delete SQL update file
    Command:

    cmd.exe /c del "C:\BatchPatch\deployment\temp\SQLServer2022-KB5063814-x64.exe" /F /Q

  5. In BatchPatch click on Actions > Job Queue > Create/modify job queue

    In the lower left corner of the Job Queue window you’ll find the three commands that you just created. Double click on them to add them to a new job queue in the following order (order shown below). Then save the job queue by using the >> button:

    -Copy SQL update
    -SQL update execution
    -Delete SQL update file

    See the screenshot below for exactly what it should look like:

  6. Finally you can execute the job queue on desired target computers. Select the desired target computers in the grid. Then click on Actions > Job Queue > Execute saved job queues > SQL Update

    The file is copied to the target computer. The update is applied successfully. Then the file is deleted successfully.

Posted in Blog, Tutorials | Tagged , | Comments closed

BatchPatch New Build Released August 2025

We published a new build recently.

–You can now generate consolidated reports of available updates from within the job queue and task scheduler

–You can now run Download offline updates repository from within the job queue and task scheduler

–You can now export a sanitized copy of the grid

–BatchPatch now includes a built-in workaround for the CopyToCache failure/error that users have been seeing in the latest versions of Windows 11. This workaround can be enabled under Tools > Settings > Windows Update > Automatically apply offline mode workaround for CopyToCache error (beta)

To view the rest of the changes/updates/fixes, please look in the software under Help > Check for updates > View change log

Posted in Blog, General | Tagged , , | Comments closed

Upgrading Multiple Computers from Windows 10 to Windows 11 using BatchPatch

You can use BatchPatch to upgrade your target computers from Windows 10 to Windows 11 by following the process outlined below. For this example I upgraded from a new Windows 10 22H2 installation to a Windows 11 24H2 installation, but the process should generally work for any release of Windows 10 to 11, and you can perform the deployment on numerous target machines simultaneously.

  1. Obtain the Windows 11 ISO installation media from Microsoft

    At the time of this writing, you can obtain the Windows 11 ISO from https://www.microsoft.com/en-us/software-download/windows11. In the past if you wanted an ISO file you would first have to download the Windows Media Creation Tool first (also available from the same link), and then you could run the media creation tool to obtain the ISO, but now they also have a direct link for the ISO file, which makes the process quicker and simpler.

  2. Extract the contents of the ISO file to a folder

    To perform the extraction you can either use a tool like 7-zip to directly extract the contents,


    or you can instead mount the ISO in Windows by browsing to the file, right-clicking on it, and then selecting the Mount option.

  3. Create the BatchPatch deployment

    by selecting the desired target computers in the grid, and then clicking on Actions > Deploy > Create/modify deployment….

    Click on the button to browse to the location of your setup.exe file, which will be inside of the folder where you extracted the Windows 11 ISO contents.

    Next, check the two boxes below that field to Copy entire directory and Leave entire directory.

    The Target working directory is where BatchPatch will copy the installation files to on the target computer. In this case since we have to use the setting to Leave entire directory, you could change this location if you want. The reason we have to leave the entire directory at the end of the deployment is because Windows will still need it to complete the setup process when the machine is rebooted. Once the target computer has rebooted and completed the Windows 11 setup process, you may delete the contents of the directory.

    Lastly, make sure your Parameters field is identical to mine. It should contain the following text:

    /auto upgrade /quiet /EULA accept

  4. Save and execute the deployment

    At this point you can save the deployment configuration with the double-right-arrow >> button. If you want to execute the deployment immediately on the selected target hosts in the grid, click Execute now in the deployment configuration window. Alternatively if you save the deployment for execution at a later time, you’ll be able to execute it directly from the Actions menu by selecting the desired target hosts in the grid and clicking on Actions > Deploy > Execute saved deployments

Posted in Blog, General, Tutorials | Tagged , , | Comments closed

Deploying Office 2024 to Numerous Computers with BatchPatch

Configuring and Executing an Office 2024 Deployment:

  1. Create a new folder that contains your setup.exe and configuration.xml files. The directory should contain no other files other than these two. For this example my folder is called E:\Temp\Office2024
  2. Go to Actions > Deploy > Create/modify deployment… Use the button to browse to the location of your setup.exe file. Then select the checkbox for Copy entire directory contents…. Next, input into the Parameters field: /configure configuration.xml. If your configuration.xml file has a different name, use the name for your own configuration.xml file. Otherwise your deployment configuration should look the same as mine does in the screenshot below.
  3. You’ll also need to go to Tools > Settings > Remote Execution, and then set your Remote Execution Context for Deployment to Elevated token + Interactive. Note, if for some reason you are using an older version of PsExec prior to v2.32, then de-select Interactive. However, you should generally be using a newer version of PsExec, and for any newer version you’ll need to select Interactive in addition to Elevated token, like in the screenshot below.

  4. You can save the deployment for later by clicking the double-right-arrow >> button in the Deployment configuration window. To execute a previously saved deployment, highlight the desired target hosts in the grid and click Actions > Deploy > Execute saved deployments > Office 2024 Deployment

  5. Alternatively you can execute the deployment directly from the Deployment configuration window. Just make sure to first highlight the desired target computers in the grid, then click on the Execute now button.
  6. When the deployment completes you’ll see Exit Code: 0 (SUCCESS) in the All Messages log column. However, you might also see an error right after that, like I did. In the screenshot below you can see that my deployment was successful, but then BatchPatch tried to delete the temp working directory on the target computer but couldn’t do it successfully. In this case the deployment was not affected, but I believe what happened was the OS had not yet let go of the lock on the temp directory, so BatchPatch couldn’t delete it even though BatchPatch was able to delete the setup.exe and configuration.xml files inside of it. I was able to manually remove it a moment later, but it really isn’t even necessary to do that because it’s an empty temp directory inside of the deployment remote working directory, so it’s harmless to leave, and in fact it will be deleted by BP the next time I run a deployment anyway.
Posted in Blog, General, Tutorials | Tagged , , , | Comments closed

Windows 11 Monthly Cumulative Update Fails to Install in Offline Mode: Copy To Cache: Failed. HRESULT: -2145095681 or HRESULT: -2146467818

We have received some reports that using BatchPatch offline mode to install the most recent monthly cumulative update for Windows 11 is now failing with the following errors appearing in the Remote Agent Log column in the grid (this log can also be accessed by using Actions > Windows updates > View BatchPatch.log or by opening the BatchPatch.log file directly on the target computer in the remote working directory, which is defined in BatchPatch Tools > Settings > Remote Execution > Remote working directory). The default location is C:\Program Files\BatchPatch\BatchPatch.log

The error that appears in the log is:
Copy To Cache: Failed. HRESULT: -2145095681
We have also observed this other error, though much less frequently:
Copy To Cache: Failed. HRESULT: -2146467818

We are experiencing the problem on our systems too. Microsoft has (once again) made changes to the way that Windows Update functions, which is now causing this feature in BatchPatch to not work.

The current release of BatchPatch (version 20250821) has an option under Tools > Settings > Windows Update > Automatically apply offline mode workaround for CopyToCache failure (beta) that you can use to automatically employ the workaround described below.

However, for those of you with older versions, I will illustrate below how to effectively work around this issue.


Identifying the Issue:

The relevant line in the Remote Agent Log for the target system is:

skipped> 2025-03 Cumulative Update for Windows 11 Version 24H2 for x64-based Systems (KB5053598) - Reason: Update not downloaded/cached

And here is a screenshot of the Remote Agent Log column in my BatchPatch instance where I’m seeing this error right now. Notice that in the section that starts with Begin copying files to Windows Update cache, the first update (2025-03 Cumulative Update for Windows 11 Version 24H2 for x64-based Systems (KB5053598)) contains 16 files. Each file’s line in the log shows Copy To Cache: Failed. HRESULT: -2145095681 at the end:


We can see that the KB5053598 2025-03 Cumulative Update was skipped (because it wasn’t able to be cached even though the update files were successfully downloaded). The other two updates (KB5049622, KB890830) still installed successfully. To install the skipped cumulative update, I’ll first examine the list of files that the update contains. If we look at the list of files that the 2025-03 cumulative update contains, we can see there are two files with .MSU extension.

5> windows11.0-kb5043080-x64_953449672073f8fb99badb4cc6d5d7849b9c83e8.msu :: Copy To Cache: Failed. HRESULT: -2145095681
13> windows11.0-kb5053598-x64_6cb3ffc5c4d652793dc71705248426eecdacdfd0.msu :: Copy To Cache: Failed. HRESULT: -2145095681

We can deploy these files directly to the target computer(s) using the BatchPatch Deploy feature. The 2025-03 Cumulative Update is KB5053598, so I’m actually going to start with the other KB5043080. In this case I’m pretty confident that KB5043080 isn’t applicable to the computer, but I want to see what happens when I try to install it. It’s probably there as a prerequisite for machines that do not already have the update installed. Even though I expect KB5043080 won’t install due to not being applicable, I want to be thorough and make sure that I attempt to install any .MSU file that is contained in KB5053598. It will not always be sufficient to *only* install the KB5043080 (or whichever KB ID matches the current month’s cumulative update KB ID). If the cumulative update contains other child .MSU files in addition to the primary .MSU for the KB ID of the parent update, we should generally always attempt to install those other child updates first in order to be sure that any prerequisites are met before we attempt to install the .MSU for the KB ID of the parent update, which in this case is KB5053598 — the March 2025 monthly cumulative update.


Workaround: Deploying the .MSU Update Files Directly with BatchPatch

The current release of BatchPatch (version 20250821) has an option under Tools > Settings > Windows Update > Automatically apply offline mode workaround for CopyToCache failure (beta) that you can use to automatically employ the workaround described below.

However, if you have an earlier version of BatchPatch, below I will illustrate below how to effectively work around this issue:

During the offline cached mode Windows Update process, the cumulative update is downloaded to the BatchPatch local cache directory as a bundle of files. When this issue first cropped up, one of the key changes that Microsoft made was to begin delivering the .MSU version of the update file included in the bundle of files for the cumulative update. So now if you experience the error and failure that is described by the title of this article/posting during the offline cached mode installation process, you can still get the update deployed with the BatchPatch Deploy method, by directly deploying the .MSU file(s) from the BatchPatch local cache directory to your target computers. This process is explained below.

  1. With the desired target host selected/highlighted in the grid, I click on Actions > Deploy > Create/modify deployment.
  2. Next I click on the file browser button to select the .MSU file deploy. I browse to the BatchPatch cache directory on my BatchPatch computer (this location is defined under Tools > Settings > Windows Update > Local update cache directory), and then I select the .MSU file that I want to deploy. The first file I want to deploy (or attempt to deploy) is the KB5043080 .MSU file.
  3. In this case I’m going to choose the option for a singular .MSU deployment:
  4. I browse to location of the desired .MSU file, and choose it.
  5. I chose to select the /norestart option so that the installer does not reboot the target computer when it finishes installing the update.
  6. Finally I’ll click Execute now to begin the deployment process. This will tell BatchPatch to copy the file to the target computer and then initiate its installation.
  7. As I suspected, this update is not applicable to the system. I know this because the deployment completed with the All Messages log column showing Exit Code: -2145124329, which means Update Not Applicable. In the next version of BatchPatch we’ll make sure that Update Not Applicable is included in the log right next to the exit code so that there is no confusion. However, in the current version of BatchPatch you’ll only see the HRESULT exit code value.
  8. Now I’ll follow the exact same process to deploy the .MSU for KB5053598.
  9. When this one finishes, I see Deployment: Exit Code: 3010 (SUCCESS – REBOOT_REQUIRED)
  10. I can now initiate the reboot in BatchPatch. If I had NOT selected the /noreboot switch in the deployment configuration, the target computer would have rebooted itself immediately after completing the update installation. However, I prefer to have BatchPatch initiate and monitor the reboot, rather than the target computer rebooting itself.
Posted in Blog, General, Tutorials | Tagged , , , , | Comments closed

WSUS is Now Deprecated

Microsoft announced at the end of last year that WSUS is now officially deprecated.

Microsoft said:

As part of our vision for simplified Windows management from the cloud, Microsoft has announced deprecation of Windows Server Update Services (WSUS). Specifically, this means that we are no longer investing in new capabilities, nor are we accepting new feature requests for WSUS. However, we are preserving current functionality and will continue to publish updates through the WSUS channel. We will also support any content already published through the WSUS channel.

What does this announcement mean for you?

Realistically, it probably doesn’t mean a whole lot, at least not any time in the near term or medium term. The reality is that Microsoft has barely touched WSUS in the past 15+ years, and they currently have no plans to remove it or stop publishing updates to the WSUS channel, so you can continue to use your WSUS for the foreseeable future.

As for BatchPatch, it continues to work with or without WSUS.

Posted in Blog, General | Tagged | Comments closed

Wait for a Remote Process to Finish Running Before Installing Updates

BatchPatch has a lot of built-in options to facilitate customizing your Windows Update process or your process for updating a third-party application. Today I want to illustrate one way to use BatchPatch to proceed with an update installation only after it confirms that a remote process is no longer running.

Maybe your environment has some requirements that prevent you from starting a patch installation or update process on target computers until after a certain process is no longer running on those target computers. Imagine you have someProcess.exe that you want to ensure is not still running at the time that you launch a remote Windows Update installation on various target computers. Here is one way to do it:

  1. In BatchPatch you’ll need to create a job queue. Select the desired rows/hosts in the grid, and then click Actions > Job Queue > Create/modify job queue
  2. In the Job Queue window I’ve created a queue which will test the target computer for a specific running process (someProcess.exe). If that process is found to be running, the Job Queue jumps to the label STILL RUNNING, which effectively makes a loop. It waits 5 minutes and then performs the same check. The process will loop indefinitely, checking for the existence of that running process every 5 minutes. If/when the process is found to no longer be running on the target computer, only then will the job queue advance to the next step, which in this case is to Download and install updates + reboot always.
  3. In the Job Queue above you can see the steps are as follows:
    step 1: Label:STILL RUNNING
    step 2: Wait 5 minutes
    step 3: If specified process (someProcess.exe) is running, goto label:STILL RUNNING
    step 4: Label:PROCESS NO LONGER RUNNING
    step 5: Download and install updates + reboot always
  4. At this point we can either click Execute now to start the job queue on all of the currently selected hosts/rows in the grid, or if we want to save the grid for later use (or to be run as a scheduled task), we can give the queue a title and then add it to our saved queues by clicking the double-right-arrow button in the Job Queue window.
Posted in Blog, General, Tutorials | Tagged , | Comments closed