‘Access is denied’ in BatchPatch After Installing the June 2022 Cumulative Windows Update

The problem: After installing the June 2022 cumulative Windows Update (2022-06 Cumulative Update for Windows) OR any future cumulative update that is released from this point forward, if the previous patch level of the system was some date prior to June 2022, and the newly installed patch level is June 2022 or newer, you might experience BatchPatch all of a sudden returning an error for no apparent reason: Access is denied. (Exception from HRESULT: 0x80070005 (E_ACCESSDENIED))

( For general ‘Access is denied’ issues that aren’t specific to the June 2022 cumulative update, please see https://batchpatch.com/troubleshooting-common-errors-in-batchpatch )

Why this is happening: Toward the end of 2021 (the specific date varies depending on the operating system – see below for details) Microsoft released an update that added security hardening to the Distributed Component Object Model (DCOM) remote protocol in Windows to address the security vulnerability CVE-2021-2614. The hardening was available for administrators to enable, but it was not enabled by default… until June 2022 when Microsoft flipped the switch and enabled it for everyone.

The specific dates of release are as follows:
Windows Server 2022 – September 27, 2021
Windows 10, version 2004, Windows 10, version 20H2, Windows 10, version 21H1 – September 1, 2021
Windows 10, version 1909 – August 26, 2021
Windows Server 2019, Windows 10, version 1809 – August 26, 2021
Windows Server 2016, Windows 10, version 1607 – September 14, 2021
Windows Server 2012 R2 and Windows 8.1 – October 12, 2021

Important reading: In the following posting, Microsoft explains the detail of KB5004442, which was released in June 2022. When the Aug/Sept/Oct 2021 update (date depends on OS, as noted above) is installed it makes available a new registry DWORD value HKEY_LOCAL_MACHINE\SOFTWARE\Microsoft\Ole\AppCompat\RequireIntegrityActivationAuthenticationLevel, which when created and set to value data 1 will enable DCOM security hardening configuration that enables the administrator to test and see what, if anything, it breaks in their environment. In the June 2022 KB5004442 update, the DCOM security hardening configuration was then enabled by default, such that if you did not previously set the aforementioned registry value to 1, Windows would now begin behaving the same as if the value had been set to 1, which could cause some things to break. And now in order to disable the DCOM hardening changes you would have to create and set the value data to 0. Furthermore they note that in March 2023 the DCOM hardening changes will become permanent with no registry value available anymore to disable the configuration.

KB5004442—Manage changes for Windows DCOM Server Security Feature Bypass (CVE-2021-26414)

Temporary workaround: Use the registry value described in the link above (set to value data 0) to disable the DCOM hardening changes temporarily until March 2023. In March 2023 after installing the cumulative update for that month it will be permanently enabled with no further ability to be disabled anymore.

Permanent resolution: BatchPatch will only break and start producing the ‘Access is Denied’ errors described at the top of this posting in the case where the BatchPatch computer is running a Windows operating system at a patch version that is *older* than Nov 2021 AND when at the same time the target computers are running a Windows operating system at a patch version of June 2022 or newer (or if the aforementioned registry value data is intentionally set to 1 by the administrator, then the problem will manifest as soon as the target computer has the Aug/Sept/Oct 2021 update installed).

So, if you began to experience this problem after installing the June 2022 or newer cumulative update on target computers, the simplest resolution is to make sure your BatchPatch computer is updated to the latest Windows cumulative update (or at a bare minimum to a patch level of Aug/Sept/Oct 2021 or newer – The specific date is dependent on the particular version of Windows that you are running. Please refer to the OS version list above as well as the aforementioned link for the specific date for your particular version of Windows).

( For general ‘Access is denied’ issues that aren’t specific to the June 2022 cumulative update, please see Troubleshooting Common Errors in BatchPatch )

Posted in Blog, General | Tagged | Comments closed

Remotely Deploying Monthly Windows Updates to Multiple Computers

BatchPatch can do quite a few things, but at the core of the software is the functionality for managing Windows Updates on numerous computers without having to install any permanent remote agents, and with only minimal setup and configuration. In many environments BatchPatch will just work right out of the box, without any configuration. In other environments, minor initial setup/configuration will be required.

Once you have BatchPatch setup in your environment, it’s extremely simple to put it to work. Let’s say you want to start the Windows Update process on 100 target computers all at the same time so that you can download and install any applicable updates to those computers, then reboot the computers and monitor them while they go offline and come back online to make sure everything completes successfully… Here’s all you need to do:

  1. Add your computers to a BatchPatch grid by manually typing them in, importing a text file list (or just copy/paste it), or by adding computers directly from your Active Directory groups and OUs. Choose the option that you desire from the Grid menu. I’ve selected to just add mine manually for now. I’ve added just 9 computers, but you can add as many as you want.


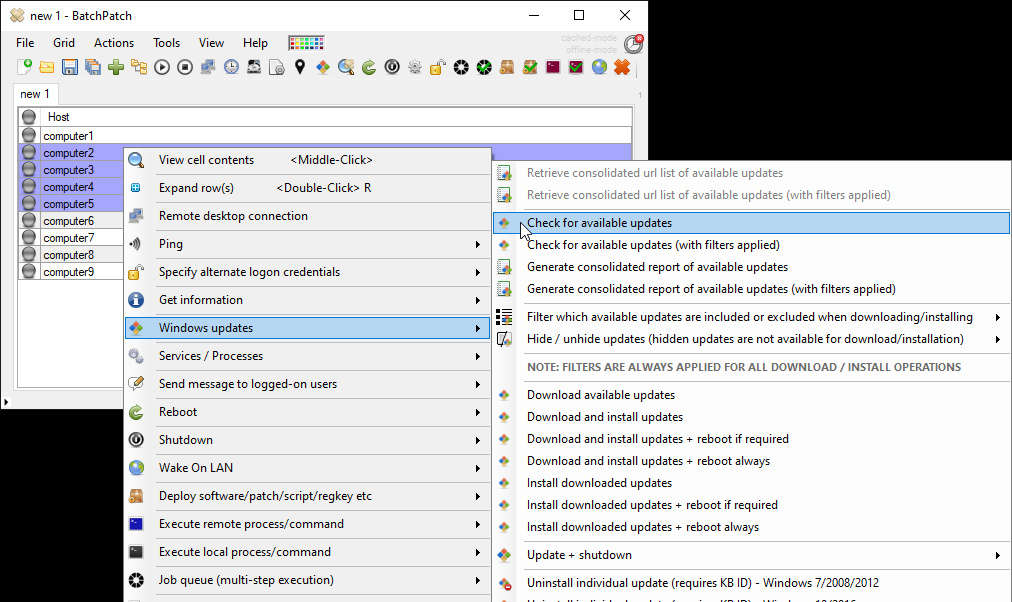
  2. Once the grid contains your computers, to perform any action you just need to select/highlight the desired target computers, and then from the Actions menu pick the action that you want to execute. For the sake of this example we are going to use ‘Actions > Windows Updates > Download and install updates + reboot if required

That’s pretty much all there is to it. You can sit back and watch your computers through the entire process. The settings that control which types of updates are searched for, downloaded, and installed, are located under ‘Tools > Settings > Windows Update‘.

What else can BatchPatch be used for? Well, in general the most important thing to know is that whichever actions you desire to execute on a single computer can be executed just as easily across numerous computers. You can…

  • Deploy third-party software
  • Run scripts and commands
  • Retrieve inventory information
  • Schedule tasks (pretty much anything that you execute manually in BatchPatch can also be scheduled to run at a desired time)
  • Execute a multi-step job queue that includes numerous individual commands to be executed sequentially on each target system
  • Execute an advanced multi-host sequence where you not only execute a multi-step job queue on each target host, but you link the target hosts together in such a way that enables you to perform actions on certain computers before or after other computers. If you have machines that are dependent on one another, this is a great way to update them all with a single click, while still ensuring that they don’t all go offline at the same time
  • Deploy updates to offline computers

The list above only represents a portion of what BatchPatch can do. We have numerous tutorials posted to help you get going. If you think that BatchPatch should be able to do X, but you aren’t sure how to do it, search the tutorials because that functionality probably already exists. If you can’t find something or if you think it’s not available, feel free to ask us a question or submit a feature request.

Posted in Blog, General, Tutorials | Tagged | Comments closed

Get the ‘Location’ Property of a Computer Object in Active Directory

Recently someone asked us how he could import the ‘Location’ property value on computer objects from Active Directory for a group of computers in a BatchPatch grid.

BatchPatch enables you to run a script and view the output of the script, which is how we’ll accomplish this task. And while there is more than one way to write a script to retrieve the location value of computers in Active Directory, the simplest method is to use the Get-ADComputer PowerShell cmdlet that’s included with the Active Directory PowerShell module in the Remote Server Administration Tools (RSAT) for Windows, so that’s exactly what we’re going to do here.

  1. On the BatchPatch computer you’ll need to make sure you have installed the Active Directory PowerShell module so that we can take advantage of the Get-ADComputer cmdlet. Microsoft has installation instructions here.
  2. Test the Get-ADComputer cmdlet in a PowerShell prompt to ensure that you’ve installed the module successfully. I have a computer called WIN10_TEMP_TEST, so I’ll run the following command to get its Location value:
    Get-ADComputer WIN10_TEMP_TEST -Properties location | select -ExpandProperty location

    You can see in the screenshot below that it worked.

  3. Now that we have a working command, we can essentially just insert that into BatchPatch so that we can use it to query for the location value of numerous computers simultaneously. In BatchPatch we’ll create a Local Command for this purpose. When you execute a Local Command for a given row (or group of rows) in your BatchPatch grid, the command will execute on the BatchPatch computer itself (whereas a Remote Command would execute on the target computer(s)). To create a Local Command in BatchPatch click on ‘Actions > Execute local process/command > Create/modify local commands

    The command syntax that we’re going to use in BatchPatch is:

    powershell.exe Get-ADComputer $computer -Properties location | select -ExpandProperty location

    However, note that depending on your OS and PowerShell version, if you have problems with the command above, try this instead:

    powershell.exe -ExecutionPolicy Bypass -command "Get-ADComputer $computer -Properties location | select -ExpandProperty location"

  4. Now that we’ve added the command, it’s simple to run it for the selected hosts in the grid. Just select the desired hosts, and click on ‘Actions > Execute local process/command > Execute saved local commands > Get location

    When the command is executed, the $computer variable in the command is replaced by the actual host name for the corresponding row. This way you can select a large number of rows to obtain this information for each row all at the same time. I only have two computers in my lab at the moment, but you can see that I was successfully able to obtain the location info for them:
Posted in Blog, General, Tutorials | Tagged , | Comments closed

Is it Okay to Install and Run BatchPatch on a WSUS Server?

First, let me start by saying that we have many customers who run BatchPatch on the same computer where they have the WSUS role installed (Windows Server Update Services). There is nothing inherently wrong about doing this. In many situations, it really isn’t a big deal if BatchPatch and WSUS are running on the same server. That said, it’s not what we prefer or recommend, especially as your number of target computers increases, and especially in cases where it’s important for you to be targeting many computers simultaneously. Here’s the deal…

Neither BatchPatch nor WSUS require a lot of computing/processing power to run. However, both applications can end up with many simultaneous remote connections processing at a given time, and BatchPatch can require a lot of processes and threads to be executed simultaneously. Considering that many administrators use BatchPatch in such a way that requires it to execute actions on a very large number of target computers at the same time, and considering that many of those actions might require the target computers to query and/or retrieve updates from a WSUS, we think it’s a good idea to separate BatchPatch and WSUS to produce the least potential for bottlenecks, especially considering that during a critical maintenance window administrators need everything to go as smoothly as possible.

Imagine for a moment that you have 100 target computers in your BatchPatch grid, and you initiate ‘Download and install updates’ on all 100 computers at the same time. BatchPatch now has to spin up 100+ new processes and 100+ threads, as well as at least one connection (sometimes more) to each target computer. If each target computer now begins to download updates from the WSUS, each target computer will then establish its own separate connection to the WSUS server. If the WSUS server is the same computer as the BatchPatch server, all of a sudden we have a quite lot of outbound and inbound communication taking place to many different target computers because BatchPatch is creating and maintaining many processes and threads that establish remote connections to target computers while those target computers then establish their own remote connections to the WSUS, and then WSUS then has to handle processing those requests and maintaining the connections. In many cases this won’t create any type of bottleneck or lag/delay, but in environments where you know you are going to be targeting a lot of computers at one time in BatchPatch and where you want your maintenance operation to complete as quickly as possible with as few hiccups as possible, then we think it’s a good idea to run BatchPatch on a computer that isn’t performing any other roles at the time that BatchPatch is being utilized. The goal here would be to simply minimize the amount of simultaneous connections/downloads/processes/threads on the BatchPatch computer in order to decrease the likelihood of any hiccups or bottlenecks during a critical maintenance window. You pretty much instantly halve the number of simultaneous connections required to be kept open simply by running BatchPatch on a computer that is NOT the WSUS server. And by the way, BatchPatch doesn’t even necessarily have to run on a server class machine. It can operate effectively from a standard workstation too, so that’s a consideration to keep in mind.

To reiterate once again, there is nothing inherently wrong with running BatchPatch on the WSUS server. In many cases this won’t be an issue or create any problems, and we definitely have plenty of customers who do this. However, for environments where you need or want to minimize the likelihood for any difficulties during a critical patching maintenance, and in environments where there will be a lot of target computers operated on simultaneously by BatchPatch, we would suggest that you put BatchPatch on a computer that isn’t performing any other tasks/roles at the time of the patching maintenance. At the very least we recommend doing some test runs to get an idea of how well things are running in your particular environment. If you discover that all is running smoothly, then you probably don’t need to make any changes.

Posted in Blog, General | Tagged | Comments closed

Modifying the Scope of Windows Firewall Rules to Allow Connections Only From Selected IP Addresses

When configuring BatchPatch to work in your environment, you might have to modify your Windows Firewall rules on target computers to enable BatchPatch to work properly. As explained in this posting, BatchPatch will require inbound allowances on all target computer firewalls for File and Printer Sharing and Windows Management Instrumentation in order for BatchPatch to be able to connect to and execute actions on target computers.

In many or perhaps most network environments these allowances will already have been granted long ago because without them it’s very difficult for IT administrators to accomplish the tasks that they regularly need to accomplish. In many/most environments the necessary rules for BatchPatch to work are the same rules that are already in place for general network and system administration, so you might not need to make any changes. In fact, if you regularly ping computers on your network and/or copy files to and from them by connecting to \\targetComputer\C$ in Explorer, then these allowances likely already exist.

In the case where you don’t already have these allowances configured but you’re considering using BatchPatch, you might be wondering how to make the necessary firewall configuration changes so that *ONLY* the computer that is running BatchPatch can take advantage of them. That is, you might want to limit the IP address scope in any firewall rules that you create so that those firewall rules only apply to a particular IP address. The effect of doing this would be that after the rules are created in all target computers’ Windows Firewalls, BatchPatch will only be able to connect to those target computers if the computer running BatchPatch has a particular IP address (or is within a certain IP address range, depending on how you configure the scope).

Applying a particular IP scope to inbound rules in Windows Firewall is simple. First, make sure you have made allowances for File and Printer Sharing and Windows Management Instrumentation as described on this page. A quick review of that process is below in the first step of the tutorial. Note, you can perform this process on an individual target computer or you can make the changes via Group Policy to apply to a large group of computers on a domain. The concept is the same in both scenarios, but please note that in this tutorial my screenshots and specific instructions are based on making these changes on just a single machine, so if you’re making the changes in Group Policy there might be slight differences as compared to my notes and screenshots below:

  1. Go to Control Panel > Windows Defender Firewall > Allow an app or feature through Windows Defender Firewall and then tick the checkboxes next to File and Printer Sharing and Windows Management Instrumentation for the firewall profile(s) that you want to modify (private/public/domain)


  2. Once the initial rules have been created, then you can modify the scope of those rules to limit which IP addresses can utilize them. Go to Control Panel > Windows Defender Firewall > Advanced settings to launch the interface for Windows Defender Firewall with Advanced Security. Click on Inbound Rules on the left-pane of this interface. In the screenshots below you can see that I’ve highlighted all of the individual inbound rules that I will be modifying.


  3. At this point you are going to need to modify every individual inbound rule for File and Printer Sharing and Windows Management Instrumentation for the firewall profile(s) that you are using (private/public/domain). In my case I’m using the private firewall profile, so I’m only modifying the entries for the private profile. However, for your environment you might need to modify the domain profile. Unfortunately this process needs to be completed on each inbound rule one at a time. It’s not possible to perform the action in bulk on all of them at the same time. So go ahead and start at the top and highlight the first rule and then right-click on it and select Properties. In the Properties window, go to the Scope tab.


  4. In the Remote IP address section at the bottom of the window, highlight where it says Local subnet, and then click Edit. Select the radio button for This IP address or subnet, and then enter the IP address of the computer that you will be using to run the BatchPatch console. In my lab here it’s 192.168.1.37, so that’s what I’ve entered.


  5. Repeat the IP scope modification on all of the applicable inbound rules. When complete, File and Printer Sharing and Windows Management Instrumentation will be accessible on the target computer(s) from *ONLY* the IP address that you specified.
Posted in Blog, General, Tutorials | Tagged , , , | Comments closed

Remotely Deploying Windows Feature Update Version 21H2 to Numerous Computers

Standard Deployment Method for Windows Feature Update 21H2 (and other feature updates/upgrades such as 22H2 etc) in BatchPatch

Unless you are using a version of BatchPatch that was released prior to April 2020, you can usually deploy/install feature updates like 21H2 with the normal Windows Update actions in BatchPatch under ‘Actions > Windows updates‘. However, Microsoft continues to make a lot of changes to how feature updates are handled, so there are some cases where you might have to perform the deployment using the alternate method that’s explained further down in this tutorial.

For the standard deployment method, the first requirement is that the feature update that you desire to install must be offered to the computer and show as an available update when you select ‘Actions > Windows updates > Check for available updates‘ in BatchPatch. If you see the desired feature update in that list of available updates for a given target computer or group of computers, then all you need to do to download/install the update on those computers is modify the classification filtering in ‘Tools > Settings > Windows Update‘ so that the ‘Include “Upgrades”‘ box is ticked.

After the ‘Upgrades’ classification is selected you can simply use ‘Actions > Download available updates‘ with ‘Actions > Install downloaded updates‘ or you can just use ‘Actions > Download and install updates‘. As long as you are operating in standard, non-cached mode, feature updates will install (assuming, of course, that you currently have a feature update showing in the list of available updates for a given computer).

Feature Update Deployment Considerations – Update deferral policies, and when an update is only available for “seekers”

Please note there are a couple of things to consider when installing feature updates using the standard non-cached mode BatchPatch update method.

First, as mentioned above, the target computer needs to have the desired feature update showing as one of the available updates for the computer. If you’re expecting to see it but you don’t, it could be because the update is not approved on your WSUS yet, or it could be that you have a Group Policy or Local Policy setting configured for the target computer that is set to defer the installation of feature updates for a specified amount of time. Check your Group Policy configuration for any deferral policies enabled under the following locations:

Computer Configuration > Administrative Templates > Windows Components > Windows Update

Computer Configuration > Administrative Templates > Windows Components > Windows Update > Windows Update for Business

Second, depending at what stage of the rollout Microsoft currently is at the time you attempt to deploy a given feature update, they might not yet be delivering the update through the normal Windows Update channel. They typically begin the rollout with delivery only to “seekers”. This is the name they give to people who manually click on the ‘Check for updates’ button in the Windows Control panel. “Seeker” updates are visible in BatchPatch when you click on ‘Search for only optional software updates

Third, over the past couple/few years Microsoft has made quite a few changes to how Windows Update works, particularly with regard to how feature updates are handled. It’s possible that there is some other reason that I didn’t mention above that is the cause for why you are not seeing the feature update available for installation through the normal Windows Update methods.

Alternate Deployment of Windows Feature Update 21H2 (and other feature updates/upgrades) with BatchPatch (can be used for deployment to offline target computers)

If you need to deploy feature update version 21H2 (or any other feature update) to target computers that don’t have internet access and don’t have WSUS access and therefore cannot be targeted in standard, non-cached mode (that is to say, you are using either online cached mode or offline cached mode with those target computers, and you are not able to disable cached mode and switch to standard mode for whatever reason), then you may use the method outlined below to deploy the feature update to those computers.

  1. Download (from Microsoft) the Windows 10 Media Creation Tool. Use this link to download the media creation tool directly from Microsoft. The media creation tool web page contains two options: ‘Update now’ and ‘Download tool now’. Do NOT click on ‘Update now’ because doing so would begin the update process on your computer. Since your goal is to deploy the upgrade to remote computers, instead please click on ‘Download tool now’ to save the tool to your computer. Important: When you run the media creation tool per the next step, you will not have a choice to select which Windows 10 version is used to create the media. This means that if Microsoft releases a new version of Windows 10 when you follow this tutorial, you’ll end up with that version as opposed to the specific version 21H1 that is available today at the time of this writing. If you have another channel for obtaining media for a particular Windows 10 version, such as with a Microsoft volume licensing agreement, you may use that instead of obtaining the media through the steps outlined in this tutorial.
  2. Open the Windows 10 Media Creation Tool that you saved to your computer a moment ago. IMPORTANT: It is NOT sufficient to run the tool as administrator (using right-click, run-as) from an account that is logged on without admin privileges. For reasons that aren’t fully clear, Microsoft requires that you *must* actually be logged on to the computer with an account that is a member of the local administrators group. Otherwise the tool will not allow you to run it to completion. We don’t know why Microsoft made the tool work this way, but it’s what they did, and presumably it’s for a good reason. So go ahead and log on to your computer as a local administrator, and then launch the tool and follow the rest of this tutorial.
  3. Create installation media with the Windows 10 Media Creation tool. When the tool is running you’ll have to choose between two options to either ‘Upgrade this PC now’ or ‘Create installation media (USB flash drive, DVD, or ISO file) for another PC. Choose the option to ‘Create installation media…’ and then click ‘Next’.

  4. Choose your language / edition / architecture, and then click ‘Next’.
  5. Choose the media type. For the sake of this tutorial please select ISO as the type of media. After clicking the ‘Next’ button you will be prompted to choose a location on your computer to store the ISO file that will be downloaded/created. Select a directory/location to store the file, and then do something else until the download finishes. Depending on your connection speed it could take some time because it’s something like 4GB in size.


  6. Extract the ISO contents to a location on your local disk. After the download in the previous step is complete you’ll have to locate the file on disk and then extract the contents of the ISO to another folder. I like to use the free 7-zip for this process, but you may use whichever tool you prefer: 7-zip. After the ISO has been extracted you’ll have all of the installation files for the feature update in a single folder.
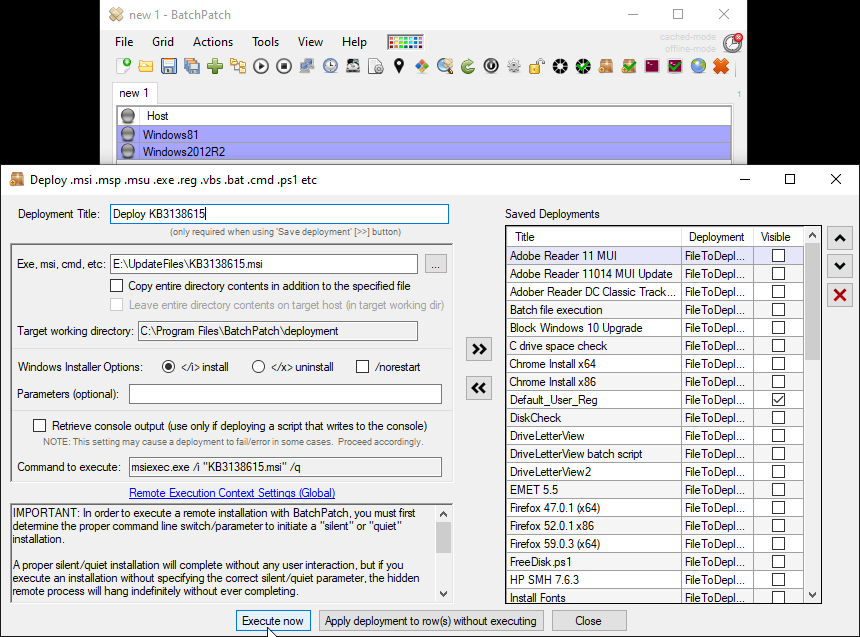
  7. Configure a deployment in BatchPatch. In BatchPatch click on Actions > Deploy > Create/modify. In the window that pops up for the Deployment configuration, click on the ‘…’ button to browse to the location where your ISO contents have been extracted to, and then choose the ‘setup.exe’ file as the file to deploy. Make sure to check the boxes for ‘Copy entire directoryandLeave entire directory. After the initial deployment phase is complete, the target Windows operating system will end up rebooting itself at least once but usually more than once while it completes the setup and installation for the feature update. As the process runs it needs to have access to all of the files that BatchPatch will deploy. Having both of the aforementioned boxes checked will ensure that when the upgrade process runs on the target computer that it has all of the files it needs for the installation. After the feature update has completed 100% you may delete the files from the target computer(s). However, please make absolutely sure that the upgrade process is 100% completed before you delete any files. In your BatchPatch deployment configuration screen you will also need to add the following parameters:
    /auto upgrade /quiet

  8. Execute the feature upgrade deployment. In the deployment configuration that you created in the in the previous step you can execute the deployment immediately for the currently selected rows in the grid by just clicking on the ‘Execute now’ button. Alternatively you may save the deployment for future usage by clicking the double-right-arrow button ‘>>’. If you choose to save the deployment instead of executing it immediately, then when you are ready to deploy the feature update to your remote computers, you can begin the process by selecting those computers in the BatchPatch grid and then clicking on Actions > Deploy > Execute deployment, and then choose the deployment that you just created/saved.

    You should expect that the entire process will take a bit of time to complete. BatchPatch has to copy the whole installation directory to the target computer(s), which contains several gigabytes, before it can execute the upgrade process on the target(s). IMPORTANT: After the BatchPatch deployment completes for a given target computer BatchPatch will show Exit Code: 0 (SUCCESS). However, this just means that the BatchPatch deployment component is finished. The Windows feature update/upgrade process will take additional time. Please be patient and let the target computer continue upgrading and rebooting as many times as is needed. It might take a little while with multiple automatic reboots before everything is 100% finished.

    NOTE: We have had a couple of reports from users who received the following error:

    Deployment: Error: Access to the path '\\TargetComputer\C$\Program Files\BatchPatch\deployment\autorun.inf' is denied.

    We don’t know the exact cause of this issue, but it seems likely to somehow be related to the way that permissions were applied or inherited during the ISO extraction process. If you encounter this error it can be resolved quickly and easily by just deleting the autorun.inf file from the source directory after extracting the ISO contents but before executing the actual deployment for any target computers. This will prevent the problematic file from ever being copied to target computers. As such, the error will not occur.

Posted in Blog, General, Tutorials | Tagged , , | Comments closed

BatchPatch New Version Released February 2022

We published a new build last week.

Aside from a number of bug fixes and miscellaneous enhancements, the key features that we added to this build are:

  • Row filter:
    We know a lot of people have wanted this for a long time, so hopefully you’ll all get some good use out of it. In previous versions of BatchPatch you were able to use CTRL+F or Grid > Find in grid… to search either the current grid or all open grids for a particular string. This has its uses but also its limitations, especially when dealing with large grids and lots of matches for your search query. However, now in the current version of BP you can use the row filter (CTRL+H or Grid > Filter rows in grid…) to quickly hide all rows that don’t match the filter string. You can select the column that you want to filter on, and you can enter a search string. So for example, if you want to only show hosts that contain ‘5’ in the host name, you can do it like this:


    Each grid/tab has its own filter, and each grid’s filter will stay enabled until you clear it. However, filters are not saved, so they don’t persist beyond the current session. If you close a grid and then re-open it at a later date, no filter will be applied until/unless you apply a new filter string to the grid. We assume that in most cases people will filter a grid temporarily in order to select/highlight just certain rows that match their filter string, then perform an action, and then clear the filter.

  • Propagate changes made to saved job queues and deployments:
    When we originally designed BatchPatch, we felt it was important for grid files (.bps files) to be portable. The challenge in doing this is that if you save a job queue or a deployment in a scheduled task for a given host or group of hosts, the entire job queue or deployment configuration has to be saved to that grid separately from the repository of saved configurations that exist for the BatchPatch installation for that logon account. Only then could a grid be transferred to a different installation of BP without breaking. However, doing this means that if you subsequently update the configuration for a job queue or a deployment, the changes have to be applied to the grid in every place where that job queue or deployment was previously saved. Prior to the current release of BP, you had to do that manually. However, now when you make changes to a job queue or deployment configuration, you are immediately prompted to apply those changes to any grids where those job queues or deployments were previously saved. We hope this relieves a lot of pain for users who are regularly modifying the contents of their scheduled task job queues and deployments.

Posted in Blog, General, Tutorials | Tagged , , , | Comments closed

Overview for Remotely Deploying Software and Specifying Default Settings

Today I’m not going to perform a specific deployment. Instead I want to provide a conceptual overview for new users who ask us “How do I remotely install software on multiple computers and configure that software to have specific default settings for the end user?” Similarly, “How do I remotely install software to multiple computers and select or choose all of the settings/configurations that I normally do with my mouse and keyboard during an standalone software installation on a single computer?” These are two common questions that we receive in one form or another, so let me spend some time going over the basic process for deployment.

  1. Silent/quiet installation switch for command line or remote deployment:

    99.9% of software packages have the ability to be installed “silently” or “quietly.” When we talk about a ‘silent’ or ‘quiet’ installation, what we mean is that the software can be installed without any dialog boxes to click through and with no options to choose nor filepaths to specify etc. A silent/quiet installation can be run at a command prompt with a single command that launches the entire process. Once the process has been started, no interaction is needed from anyone to complete the process. You simply have to wait for it to complete, and that’s it. When you want to perform a software deployment in BatchPatch, the first thing you need to do is figure out how to execute a silent/quiet installation for the particular package that you are deploying. We have an entire posting dedicated to explaining this purpose, so please start by reading that carefully.

  2. The summary version is that you’ll check the vendor’s documentation and/or review the built-in help in the actual deployment package itself to determine what the proper silent installation switch is. In many cases it’s just a /q or /s, but every package is different, so please review the aforementioned link for instructions on discovering it for your package.

  3. Configuration or “answer” settings file for controlling the installation settings in a silent installation:

    Many software products are just a very simple, straightforward installation where all you need to do is execute them silently without worrying about anything else. They’ll install to the default location with the default settings, and you’re good to go. However, in an enterprise setting you might have the need to deploy a more complex package or a package where you need to specify non-default settings. How do you accomplish this if the software is being deployed silently, such that you can’t click through any dialog boxes to modify installation settings for the end users? The way this is typically done is through the use of a configuration file which is sometimes referred to as an answer file or an unattended setup file. Generally speaking, if a software package provides the ability for you to perform a silent installation, and if that software package has settings that a user might want or need to change, then it will also provide a way for you to modify those settings during the silent installation through an unattended setup file or similar. Consult the software vendor’s documentation to see the specifics for the package that you are deploying. Below I’ll provide a generic/conceptual overview of what it might look like.

  4. Conceptual overview for performing the silent installation with an unattended setup file:

    As mentioned previously, the most important thing you need to do before you get started is consult the vendor’s documentation for the specific software that you’re going to deploy. The way it typically works is something like this. Let’s say you have a software package called SoftwarePackage.exe. That SoftwarePackage.exe is going to have a built-in silent or quiet switch, which for the sake of this example we’ll assume is /q. If you execute a command line installation of the package you would use

    C:\PathOnYourComputerWherePackageIsLocated\SoftwarePackage.exe /q

    to perform a silent installation of the software with its default settings on the local computer. In the case where the vendor provides instructions for creating an unattended setup file so that various settings can be configured at installation time even though the installer is running silently, you’ll probably have a separate file that you have created, which for the sake of this example we’ll just call ‘UnattendedSetup.xml’. Inside of that XML file (your particular software vendor might not use XML format at all– It might be a simple text file or something else altogether) you’ll choose the desired settings per the instructions from your vendor. Furthermore, the vendor’s documentation will include instructions for how SoftwarePackage.exe is going to know about UnattendedSetup.xml. Typically it would be through the use of another command line switch. So, for example, you might find that your silent installation with unattended setup will be executed something like this:

    C:\PathOnYourComputerWherePackageIsLocated\SoftwarePackage.exe /q /u:UnattendedSetup.xml

    Remember, I am just giving you a generic example here. Assume that your software package will be different, and make sure to consult your package’s documentation. OK, once you have determined the proper syntax for executing your silent installation with unattended setup, you need to actually perform that installation from the command prompt of a test computer. You need to make sure that it works properly for your needs. When you have it working properly with the correct syntax for your package, and when you have verified that your settings are applied to the installation as needed (by launching the software after command line installation on your test computer to make sure that the software is configured in the way that you expect), ONLY THEN you should convert that command line installation into a remote deployment in BatchPatch.

  5. Performing the remote deployment in BatchPatch:

  6. Once you have tested your command line installation syntax at the command prompt of a test computer, and you have everything working so that the installation is executed with just a single command, and so that all of your settings are applied during the installation so that when the software is launched for the first time on the computer by the end user it has all of the settings configured in exactly the way that you need or want, then you’re ready to move that command line installation over to BatchPatch for remote deployment to numerous computers. Remember for the sake of this example we have the following syntax for our package to be installed silently at the command line with unattended setup:

    C:\PathOnYourComputerWherePackageIsLocated\SoftwarePackage.exe /q /u:UnattendedSetup.xml

    The way that we would then deploy this with BatchPatch is we would put both UnattendedSetup.xml and SoftwarePackage.exe into C:\PathOnYourComputerWherePackageIsLocated on the BatchPatch computer. Then in BatchPatch we would create a deployment with ‘Actions > Deploy > Create

    In the BatchPatch ‘Deploy’ window we would specify the path to our SoftwarePackage.exe, and in the parameters field would we add our parameters. In the screenshot below you can see that our ‘Command to execute’ is essentially the same as the command that we used when we tested the installation manually at the command prompt earlier. Also note that I have ticked the box ‘Copy entire directory‘. This is important! What this means is that BatchPatch will not only copy SoftwarePackage.exe but will also copy the entire contents of C:\PathOnYourComputerWherePackageIsLocated to the target computer, including the UnattendedSetup.xml file that’s in there. This is required so that when the command line silent installation is performed remotely on the target computer, the target computer will be able to find the UnattendedSetup.xml in the same directory as the SoftwarePackage.exe. At this point you’ll want to test your remote deployment on a single machine before you deploy it to numerous computers. You can either use the “Execute now” button or you can save the deployment with the double-right-arrow for executing at a later time.

Posted in Blog, General, Tutorials | Tagged , , , | Comments closed

Don’t Forget the Middle-Click Scroll-Wheel Button on your Mouse!

Sometimes I am reminded that we always have some users who aren’t aware of the middle-click functionality in BatchPatch. This is a bit sad because it’s probably the most clicked button by the rest of us who use BatchPatch on a regular basis. Soooooooooooo… this is just a reminder to everyone that almost every cell in BatchPatch can be middle-clicked to reveal its contents. This helps immensely to get a quick view of what’s going on with a particular target host without having to launch a whole new window.

Middle-Click (Scroll Wheel Mouse Button Click) Example:

For example, in the screenshot below I pressed the middle-click button on my mouse directly on top of the ‘All Messages’ cell in the first row of the grid (this is usually the scroll wheel on your mouse, which some people do not know is actually also a button that you can press!)

Viewing an Entire Row’s Contents:

Yes, you can also double-click a row or press the R key or click ‘Actions > Expand row(s)‘ to view its entire contents in a separate window (see below screenshot), but it’s not as quick and clean as using the middle-click in cases where you just want or need to quickly view the contents of an individual cell.

Viewing the Entire Contents of Multiple Rows:

You can alternatively select multiple rows, and then press the R key or click ‘Actions > Expand row(s)

OK! That’s all for today. Happy BatchPatching!

Posted in Blog, General, Tutorials | Tagged , , | Comments closed

Deploy Microsoft Edge to Multiple Computers

The process for deploying Microsoft Edge with BatchPatch to numerous computers, simultaneously, is essentially the same as with any standard deployment. In this case we will download the Edge .MSI installer, and then create a BatchPatch deployment, and then execute it against our target computers. The process is illustrated step by step below.

  1. Download the .MSI installer file for Microsoft Edge. Choose the appropriate installer file for your needs. For this example I have downloaded the x86 installer to deploy to a Windows 2012R2 test machine in our lab. The Microsoft Edge .MSI installer file is available at this page.
  2. Create a BatchPatch deployment. Click Actions > Deploy > Create/modify deployment
  3. In your deployment window you only need to select the location of your .MSI file. No additional configuration is required. The screenshot below is what it should look like.
  4. When the deployment has been created you can use the double-right-arrow button to save it for later, or you can execute it now by clicking the Execute now button (just first make sure the desired target hosts are highlighted in your BatchPatch grid)
  5. You can see below I have deployed it successfully to my test target machine. I also verified on the target computer that it’s now installed/available.
Posted in Blog, General, Tutorials | Tagged , | Comments closed