One of the questions that arises for some users who are using BatchPatch without a WSUS (Windows Server Update Services) server, is how should Group Policy be configured for target computers? The main detail here to consider is that if your computers are not setup to get their updates from a WSUS server then there is a good chance that you’re using the default Windows Update configuration where Windows Updates are automatically installed on target computers. However, if you’re now considering using an app like BatchPatch (or if you’re already using BatchPatch) to manage your monthly Windows Update process, you’re going to want to disable the automatic update functionality that your computers are currently using so that you can have BatchPatch initiate the download and/or installation of updates on all target computers. This is where Group Policy comes in. Or if you don’t have a domain environment and instead have all computers running standalone or in a Windows workgroup, then you’ll use Local Policy on each target computer instead of Group Policy since Group Policy is configured at the domain level. (Local Policy is configured on a given computer by launching the Group Policy editor locally by typing gpedit.msc in an administrator elevated command prompt)
- Create/edit a group policy that is linked to the OU containing your target computers. Or if there is no domain and you are just using Local Policy for non-domain computers, then simply launch gpedit.msc from an administrator elevated command prompt directly on the computer that you are configuring
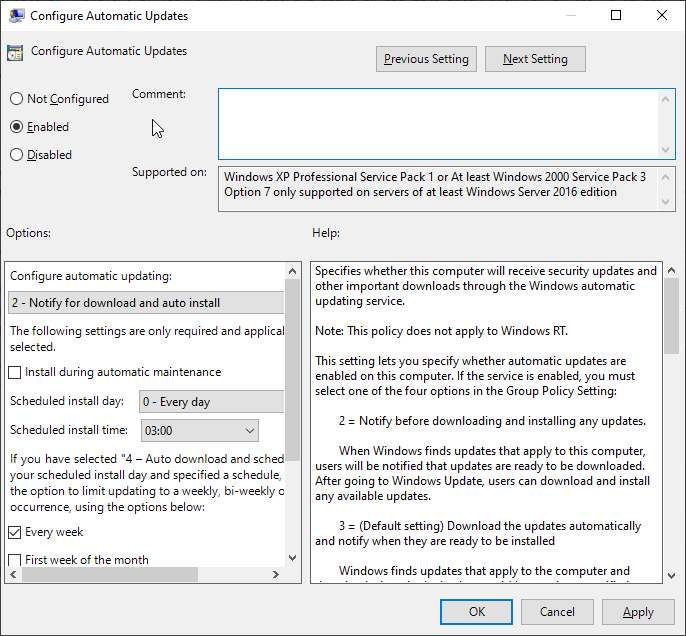
- In Group Policy editor (gpedit.msc) go to Computer Configuration > Administrative Templates > Windows Components > Windows Update and set the Configure Automatic Updates setting to 2 = Notify for download and auto install. The effect of this setting is essentially to disable the Automatic Updates feature on the target computers. It doesn’t turn off the Windows Update service. It simply tells Windows to stop automatically downloading updates. Since you want to use BatchPatch to perform the download/install process on-demand on your target computers, you need to stop the target computers from automatically downloading and installing updates. Or if you prefer to have Windows automatically download updates but not install them until you initiate the installation process with BatchPatch, then select 3 = Auto download and notify for install. However, please note that if you use setting 3 without a WSUS, you’ll end up getting all available updates downloaded. This is fine for most cases, but if you need or want to selectively download updates (this was a much more common need prior to Windows 10, which most likely won’t be a concern for Windows 10/11+ admins), you won’t have the ability to do that unless you have a WSUS where you can pre-select which updates will get offered to target computers. Otherwise you would have to just use BatchPatch instead of Group Policy to perform the download of the specific/desired updates (using filters to skip unwanted updates, and/or using the “hide” option to hide unwanted updates on target computers).