Most of you are probably well aware of the fact that Microsoft releases Windows Updates on the second Tuesday of each month. This recurring Tuesday has come to be known in the industry as ‘Patch Tuesday.’ One of the things that has always been annoying to many admins is the fact that while Patch Tuesday is always the second Tuesday of the month, the Wednesday that comes the day after Patch Tuesday is not necessarily always the second Wednesday of the month! For example, if the first day of a given month is a Wednesday, then the Wednesday that comes the day after Patch Tuesday will be the third Wednesday of the month, not the second.
Why does all this matter? Well, in terms of scheduling, it can be a bit tricky. Some companies choose to apply Windows Updates almost immediately after they are released on Patch Tuesday. For some this means that the Wednesday after Patch Tuesday is server maintenance day. For others it means that the Friday or Saturday after Patch Tuesday is server maintenance day. If you are scheduling any portion of your update process to run automatically, you need a good way to define the maintenance window. If you choose to have a recurring schedule that runs on the second Wednesday of every month, you’re going to miss your target in the months where the second Wednesday is not the day that comes after the second Tuesday.
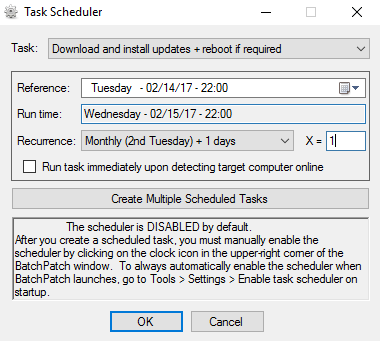
In the most recent release of BatchPatch we added a new recurrence option to the Task Scheduler. So now if you want to schedule your tasks to run on the day after Patch Tuesday, you can do it more easily. For any recurring task you can now define a run time to come X days after a reference time. In the screenshot below you can see that I’ve set recurrence to be ‘Monthly (2nd Tuesday) + 1 days’ which means that no matter how the days fall, my schedule will always run on the day after Patch Tuesday.