We have never previously posted any specific information about the type of hardware required to run BatchPatch because the reality is that BatchPatch should run fine on almost any modern Windows computer. We have run it without issue on systems with very limited hardware capabilities, but there are still a handful of things worth considering with regard to performance expectations.
- RAM: We suggest having at least 2MB of free RAM available on the BatchPatch computer for each simultaneous target computer that you plan to patch. This means if you want to patch 100 target computers all at the same time, then you would need to have at least 200MB of free RAM.
- CPU: Generally speaking we have found that on most modern computers it shouldn’t be a problem to patch at least a few hundred target computers at the same time. We have many customers who do more and many who do less. A faster CPU can help with grid performance when patching a very large number of computers, simultaneously. A particularly slow CPU would likely cause noticeable stuttering when trying to patch a large number of computers, so we don’t recommend running BatchPatch on a device with an ultra-low voltage CPU, such as the Atom processor, for example.
- Network Interface: BatchPatch has to maintain communication with every target computer during the operation, so it’s a good idea to have a gigabit network connection on the BatchPatch computer, though it’s not absolutely required.
- WSUS: If you are using a WSUS, please note that if you instruct a large number of target computers to search for and/or download updates from your WSUS all at the same time, the WSUS computer would need to be able to support all of those connections. WSUS does not have significant hardware requirements, so it’s not necessarily going to be a problem. I only mention it as something to be aware of. We like to use GPO to pre-download the updates to target computers so that when the server maintenance window begins, the updates may be installed immediately on target computers without having to wait for download to complete and without any potential, albeit unlikely, bottleneck at the WSUS. More here.
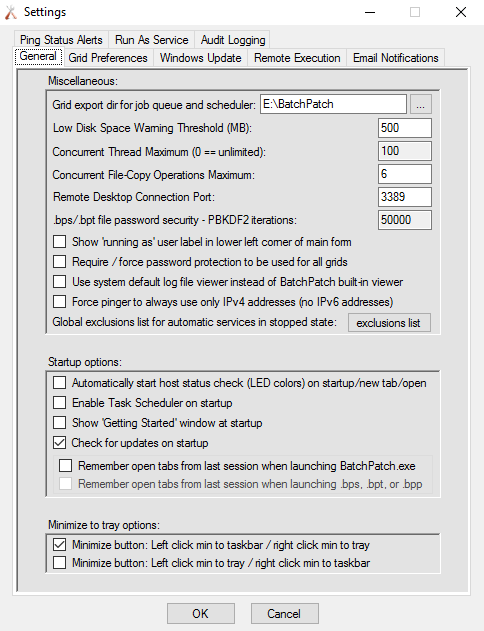
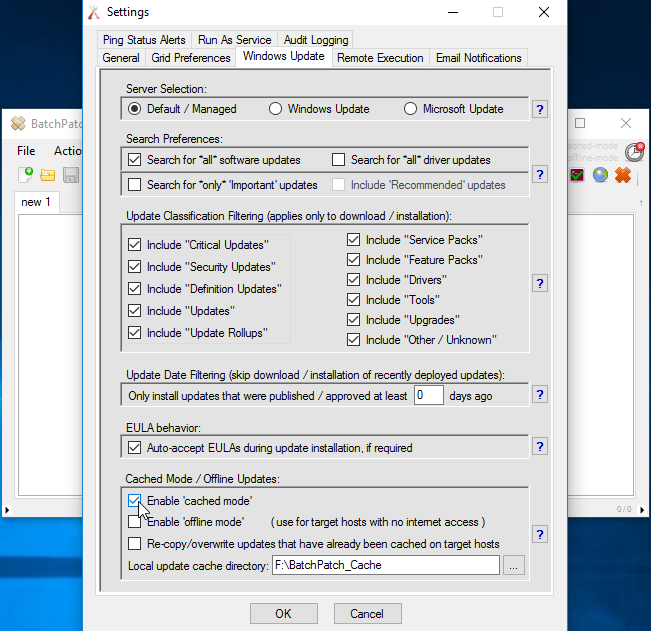
- Maximum Hosts: BatchPatch does not impose any limit to the number of computers that may be added to the grid. However, if you were to add 10,000 target computers to a grid and if you were to try to install Windows updates on all of those computers simultaneously, I can pretty much guarantee that the user interface is going to lock up, even if you are running BatchPatch on a very powerful computer. Our general philosophy has always been to provide the sysadmin with as much flexibility as possible without placing any artificial or seemingly arbitrary restraints on the software as far as performance is concerned. Essentially, we don’t prevent the administrator from shooting him/herself in the foot. However, BatchPatch does provide a couple of performance settings that can be used to make sure something like this does not happen. Under ‘Tools > Settings > General‘ you will find ‘Concurrent Thread Maximum‘ and ‘Concurrent File-Copy Operations Maximum‘.
The Concurrent Thread Maximum setting enables the administrator to specify a maximum number of simultaneous operations that will be allowed in the grid. For example, if this value is set to 100 (default), then if you launch an action on 500 computers all at the same time, the first 100 will begin processing while the other 400 will queue until threads become available from the first 100 as they complete their operations. You can set this value to 0 to remove the cap and allow unlimited simultaneous actions. However, please be mindful that you could cause the GUI to lock up if you try to handle too many actions at once. Though also please note that if the GUI *does* lock up in this case because you tried to process too many simultaneous hosts, usually it will unlock eventually as actions are processed. It is best to leave it alone until it finishes (be patient) rather than forcibly closing the application. I am reminded of one customer who mentioned that he patches approximately 5000 computers simultaneously in one BatchPatch grid. He knows that when he launches the operation that it’s going to cause the GUI to freeze/hang, but he simply leaves it for 45 minutes. When he comes back to it, all 5000 computers have been patched, and the GUI is no longer frozen.
The Concurrent File-Copy Operations Maximum setting enables the administrator to specify a maximum number of simultaneous file copies that the BatchPatch computer will perform when copying files to target computers. This is not limited to files that are copied via ‘Actions > Copy file/folder‘. It also includes files that are copied to targets during Windows Update, such as when cached mode is enabled. The default value is set to 6, which we find to be a good number for most situations. However, there is no problem with increasing this value, if you so desire. It’s hard to know what the best balance is between total number of concurrent copies allowed vs speed of each individual copy. At some point when increasing this value there will likely be diminishing returns.