Today I’m not going to perform a specific deployment. Instead I want to provide a conceptual overview for new users who ask us “How do I remotely install software on multiple computers and configure that software to have specific default settings for the end user?” Similarly, “How do I remotely install software to multiple computers and select or choose all of the settings/configurations that I normally do with my mouse and keyboard during an standalone software installation on a single computer?” These are two common questions that we receive in one form or another, so let me spend some time going over the basic process for deployment.
-
Silent/quiet installation switch for command line or remote deployment:
99.9% of software packages have the ability to be installed “silently” or “quietly.” When we talk about a ‘silent’ or ‘quiet’ installation, what we mean is that the software can be installed without any dialog boxes to click through and with no options to choose nor filepaths to specify etc. A silent/quiet installation can be run at a command prompt with a single command that launches the entire process. Once the process has been started, no interaction is needed from anyone to complete the process. You simply have to wait for it to complete, and that’s it. When you want to perform a software deployment in BatchPatch, the first thing you need to do is figure out how to execute a silent/quiet installation for the particular package that you are deploying. We have an entire posting dedicated to explaining this purpose, so please start by reading that carefully.
-
Configuration or “answer” settings file for controlling the installation settings in a silent installation:
Many software products are just a very simple, straightforward installation where all you need to do is execute them silently without worrying about anything else. They’ll install to the default location with the default settings, and you’re good to go. However, in an enterprise setting you might have the need to deploy a more complex package or a package where you need to specify non-default settings. How do you accomplish this if the software is being deployed silently, such that you can’t click through any dialog boxes to modify installation settings for the end users? The way this is typically done is through the use of a configuration file which is sometimes referred to as an answer file or an unattended setup file. Generally speaking, if a software package provides the ability for you to perform a silent installation, and if that software package has settings that a user might want or need to change, then it will also provide a way for you to modify those settings during the silent installation through an unattended setup file or similar. Consult the software vendor’s documentation to see the specifics for the package that you are deploying. Below I’ll provide a generic/conceptual overview of what it might look like.
-
Conceptual overview for performing the silent installation with an unattended setup file:
As mentioned previously, the most important thing you need to do before you get started is consult the vendor’s documentation for the specific software that you’re going to deploy. The way it typically works is something like this. Let’s say you have a software package called SoftwarePackage.exe. That SoftwarePackage.exe is going to have a built-in silent or quiet switch, which for the sake of this example we’ll assume is /q. If you execute a command line installation of the package you would use
C:\PathOnYourComputerWherePackageIsLocated\SoftwarePackage.exe /q
to perform a silent installation of the software with its default settings on the local computer. In the case where the vendor provides instructions for creating an unattended setup file so that various settings can be configured at installation time even though the installer is running silently, you’ll probably have a separate file that you have created, which for the sake of this example we’ll just call ‘UnattendedSetup.xml’. Inside of that XML file (your particular software vendor might not use XML format at all– It might be a simple text file or something else altogether) you’ll choose the desired settings per the instructions from your vendor. Furthermore, the vendor’s documentation will include instructions for how SoftwarePackage.exe is going to know about UnattendedSetup.xml. Typically it would be through the use of another command line switch. So, for example, you might find that your silent installation with unattended setup will be executed something like this:
C:\PathOnYourComputerWherePackageIsLocated\SoftwarePackage.exe /q /u:UnattendedSetup.xml
Remember, I am just giving you a generic example here. Assume that your software package will be different, and make sure to consult your package’s documentation. OK, once you have determined the proper syntax for executing your silent installation with unattended setup, you need to actually perform that installation from the command prompt of a test computer. You need to make sure that it works properly for your needs. When you have it working properly with the correct syntax for your package, and when you have verified that your settings are applied to the installation as needed (by launching the software after command line installation on your test computer to make sure that the software is configured in the way that you expect), ONLY THEN you should convert that command line installation into a remote deployment in BatchPatch.
-
Performing the remote deployment in BatchPatch:
The summary version is that you’ll check the vendor’s documentation and/or review the built-in help in the actual deployment package itself to determine what the proper silent installation switch is. In many cases it’s just a /q or /s, but every package is different, so please review the aforementioned link for instructions on discovering it for your package.
Once you have tested your command line installation syntax at the command prompt of a test computer, and you have everything working so that the installation is executed with just a single command, and so that all of your settings are applied during the installation so that when the software is launched for the first time on the computer by the end user it has all of the settings configured in exactly the way that you need or want, then you’re ready to move that command line installation over to BatchPatch for remote deployment to numerous computers. Remember for the sake of this example we have the following syntax for our package to be installed silently at the command line with unattended setup:
C:\PathOnYourComputerWherePackageIsLocated\SoftwarePackage.exe /q /u:UnattendedSetup.xml |
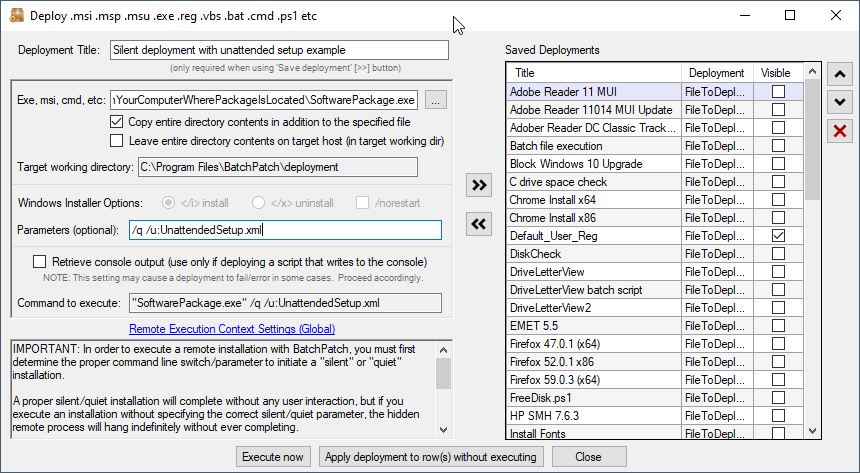
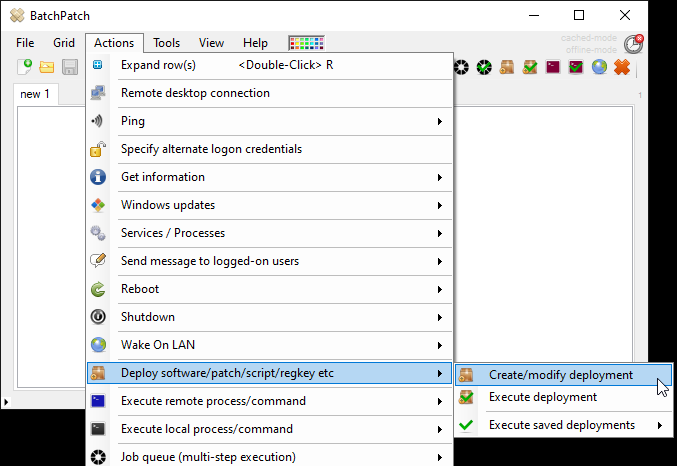
The way that we would then deploy this with BatchPatch is we would put both UnattendedSetup.xml and SoftwarePackage.exe into C:\PathOnYourComputerWherePackageIsLocated on the BatchPatch computer. Then in BatchPatch we would create a deployment with ‘Actions > Deploy > Create‘
In the BatchPatch ‘Deploy’ window we would specify the path to our SoftwarePackage.exe, and in the parameters field would we add our parameters. In the screenshot below you can see that our ‘Command to execute’ is essentially the same as the command that we used when we tested the installation manually at the command prompt earlier. Also note that I have ticked the box ‘Copy entire directory‘. This is important! What this means is that BatchPatch will not only copy SoftwarePackage.exe but will also copy the entire contents of C:\PathOnYourComputerWherePackageIsLocated to the target computer, including the UnattendedSetup.xml file that’s in there. This is required so that when the command line silent installation is performed remotely on the target computer, the target computer will be able to find the UnattendedSetup.xml in the same directory as the SoftwarePackage.exe. At this point you’ll want to test your remote deployment on a single machine before you deploy it to numerous computers. You can either use the “Execute now” button or you can save the deployment with the double-right-arrow for executing at a later time.