Remotely Uninstalling Windows Updates

Let’s face it… even though we all wish Microsoft’s quality assurance and testing was better, it really seems to have gotten worse in recent years… significantly worse. There are a few primary ways that systems administrators can reduce the likelihood of encountering problems after installing Windows updates each month. First, have a testing lab setup with machines that largely resemble production computers, so that updates can be deployed into the testing environment before they are deployed to the production environment. If the testing environment’s computers are actually prepared with similar applications and services as production computers, then there is a good chance that the testing environment will reveal any major issues with Windows updates *before* those updates are ever deployed to production machines. However, it’s often difficult or even impossible to accurately configure testing servers to resemble the production servers closely enough to guarantee that update issues will be discovered in testing before they are deployed to production, so this isn’t the only step that should be taken. We also recommend designating certain production machines to be the first to receive updates, so that if any problems are identified, they can be addressed before deploying the same updates to an entire production network. Additionally, we think it’s important in most cases to *not* install updates within the first few days of their release. We believe that most organizations should be waiting at least a week after Patch Tuesday before they deploy new updates to production systems. This gives the rest of the world a chance to test the updates and report any problems, so that you can then decide if you need to postpone a maintenance window until Microsoft re-issues a fixed version of the update, or to perhaps do additional testing in your environment to confirm whether or not you might be affected by any problems that have been reported with the updates. However, while we do think that waiting a week or so is a great idea for most organizations, you shouldn’t wait too long, especially in cases where the updates to be installed are fixing critical issues that are actively being exploited in the wild. A balance will need to be struck, depending on the details, setup, and requirements of each particular environment, so that updates can be installed soon enough to protect computers while also waiting long enough to minimize any potential problems that might be encountered by installing a problematic update.
What happens if you install an update that is causing problems on your computers?

It’s going to depend on the nature of the problem, of course, because if the update is so destructive that computers won’t even boot, then you’re obviously going to have to manually address each affected computer in order to resolve the problems. However, in most cases when a problematic update has been deployed, simply uninstalling it is sufficient to make the problem go away until a fixed version of the update is published by Microsoft. If you find yourself in a situation where you need to remove a Windows update that you previously installed on numerous computers, you can use BatchPatch to execute the removal/uninstallation process.

Using BatchPatch to Execute the Update Removal/Uninstallation Command

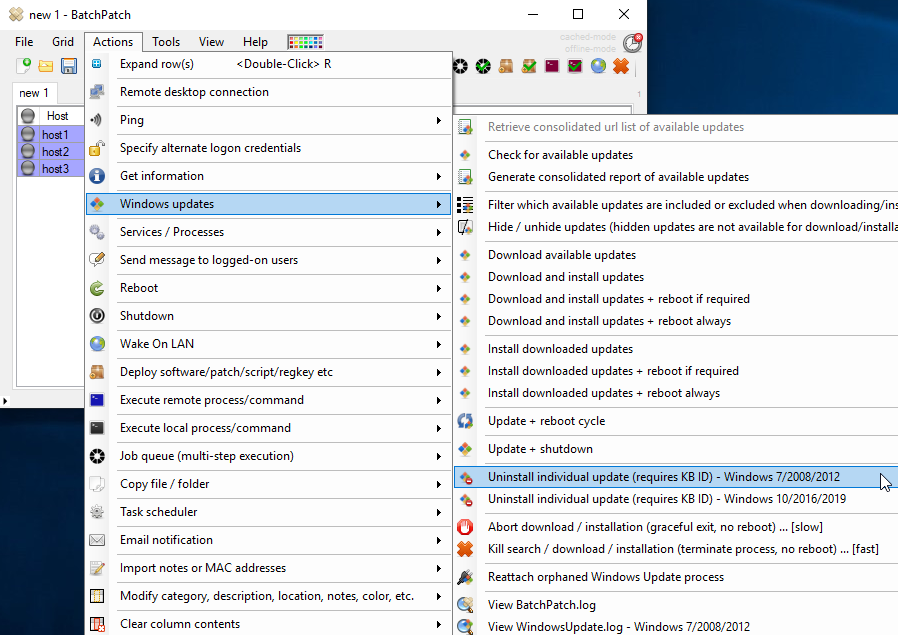
First, note that there are two different commands built-in to BatchPatch for removing Windows updates. You’ll need to execute the command that corresponds to the particular operating system that you will be removing the update from. In BatchPatch you can see the two different menu items in the screenshot below:

  1. Highlight the rows in the grid for the computers that have the update installed that you want or need to remove/uninstall.
  2. Click on the relevant menu item, depending on which OS is installed on your target computers… either ‘Actions > Windows updates > Uninstall individual update (requires KB ID) – Windows 7/2008/2012‘ or ‘Actions > Windows updates > Uninstall individual update (requires KB ID) – Windows 10/2016/2019
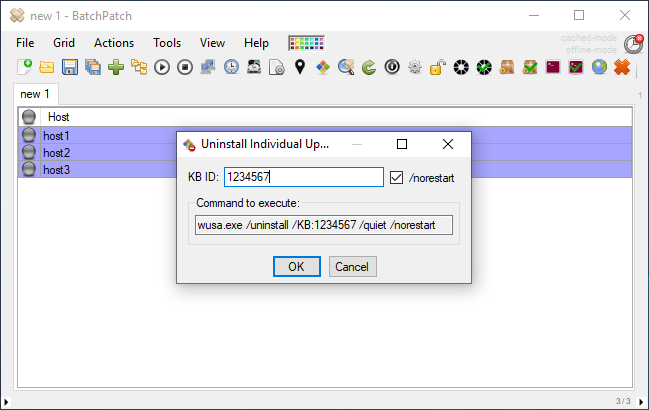
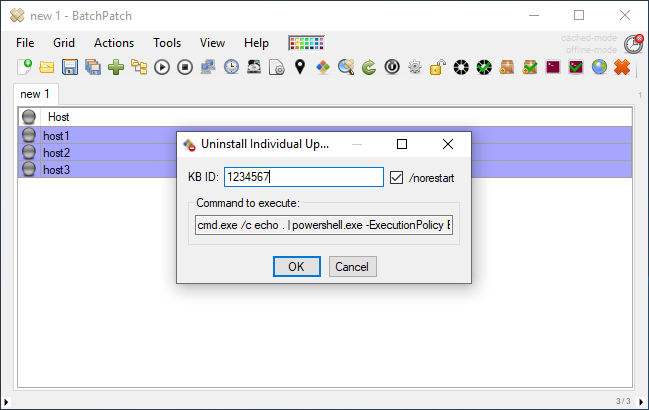
  3. Enter the KB ID of the update that you want to remove, and tick or untick the ‘/norestart’ option, depending on whether you want the command to prevent the update process from rebooting the computer or not. If the computer needs to be rebooted in order to complete the update removal, and if you tick the ‘/norestart’ option, you’ll need to execute the reboot separately in order for the update removal process to be completed. We generally prefer to check ‘/norestart’ and then separately initiate the reboot in BatchPatch. In this way BatchPatch can monitor the reboot through its normal process. If the removal command itself performs the reboot (this happens if /norestart is un-ticked and the update removal process requires a reboot), BatchPatch won’t monitor it. Note, the command to execute is different, depending on which menu item you selected in the previous step. The screenshots below show the difference:

    wusa.exe /uninstall /KB:1234567 /quiet /norestart


    cmd.exe /c echo . | powershell.exe -ExecutionPolicy Bypass -command "$SearchUpdates = dism /online /get-packages | findstr 'Package_for'; $updates = $SearchUpdates.replace('Package Identity : ', '') | findstr 'KB1234567'; DISM.exe /Online /Remove-Package /PackageName:$updates /quiet /norestart"

  4. Lastly, click OK to execute the process.
Posted in Blog, General, Tutorials | Tagged , | Comments closed

Using the Job Queue to Execute an Ordered List of Actions on Target Computers

One of the most commonly used features in BatchPatch is the Job Queue. The Job Queue enables you to execute a series of actions, sequentially, on target hosts. Just about any action that BatchPatch can perform through manual execution can also be added to a job queue.

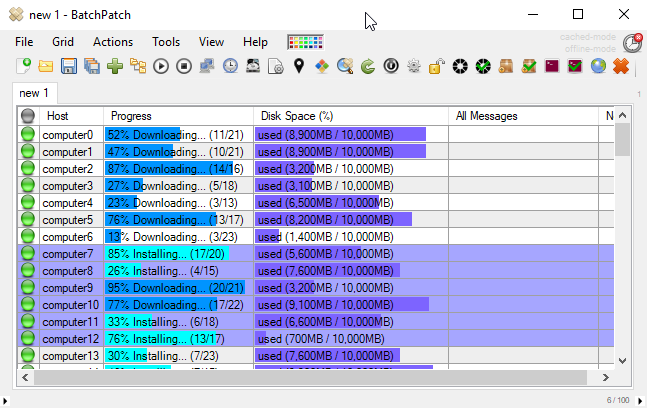
One of the most common reasons people use the job queue is to perform multiple update and reboot cycles on target computers– a kind of “lather, rinse, repeat” option for Windows Updates. Historically, Windows has sometimes behaved in such a way where after applying Windows updates and rebooting, subsequently doing a fresh scan for available updates would sometimes yield more updates to install. So it’s convenient to be able to automate the process whereby you can download and install updates, reboot, wait for the computer to come back online, then download and install updates, reboot, wait, and so on until no more updates are found. With the most recent versions of Windows (10/2019) we have not really seen this behavior occur as frequently as it once did with previous versions of Windows, but it’s still something that can happen, and it’s nice to be able to automate the “lather, rinse, repeat” process in order to save time and effort.

A Few Ways The Job Queue Can Help

Beyond doing an update and reboot cycle, there are many other reasons why one might want or need to be able to execute a series of actions, step by step, on a group of computers. For example, sometimes you might need to run a script or a command that disables a service or stops a process before or after you begin the normal Windows update and reboot process. In other cases you might need to pop a notification to the currently logged-on end user of the target computer before you proceed with any download or installation of updates. Or perhaps you need to install a third party application before or after the Windows update process completes. There are many reasons why using a job queue can be beneficial, so today I’m going to show you how to use it.

What About A Job Queue That Links Multiple Independent Systems Together Into A Larger Sequence?

Note, the BatchPatch Job Queue enables you to create a sequence of actions to run on a target computer or group of target computers. You can create a separate queue for each target, or you can execute the same queue on all targets. There is a lot of flexibility in what you can do, and even if you need to coordinate the actions of multiple different computers, such that one computer (or a group of computers) executes its job queue, and when it completes it triggers another computer (or group of computers) to execute its job queue, and so on… you can do that with the job queue too! However, note that to perform this kind of more complex queue you actually would use the Advanced Multi-Row Queue Sequence, which is a feature that works in conjunction with the standard job queue to effectively link different hosts together into one larger sequence, which can be very powerful for automation of many different tasks so that you can, for example, create a one-click process to execute updates and reboots on machines with interdependencies. And of course in BatchPatch you can also always schedule these job queues or advanced sequences to be executed at a specific datetime if you don’t want to manually launch them.

How To Create And Launch A Job Queue

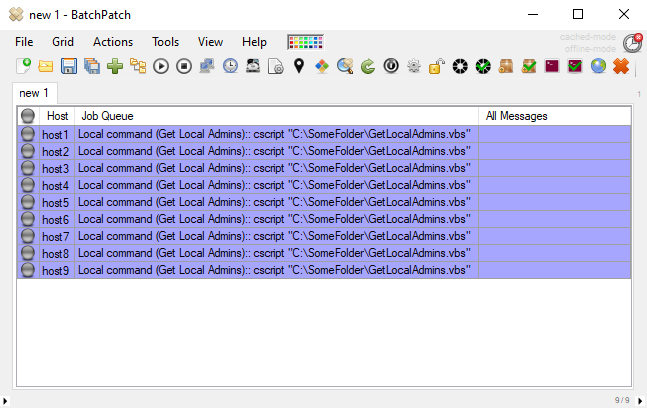
  1. To create a job queue, select the desired rows in the grid, and then click on ‘Actions > Job queue > Create/modify job queue
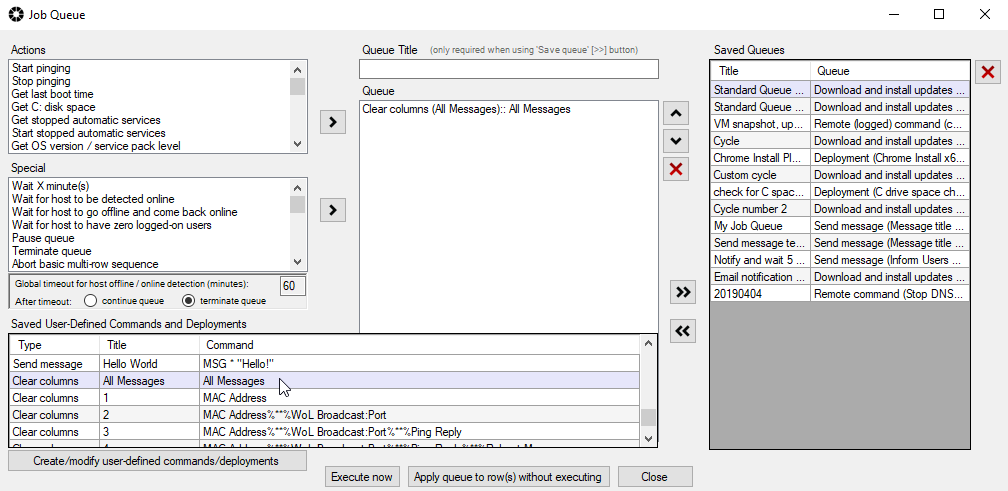
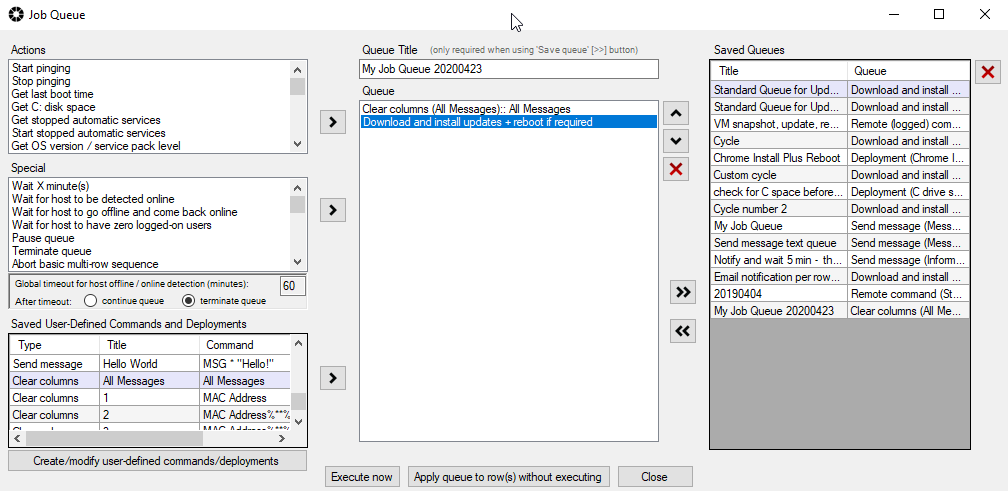
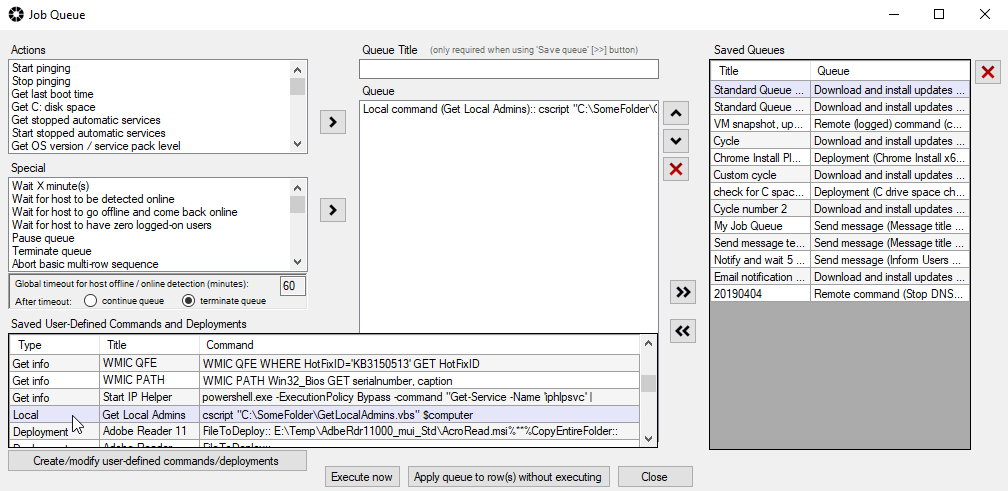
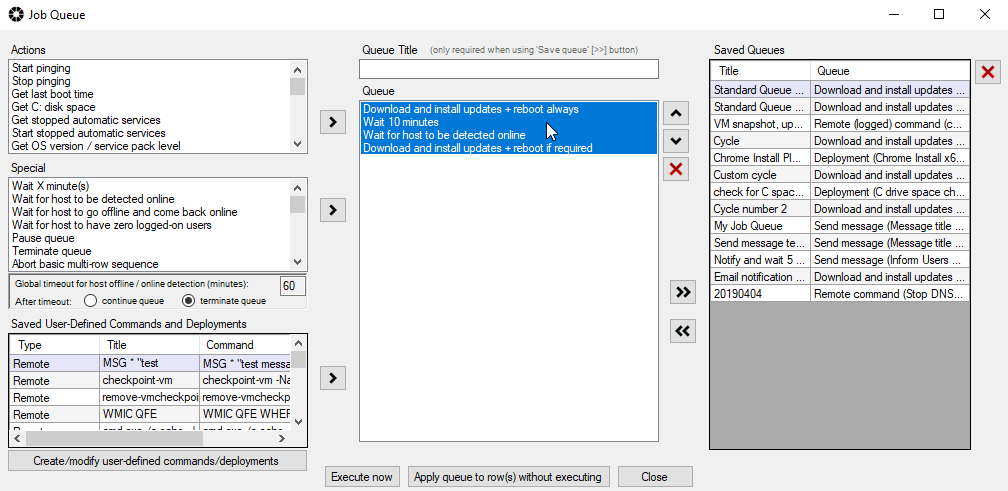
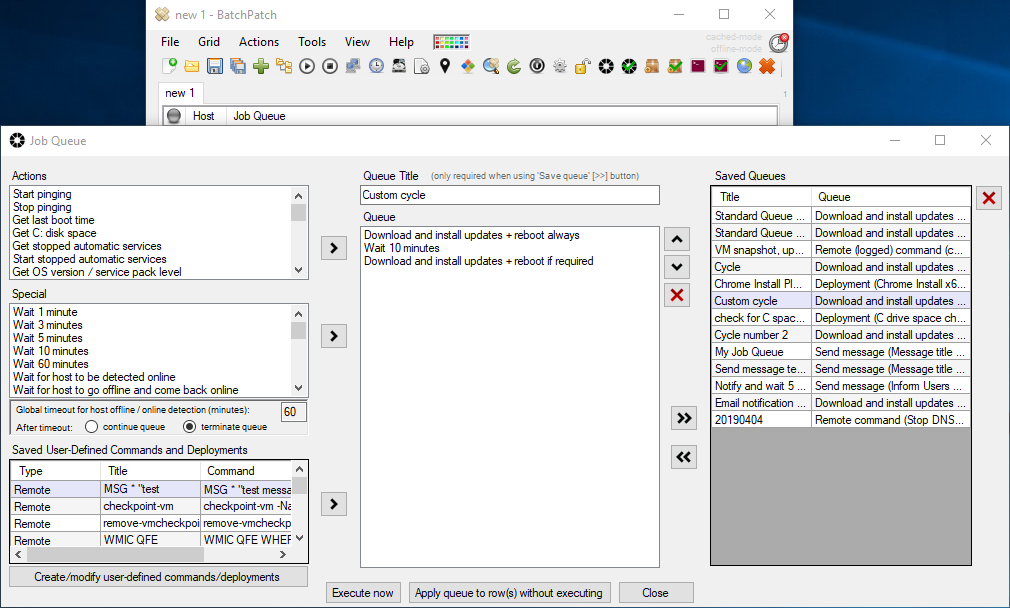
  2. In the Job Queue window, create the desired queue. On the left side of the window you can select from available actions, and then either double-click or use the arrow button to add the selected item to the queue. The lower-left grid contains all of the custom commands, deployments, notifications etc that you have previously created and saved in BatchPatch.
  3. Select ‘Execute now’ to launch the queue on the highlighted hosts in the grid. Or if you want to save the queue to be executed at a later time, simply give it a title and click on the double-right-arrow button to save it. Queues that have been saved can be launched either from the Job Queue window or by simply selecting the saved queue from the Actions menu under ‘Actions > Job Queue > Execute saved job queues‘. Saved queues can also be launched via the Task Scheduler so that you don’t have to be there to kick them off.
Posted in Blog, General, Tutorials | Tagged , , | Comments closed

Notify Users of Upcoming Reboot or other Patching Activity

When a systems administrator is performing a maintenance operation on end-user computers, one of the things that can really help significantly is being able to notify any currently logged-on users of any impending actions that are about to occur. Even if it’s a late-night or early-morning maintenance window, you never really know who might actually be working on the computer at any given time, and even though you likely would have already sent numerous emails during the days/weeks leading up to the maintenance to notify the users of the upcoming maintenance window, inevitably the end-users either disregard these emails in the first place, or they forget about them until it’s too late. They end up finding that their computer is updating and/or rebooting right before their eyes, unexpectedly, while they are working on a very important document.

BatchPatch provides a couple of basic ways to notify logged-on users of impending actions to their computers. Below I’ll show you how to use these to make sure your end-users don’t get surprised when you reboot their machines.

Method 1: Send message to logged-on users

  1. This method actually utilizes the Windows built-in MSG command to send any message to the logged-on users of target computers. The only limitation here is that the message cannot exceed 255 characters. Highlight the target hosts in the grid, then select ‘Actions > Send message to logged-on users > Create/modify messages
  2. In the window that appears (see screenshot above), enter your message text, and optionally if you want the message to automatically close after X seconds, you can tick the appropriate box and specify a value for X. However, for most situations it’s usually best to leave the message on the screen. This way the end user will be more likely to see the message without missing it. When the logged-on user of the target computers sees the message, he/she will be able to close it.
  3. If you want to save the message for repeat usage at a later time/date, or if you want to incorporate the notification into a BatchPatch job queue, so that you can automate a sequence of events that includes an end-user notification, then make sure to fill in the ‘Title’ field, and then click on the double-right-arrow button to save the message for future use.
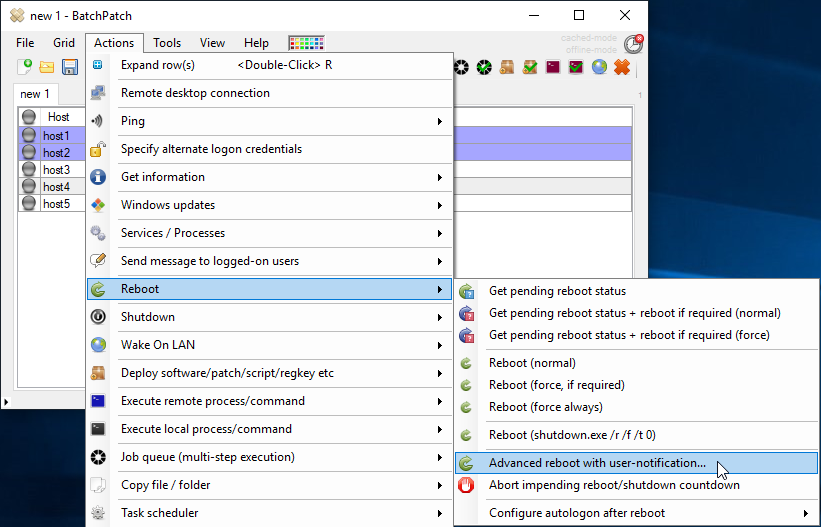
  4. At this point you’re ready to send the message. If you want to send it now, click on ‘Send message now‘. However, if you want to send it later, make sure it has been added to the ‘Saved Messages’ grid on the right, and then close the window. Once you’ve done that you can send the message at any time by selecting it from the Actions menu, as illustrated in the screenshot below.
  5. If you want to add your saved message to a job queue at some point, you can do that by selecting it from the ‘Saved User-Defined Command and Deployments’ grid that appears in the lower-left portion of the job queue window. It will be listed as ‘Type’ ‘Send message’.
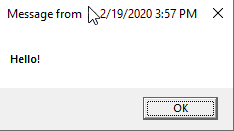
  6. When the message is actually sent, it will appear on the target computer to the logged-on users as shown in the screenshot below.

Method 2: Advanced reboot with user-notification

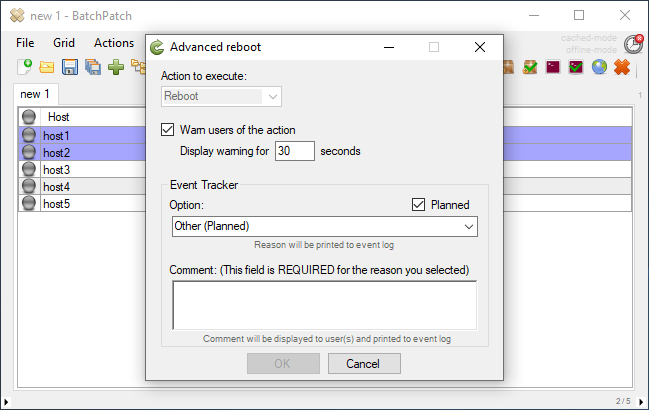
  1. The other option you have for notifying logged-on users is built-in to the ‘Advanced reboot‘ and ‘Advanced shutdown‘ methods in BatchPatch. We’ll just look at the ‘Advanced reboot’ method for the sake of this example. Highlight the target hosts in the grid, and then select ‘Actions > Reboot > Advanced reboot with user-notification
  2. In the window that appears you have the ability to tick a box to ‘Warn users of the action‘. Then you can enter the desired message that you want the users to see in the ‘Comment’ field at the bottom of the window. When you use this operation, the comment will also be printed to the event log on the target computer, so this option for notifying end-users of an impending action might be less favorable in many cases.
  3. After you enter something in the comment field, you’ll be able to click OK to execute the reboot action, which will pop a message to logged-on users of the selected targets computers as well as create an entry in the event log on those computers with that same message/comment text.
Posted in Blog, General, Tutorials | Tagged , | Comments closed

Offline Windows Patching for Isolated or Air-Gapped Networks

Applying Windows security updates to a network that is isolated from or completely air-gapped from the primary network can be a challenge and a pain. At the very least it means that you, the sysadmin, have to devise a patching plan for multiple networks. However, it also means that you need a way to figure out which updates the computers on the isolated network need installed, and you need to figure out how to get those updates to that network. One of the most frustrating parts of this process is that frequently when a network is isolated or completely air-gapped, getting files onto or off of that network brings with it additional bureaucratic, or even political, challenges inside the organization that go beyond any existing technical challenge. If a company has taken the precaution of isolating an entire network of computers, they usually will also have very specific processes in place for change management to prevent unauthorized files from getting onto or being taken from the network in question. If the air-gapped network is housing high security computers or data, which is usually why a network would be air-gapped in the first place, then there will typically be very stringent rules that govern when and how files may be removed from that network or brought onto that network.

Offline Updates / Offline Patching:

BatchPatch provides several different modes of operation. You’ll want to select which mode of operation you use, depending on the configuration and rules in your particular environment. All of the different modes are described at the following link, but for users who will be patching isolated / offline / air-gapped networks, you’re likely going to be looking at scenario 3, scenario 4, and scenario 5

Offline Updates with Scenario 3:
In scenario 3 the isolated network is *not* air-gapped but rather is firewalled carefully such that you can setup BatchPatch on a computer that has internet access as well as access to the isolated network, even though the computers on the isolated network do not otherwise have direct access to the internet. In this scenario WSUS may or may not be involved. Involving WSUS would depend primarily on whether or not you already have one in place or whether or not you want to setup a new one. For most users who are reading this now, you’re probably here because you do not already have WSUS and/or do not want to use WSUS. More details here: Cached Mode and Offline Updates

Offline Updates with Scenario 4:
In scenario 4, the isolated network may or may not be air-gapped, but it assumes that you are not allowed/able to simply setup BatchPatch on an internet-connected computer that also has direct access to the isolated network. However, in this scenario you *are* allowed to remove files from the isolated network, which you can use to your advantage with BatchPatch to figure out which updates BatchPatch needs to download from Microsoft by first doing a BatchPatch scan on the isolated network, and then taking the results list to an internet-connected network. The downloading of updates would occur on the separate internet-connected network. More details here: Cached Mode and Offline Updates

Offline Updates with Scenario 5:
In scenario 5 you’re dealing with the highest level of security, in which you are not even allowed to remove any files from the isolated network, or perhaps too much paperwork is required for it to be a viable option that is easily repeated every single month. In this case you would use BatchPatch on an internet connected computer to download all possible updates that could ever be required by computers on the isolated network. In this way you don’t ever perform a scan on the isolated network, so therefore you don’t have to remove the scan results list. Instead you just go directly to the internet connected network to download all possible updates, and then you bring that entire repository to the offline network. More details here: Cached Mode and Offline Updates

Posted in Blog, General | Tagged , , , , , | Comments closed

Automatically Trigger an Email Notification for an Entire Grid Only After All Targets’ Actions Have Completed

There are different ways to utilize email notifications in BatchPatch. For example this link illustrates how to schedule email notifications or include them inside job queues. Additionally we have a couple of other tutorials on email notifications here and here.

Today I would like to address a particular scenario for triggering email notifications that some BatchPatch users like to use. In this example I’ll demonstrate how you can configure an email notification to be sent that includes the status of the entire grid but is only sent after all of the desired actions for all of the desired hosts are fully complete. In this case we’ll make sure that every row in the grid is configured to complete its actions before the email notification is triggered. This way when you get the email, which will include an HTML representation of the grid, it will include all of the rows’ activities that have completed prior to the email being sent.

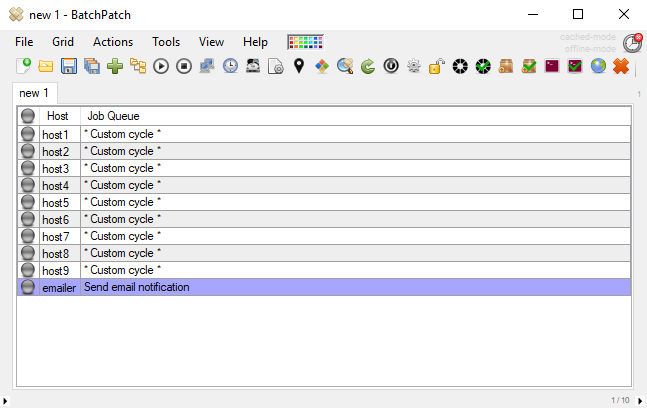
There are essentially two things that we need to do in order to make this work. First, we need to create a job queue for each row/host in the grid. The job queue will contain all of the actions for each host that we want to execute. Second, we’ll configure an advanced multi-row queue sequence to be responsible for making sure the email notification is sent immediately after all of the other rows’ job queues have completed.

  1. The first thing I’ll do is select all of the hosts in the grid, and then click on ‘Actions > Job Queue > Create/modify job queue
  2. In the Job Queue window that appears I will simply create the desired queue that I want each target host to execute, and then I’ll use the ‘Apply queue to row(s)‘ button to apply the job queue to each of the selected rows in the grid *without* executing the queue (execution will come later). Note, there is no requirement to assign the same job queue to each host. In fact, each host can have its own unique job queue, if desired, but in this particular example I have applied the same job queue to each target host simply because I need/want them all to perform the same update download/installation task.

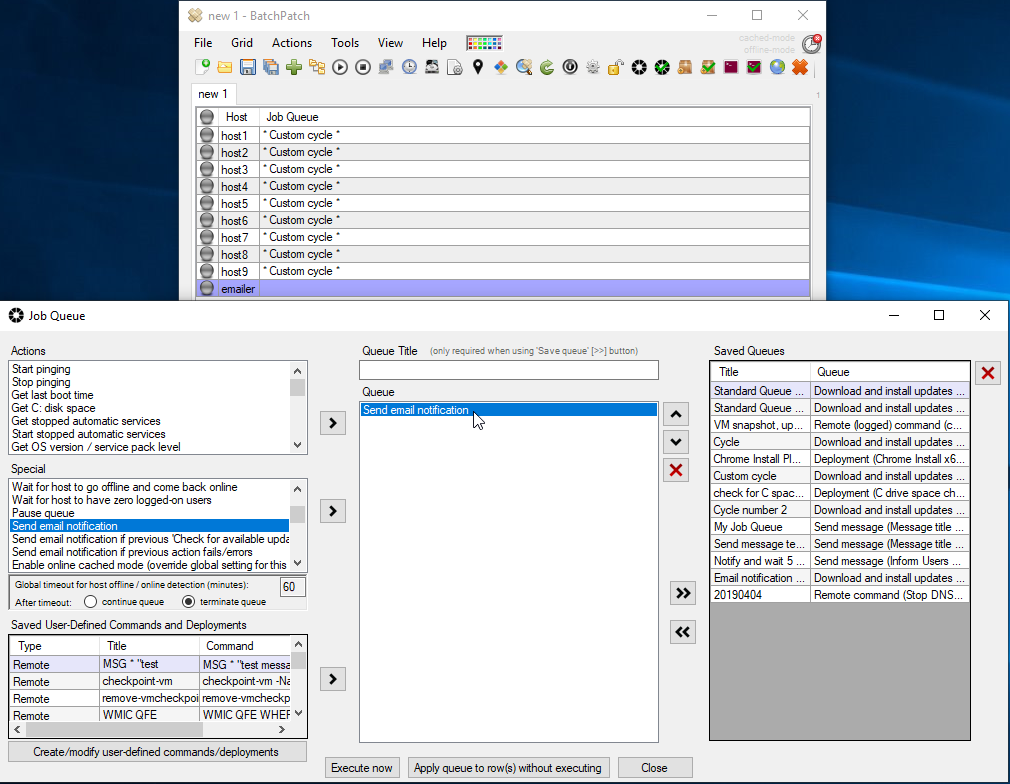
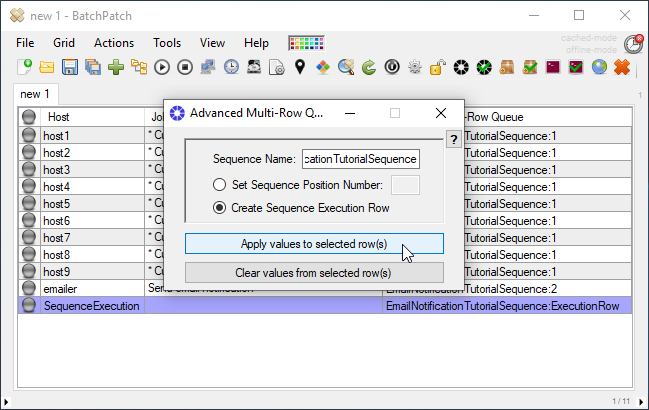
  3. Once the desired job queues have been configured for the selected rows, we can go ahead and setup the advanced multi-row queue sequence. What the sequence will enable us to do is tell BatchPatch to first execute the job queue for all of the target hosts that we choose, and then only after all of those rows have completed their job queues BatchPatch is instructed to send an email notification that includes a HTML representation of the entire grid. You’ll notice that I have a row in the grid called “emailer” that currently has nothing configured. This is the row that we’ll use to actually send the email. I’m going to create a job queue for this row that has only one step, which is to send an email notification.

  4. If you have not previously configured your email notification settings, you’ll need to do that. You can see my settings in the screenshow below. The most important component for the sake of this example is that I have set the HTML attachment content (and the body content) to $grid. This will instruct BatchPatch to include a copy of the entire grid in the email notification. Note, if you have a situation where you need some rows to send email notifications that only include the content of their rows instead of the entire grid contents, you can certainly override the global settings on a per-row basis, if desired. This way you can have the global setting configured for $grid, with particular rows configured for $row, if needed. See ‘Actions > Email notifications > Override‘ if you need to have individual rows configured differently from the global configuration. For this tutorial we have the global setting set to $grid so that our email notification includes the entire grid. If we needed to keep the global setting as $row then we would just override the email notification row’s setting to be $grid.
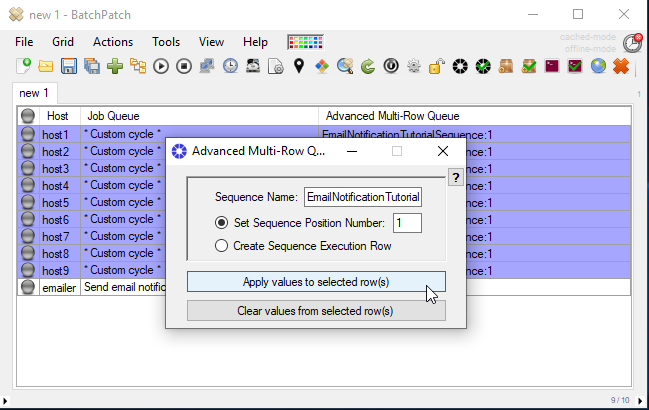
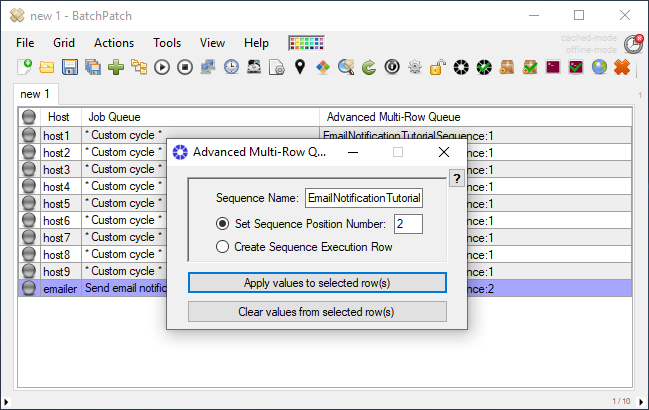
  5. Now we can configure the advanced multi-row queue sequence. Select ‘Actions > Job Queue > Create/modify advanced multi-row queue sequence‘. We use the window that appears to set the ‘Sequence Name’ and ‘Sequence Position Number’ for each row. In this case we want all of the hosts to execute their job queues at the same time in position number 1. When all of position number 1 rows complete, position number 2, the email notification row, will be executed. Select all hosts in the grid and set them to sequence position number 1. Choose a name for the sequence because all of the rows that will participate in the sequence must have the same sequence name. Set the email notification row to position number 2 with the same sequence name as used for the hosts in position number 1.


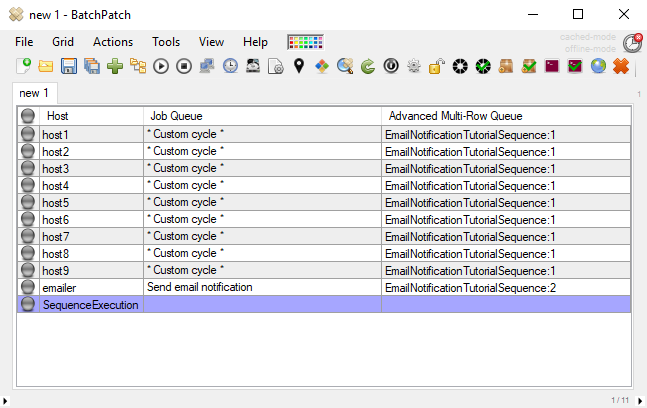
  6. At this point we are nearly done. All of the hosts are set for position 1, and the email notification row is set for position 2. The last thing that we need to do before we can execute the sequence is create a sequence execution row. Add another row to the grid.
  7. In the advanced multi-row queue sequence, set that new row to be the execution row as illustrated in the screenshot below. Make sure to use the same exact sequence name as before.
  8. The last thing to do is simply execute the sequence. You can execute it manually or you can create a scheduled task to launch it on a particular time/day. To execute it manually, highlight the SequenceExecution row that you created in the previous step, and then select ‘Actions > Job Queue > Execute advanced multi-row queue sequence‘. Alternatively, setup a scheduled task on that same SequenceExecution row by selecting the row and choosing ‘Actions > Task Scheduler / Create/modify scheduled task‘. More on scheduled tasks is available here.
Posted in Blog, General, Tutorials | Tagged , | Comments closed

A Utility to Schedule Windows Updates on Numerous Computers

When we first created BatchPatch it was intended to be used primarily as a real-time utility, where an administrator could initiate the download and installation process for Windows Updates on many target computers at the same time, while also being able to monitor the progress of each action on every computer all the way through to completion, including through the reboot process. However, of course there are times when the sysadmin simply cannot be in front of the BatchPatch console at the desired time of execution. For those times we provide the BatchPatch Task Scheduler. As systems administrators we frequently have to patch computers in the middle of the night or in the early morning or over a weekend, and it’s nice to be able to schedule these actions to run at a desired time on a particular day rather than having to actually be sitting in front of the computer while they run.

We always recommend that if you are going to be patching a large number of computers, it’s best to be monitoring the entire process in real-time all the way through to completion. This way if any computers fail to apply updates or perhaps get stuck during reboot or maybe don’t start up all of their services upon reboot, typically you’re going to want to be aware of these issues as quickly as possible so that they can be rectified or otherwise dealt with right away before they turn into big problems. If you’re lying in bed fast asleep while hundreds or thousands of computers are being updated, you’re asking for trouble when you wake up. That said, there are certainly many times where scheduling Windows Updates makes plenty of sense. Whether it’s for a one-off computer here or there in the middle of the night, or if you are doing a large number of non-critical machines, those might be times where a scheduling utility could come in handy. And of course even though we don’t particularly recommend scheduling a lot of computers, especially critical ones, we certainly have many customers who always schedule all of their updates without ever handling the process in real-time. Clearly it’s something that is going to be up to the individual administrator to decide upon, depending on the particulars in his/her environment we well as uptime requirements etc.

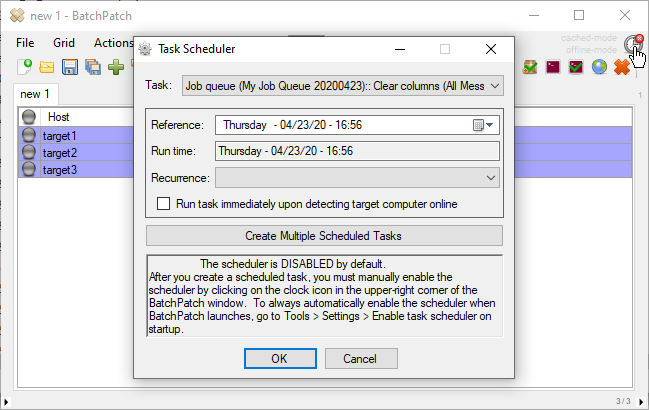
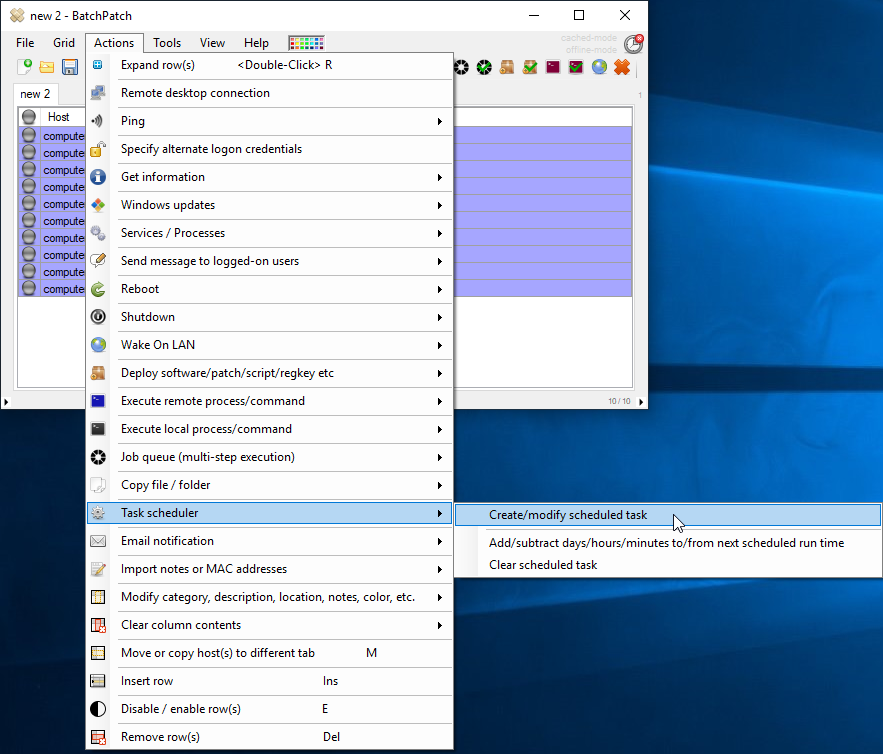
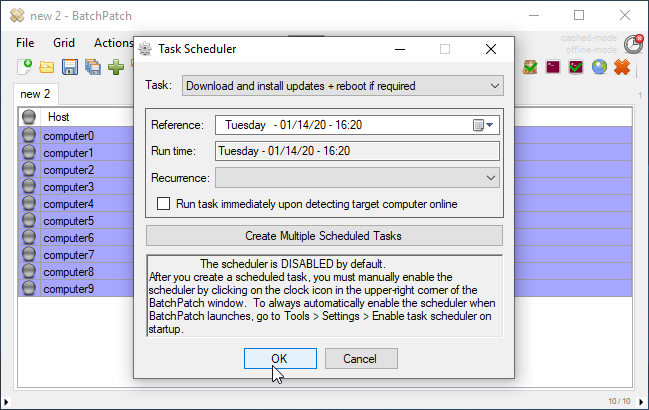
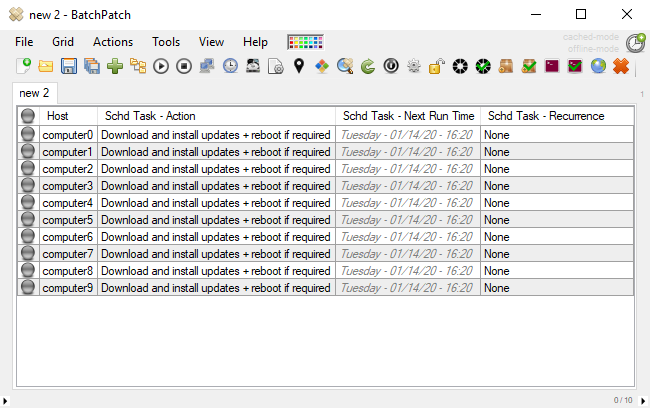
To schedule a group of computers to perform an action (or a set of actions) at a specific time/day, it’s simple. Select the group of computers in the BatchPatch grid, and then click on ‘Actions > Task Scheduler > Create/modify scheduled task‘. The action can be an individual action such as ‘Download and install updates + reboot if required‘ or one of many other possible commands that are built-in or that you have created in BatchPatch, or it can be a BatchPatch Job Queue that you previously created to execute a group of actions, sequentially, on each target computer.

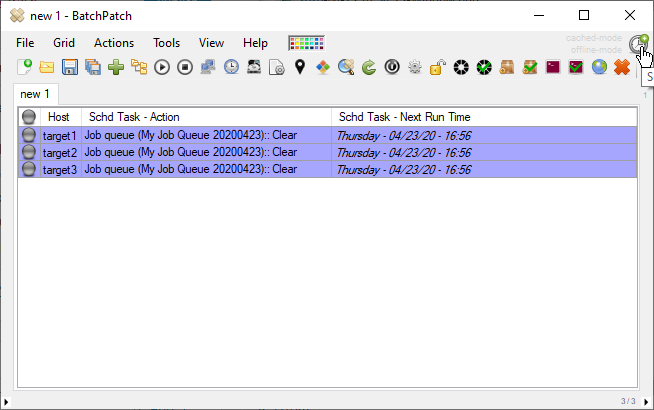
After you have applied the desired task to each row/target, you then just need to enable the task scheduler by clicking on the small red clock/timer icon in the upper right corner of the BatchPatch window. The red changes to green once the scheduler has been enabled.

Posted in Blog, General, Tutorials | Tagged , , | Comments closed

Say Goodbye to Remote Desktop for Patch Management

Sometimes I forget just how many systems administrators are still using Remote Desktop to connect individually and manually to each and every computer on their network via Remote Desktop in order to manually install Windows Updates or third party software applications. The process often goes something like this:

Sample Manual Update Process

::Maintenance window begins

::Sysadmin starts launching remote desktop connections to each computer on the network. You’d think that this would only occur in organizations with very few computers, but you’d be surprised. I know of one guy who would spend an entire week each month connecting to hundreds of target computer via remote desktop just for patch management.

::Sysadmin starts running the desired/needed update commands or GUIs on each remote desktop connection

::Sysadmin then starts pulling out his/her hair as s/he proceeds to switch between all the different remote desktop windows in order to monitor the status of each update session

::As update installations complete on each machine, the sysadmin then begins the reboot process on an individual, as-needed basis

::As soon as the reboot process begins, thus begins the process of launching numerous command prompt cmd.exe windows with ‘ping -t ComputerName’ commands, so that the target computers can be monitored make sure they go offline and then come back online.

It Really Doesn’t Have To Be This Way

For anyone who has ever performed a manual patch management maintenance like this, you know what I’m talking about. For those of you who believe that no one does this or would ever do this, be thankful that you’ve never had to do it. It’s shockingly common not only at very small organizations but even at medium and sometimes even larger ones. One of the reasons this happens at larger organizations is because at some point the organization spent many tens of thousands of dollars on a behemoth patch management solution, but it’s so clunky and such a nightmare to operate that the admins find it more efficient and/or just easier to avoid altogether.

For anyone who is still using Remote Desktop to every target computer for manual patch management, maybe it’s time to re-think your process. BatchPatch is truly one of the easiest applications to setup and use, and it’s also one of the least expensive options you’ll find. It was designed very specifically with the systems administrator in mind, and with the goal of having the app work intuitively and simply. You can just launch the app, add a list of computers, select them and choose your patching action.

Simple, Intuitive, Inexpensive Patch Management, Windows Updates, Software Deployments, and Much More with BatchPatch

We offer a free evaluation version for you to get the software up and running in your environment so that you can figure out if you want to buy licenses or not. If you have any questions, don’t hesitate to reach out.

Posted in Blog, General | Tagged , , , | Comments closed

Deploying Windows Feature Update Version 1909 (the ‘November 2019 Update’) to Numerous Remote Computers Simultaneously

To remotely apply Windows 10 feature update 1909 (as well as the other Windows 10 feature updates) to numerous computers using BatchPatch, you should follow the process outlined below. The built-in, default Windows update features in BatchPatch will not work to successfully deploy these feature updates in most cases, so instead you’ll need to follow the deployment steps outlined below. EDIT: Beginning with the April 2020 release, BatchPatch can now also apply feature updates through the normal Windows Update actions in standard mode (not in cached mode). If using cached mode, then you’ll need to still use the method outlined below. Also note FYI even though these are called “feature updates”, the technical Windows Update classification by the Windows Update Agent (and WSUS etc) is called “upgrades”. The particular name of the update classification is likely not all that important for the sysadmin to pay attention to in many cases, but I did just want to highlight it just so that you are aware.

  1. Download (from Microsoft) the Windows 10 Media Creation Tool. Use this link to download the media creation tool directly from Microsoft. The media creation tool web page contains two options: ‘Update now’ and ‘Download tool now’. Do NOT click on ‘Update now’ because doing so would begin the update process on your computer. Since your goal is to deploy the upgrade to remote computers, instead please click on ‘Download tool now’ to save the tool to your computer. Important: When you run the media creation tool per the next step, you will not have a choice to select which Windows 10 version is used to create the media. This means that if Microsoft releases a new version of Windows 10 when you follow this tutorial, you’ll end up with that version as opposed to the specific version 1909 that is available today at the time of this writing. If you have another channel for obtaining media for a particular Windows 10 version, such as with a Microsoft volume licensing agreement, you may use that instead of obtaining the media through the steps outlined in this tutorial.
  2. Open the Windows 10 Media Creation Tool that you saved to your computer a moment ago. IMPORTANT: It is NOT sufficient to run the tool as administrator from an account that is logged on without admin privileges. For whatever reason, you must actually be logged on to the computer with an account that is a member of the local administrators group. Otherwise the tool will not allow you to run it to completion. We have no idea why Microsoft made the tool work this way, but it’s what they did. So go ahead and log on to your computer as a local administrator, and then launch the tool and follow the rest of this tutorial.
  3. Create installation media with the Windows 10 Media Creation tool. When the tool is running you’ll have to choose between two options to either ‘Upgrade this PC now’ or ‘Create installation media (USB flash drive, DVD, or ISO file) for another PC. Since you are following this tutorial with the intention of learning how to to use BatchPatch to update other PCs, choose the option to ‘Create installation media…’ and then click ‘Next’.
  4. Choose your language / edition / architecture, and then click ‘Next’.
  5. Choose the media type. For the sake of this tutorial please select ISO as the type of media. After clicking the ‘Next’ button you will be prompted to choose a location on your computer to store the ISO file that will be downloaded/created. Select a directory/location to store the file, and then do something else until the download finishes. Depending on your connection speed it could take a little while because it’s in the range of 4GB.
  6. Extract the ISO contents to a location on your local disk. After the download in the previous step is complete you’ll have to locate the file on disk and then extract the contents of the ISO to another folder. I like to use the free 7-zip for this process, but you may use whichever tool you prefer: 7-zip. After the ISO has been extracted you’ll have all of the installation files for the feature update in a single folder.
  7. Configure a deployment in BatchPatch. In BatchPatch click on Actions > Deploy > Create/modify. In the window that pops up for the Deployment configuration, click on the ‘…’ button to browse to the location where your ISO contents have been extracted to, and then choose the ‘setup.exe’ file as the file to deploy. Make sure to check the boxes for ‘Copy entire directoryandLeave entire directory. After the initial deployment phase is complete, the target Windows operating system will end up rebooting itself at least once but usually more than once while it completes the setup and installation for the feature update. As the process runs it needs to have access to all of the files that BatchPatch will deploy. Having both of the aforementioned boxes checked will ensure that when the upgrade process runs on the target computer that it has all of the files it needs for the installation. After the feature update has completed 100% you may delete the files from the target computer(s). However, please make absolutely sure that the upgrade process is 100% completed before you delete any files. In your BatchPatch deployment configuration screen you will also need to add the following parameters:
    /auto upgrade /quiet

  8. Execute the feature upgrade deployment. In the deployment configuration that you created in the in the previous step you can execute the deployment immediately for the currently selected rows in the grid by just clicking on the ‘Execute now’ button. Alternatively you may save the deployment for future usage by clicking the double-right-arrow button ‘>>’. If you choose to save the deployment instead of executing it immediately, then when you are ready to deploy the feature update to your remote computers, you can begin the process by selecting those computers in the BatchPatch grid and then clicking on Actions > Deploy > Execute deployment, and then choose the deployment that you just created/saved.

    You should expect that the entire process will take a bit of time to complete. BatchPatch has to copy the whole installation directory to the target computer(s), which contains several gigabytes, before it can execute the upgrade process on the target(s). IMPORTANT: After the BatchPatch deployment completes for a given target computer BatchPatch will show Exit Code: 0 (SUCCESS). However, this just means that the BatchPatch deployment component is finished. The Windows feature update/upgrade process will take additional time. Please be patient and let the target computer continue upgrading and rebooting as many times as is needed. It might take a little while with multiple automatic reboots before everything is 100% finished.

    NOTE: We have had a couple of reports from users who received the following error:

    Deployment: Error: Access to the path '\\TargetComputer\C$\Program Files\BatchPatch\deployment\autorun.inf' is denied.

    We don’t know the exact cause of this issue, but it seems likely to somehow be related to the way that permissions were applied or inherited during the ISO extraction process. If you encounter this error it can be resolved quickly and easily by just deleting the autorun.inf file from the source directory after extracting the ISO contents but before executing the actual deployment for any target computers. This will prevent the problematic file from ever being copied to target computers. As such, the error will not occur.

Posted in Blog, General, Tutorials | Tagged , , , , , | Comments closed

A Tool to Automate Offline Windows Updates and Patches

A common issue that a lot of organizations face is how to apply various Windows updates and patches to “offline” computers that do not have internet access. Many companies operate high-security (or at least “higher-security”) networks that are segregated from their regular networks. The higher-security networks often do not have any internet connectivity whatsoever. Sometimes these high-security networks are referred to as “air-gapped” because there is no physical network connection between them and online networks that have internet connectivity, hence there is an “air-gap” in between the networks. While this can absolutely help to prevent malicious software from infecting computers on the network, it also increases the difficulty of administering and updating those computers.

BatchPatch Online Default Mode

**Online Windows updates with no caching**
(This mode is recommended for most environments)

BatchPatch’s default operating mode works for target computers that have access to either the internet for Windows Update and Microsoft Update, or to a locally installed/managed WSUS server. In this configuration, BatchPatch instructs target computers to search for and download their own updates from the configured update service (Windows Update, Microsoft Update, or WSUS). You can read more about that here:

Tutorial: BatchPatch Online Default Mode


BatchPatch Partially Offline Cached Mode

**Offline Windows updates with caching**
(The mode is recommended for restricted environments where target computers do *not* have access to the internet or a local WSUS but *do* have network access to an internet-connected computer running BatchPatch)

In this configuration, even though target computers do not have internet access and do not have a direct connection to a local WSUS server, they do have a direct connection to the computer where BatchPatch is installed/running, and that BatchPatch computer is connected to the internet. In this case the BatchPatch computer is then able to instruct target computers to perform an offline search for applicable/available updates. BatchPatch is then able to use the internet connection on its computer to downloads all of the updates needed by the offline target computers so that it can subsequently distribute them to target computers and initiate the installation process and reboots etc.

Tutorial: BatchPatch Partially Offline Cached Mode


BatchPatch Completely Offline Cached Mode for Lower-Security Networks

**Offline Windows updates with caching**
(The mode is recommended for restricted environments where target computers are on an air-gapped/offline network that does not have connectivity to the internet and does not even have connectivity to the computer where BatchPatch is installed and running. In this situation, the administrator needs to manually copy a text file from the segregated network to an internet-connected computer via an external hard drive or USB flash drive or similar)

In this setup, since target hosts do not have direct access to Windows Update and Microsoft Update via an internet connection, and they also do not have direct network connectivity to an internet-connected computer running BatchPatch, all updating occurs in a completely offline fashion. In this configuration, the search for available updates is performed offline, and then the list of available/needed updates is manually moved to an internet-connected computer running BatchPatch where the updates are downloaded. The entire update cache is then manually moved to the segregated/offline network where BatchPatch is used to distribute them to target computers.

Tutorial: BatchPatch Completely Offline Cached Mode for Lower-Security Networks


BatchPatch Completely Offline Cached Mode for High-Security Networks

**Offline Windows updates with caching**
(The mode is recommended for the most restricted environments where target computers are on a completely segregated, offline network, without access to the internet and without network access to an internet-connected computer running BatchPatch. In this case, the strict rules created to maintain the highest security of the air-gapped network disallow any files from ever being transferred from the high-security offline network to another network. When applying updates with this method, files will only ever be transferred *to* the high-security offline network, but files will never need to be removed *from* the high security offline network)

In this configuration, since target computers do not have internet access and also do not have access to an internet-connected computer running BatchPatch, all updating occurs 100% offline. In this configuration, an internet-connected BatchPatch computer is used to pre-download all Windows updates to its local cache. The administrator then copies/moves the entire BatchPatch cache of updates to the completely offline network where BatchPatch is able to distribute the updates to all the target computers even though they do not have internet or WSUS access.

Tutorial: BatchPatch Completely Offline Cached Mode for High-Security Networks

Posted in Blog, General | Tagged , , , , | Comments closed

Using BatchPatch in Non-Domain Environments with Standalone or Workgroup Computers

One of the questions we are asked regularly is can BatchPatch work on computers that are *not* domain members? How does one go about making that happen?

The answer is yes, in addition to working in a domain environment BatchPatch will also work on computers that are not members of a domain but rather are either standalone computers or computers assigned to a workgroup. However, you will most likely have to make a configuration change on your target computers in order for everything to work properly. That change is described toward the bottom of this page under the Third heading.

First:

Make sure that the account that you are using to connect to target computers is a member of the local administrators group on each of the target computers.

Second:

Decide how you will execute BatchPatch in the security context of the local administrator user that you previously defined on all target computers. You have three options here:

Option A:
Create the exact same account on the computer where you are running BatchPatch that you have already created on the target computers. The username and password of this account must be identical on the BatchPatch computer and the target computers. However, while the target computers’ user account must be a member of the local administrators group on the target computers, the user account created on the BatchPatch computer does *not* need to be a member of the local administrators group on the BatchPatch computer for most operations in BatchPatch to function properly. You certainly may add it to the local admins group if desired, but it’s not an absolute requirement since BatchPatch will generally work properly when run as a standard user for almost all of its operations. The operations that require elevation will inform you if you try to use them and they need more permission.

With the exact same account created on the BatchPatch computer as on the target computers, you may then simply log on to the BatchPatch computer as that user, and then launch BatchPatch normally by double-clicking the .exe. Since the entire BatchPatch application will now be running in the context of this user, all actions in BatchPatch will automatically have the appropriate permissions on the target computers. BUT… don’t forget to review the Third heading below in order to get everything working properly. The information provided there is necessary to get everything working in the large majority of cases.

Option B:
Just as in option A, on the BatchPatch computer you have to create the same exact user account with the same exact username and password that you previously created on the target computers. However, instead of logging on to the BatchPatch computer with that username/password, you could log on to the BatchPatch computer as a different user. Then when you launch BatchPatch, right-click on the batchpatch.exe and choose the option to “run-as” a different user. The different user that you choose to run BatchPatch would have to then be the user account that you previously created… the same one that exists in the local administrators group on all target computers.

Option C:
Launch BatchPatch with any user account on the BatchPatch computer, and then inside of BatchPatch enter alternate credentials for each row that you have added to the BatchPatch grid. To do this, select the rows and click Actions > Specify alternate logon credentials. The account that you specify here must be the account that you previously created on the target computers that is also a member of the local administrators group on the target computers.

Third:

After BatchPatch is running, you’ll find that if you try to perform an action on target computers, in most cases you will still see an error message or exception similar to the following:

Access is denied. (Exception from HRESULT: 0x80070005 (E_ACCESSDENIED))

Whether or not you see this error message will generally depend on which operating system version is running on the target computer as well as which particular action was executed in BatchPatch.

In order to resolve the ‘Access is denied’ exception, there is a registry value that needs to be created/modified on all target computers where this exception occurs. Instructions for the registry change is described toward the bottom of this page under the section Additional BatchPatch Authentication Details: BatchPatch Authentication in Domain and Workgroup (non-domain) Environments

Posted in Blog, General, Tutorials | Comments closed