

Let’s face it… even though we all wish Microsoft’s quality assurance and testing was better, it really seems to have gotten worse in recent years… significantly worse. There are a few primary ways that systems administrators can reduce the likelihood of encountering problems after installing Windows updates each month. First, have a testing lab setup with machines that largely resemble production computers, so that updates can be deployed into the testing environment before they are deployed to the production environment. If the testing environment’s computers are actually prepared with similar applications and services as production computers, then there is a good chance that the testing environment will reveal any major issues with Windows updates *before* those updates are ever deployed to production machines. However, it’s often difficult or even impossible to accurately configure testing servers to resemble the production servers closely enough to guarantee that update issues will be discovered in testing before they are deployed to production, so this isn’t the only step that should be taken. We also recommend designating certain production machines to be the first to receive updates, so that if any problems are identified, they can be addressed before deploying the same updates to an entire production network. Additionally, we think it’s important in most cases to *not* install updates within the first few days of their release. We believe that most organizations should be waiting at least a week after Patch Tuesday before they deploy new updates to production systems. This gives the rest of the world a chance to test the updates and report any problems, so that you can then decide if you need to postpone a maintenance window until Microsoft re-issues a fixed version of the update, or to perhaps do additional testing in your environment to confirm whether or not you might be affected by any problems that have been reported with the updates. However, while we do think that waiting a week or so is a great idea for most organizations, you shouldn’t wait too long, especially in cases where the updates to be installed are fixing critical issues that are actively being exploited in the wild. A balance will need to be struck, depending on the details, setup, and requirements of each particular environment, so that updates can be installed soon enough to protect computers while also waiting long enough to minimize any potential problems that might be encountered by installing a problematic update.
What happens if you install an update that is causing problems on your computers?
It’s going to depend on the nature of the problem, of course, because if the update is so destructive that computers won’t even boot, then you’re obviously going to have to manually address each affected computer in order to resolve the problems. However, in most cases when a problematic update has been deployed, simply uninstalling it is sufficient to make the problem go away until a fixed version of the update is published by Microsoft. If you find yourself in a situation where you need to remove a Windows update that you previously installed on numerous computers, you can use BatchPatch to execute the removal/uninstallation process.
Using BatchPatch to Execute the Update Removal/Uninstallation Command
First, note that there are two different commands built-in to BatchPatch for removing Windows updates. You’ll need to execute the command that corresponds to the particular operating system that you will be removing the update from. In BatchPatch you can see the two different menu items in the screenshot below:
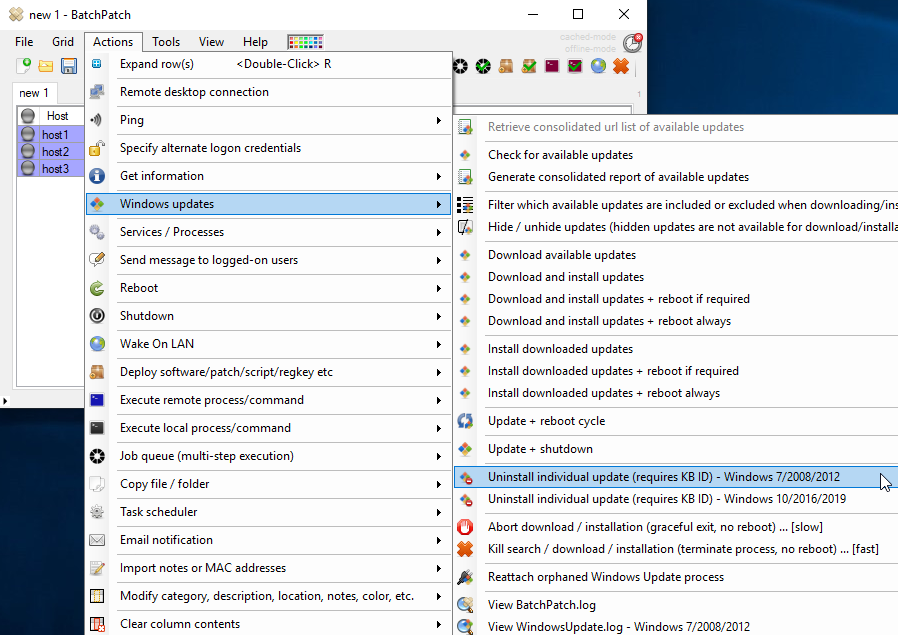
- Highlight the rows in the grid for the computers that have the update installed that you want or need to remove/uninstall.
- Click on the relevant menu item, depending on which OS is installed on your target computers… either ‘Actions > Windows updates > Uninstall individual update (requires KB ID) – Windows 7/2008/2012‘ or ‘Actions > Windows updates > Uninstall individual update (requires KB ID) – Windows 10/2016/2019‘
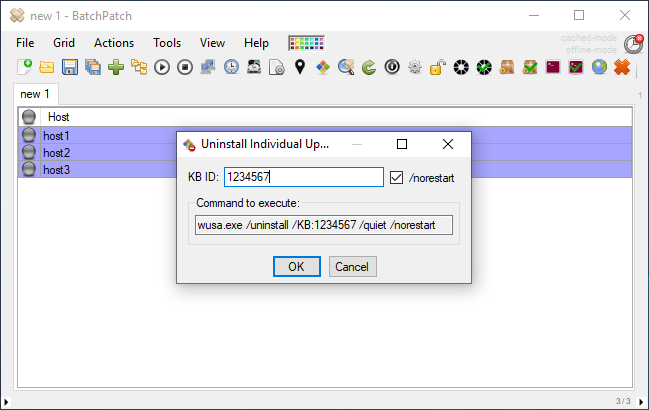
- Enter the KB ID of the update that you want to remove, and tick or untick the ‘/norestart’ option, depending on whether you want the command to prevent the update process from rebooting the computer or not. If the computer needs to be rebooted in order to complete the update removal, and if you tick the ‘/norestart’ option, you’ll need to execute the reboot separately in order for the update removal process to be completed. We generally prefer to check ‘/norestart’ and then separately initiate the reboot in BatchPatch. In this way BatchPatch can monitor the reboot through its normal process. If the removal command itself performs the reboot (this happens if /norestart is un-ticked and the update removal process requires a reboot), BatchPatch won’t monitor it. Note, the command to execute is different, depending on which menu item you selected in the previous step. The screenshots below show the difference:
wusa.exe /uninstall /KB:1234567 /quiet /norestart
cmd.exe /c echo . | powershell.exe -ExecutionPolicy Bypass -command "$SearchUpdates = dism /online /get-packages | findstr 'Package_for'; $updates = $SearchUpdates.replace('Package Identity : ', '') | findstr 'KB1234567'; DISM.exe /Online /Remove-Package /PackageName:$updates /quiet /norestart"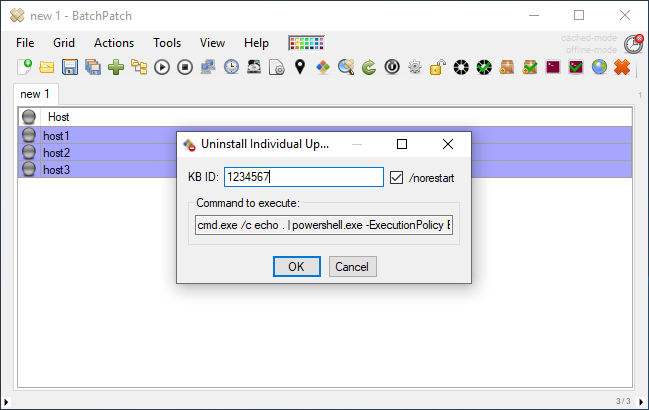
- Lastly, click OK to execute the process.