Using BatchPatch in ‘Cached Mode’

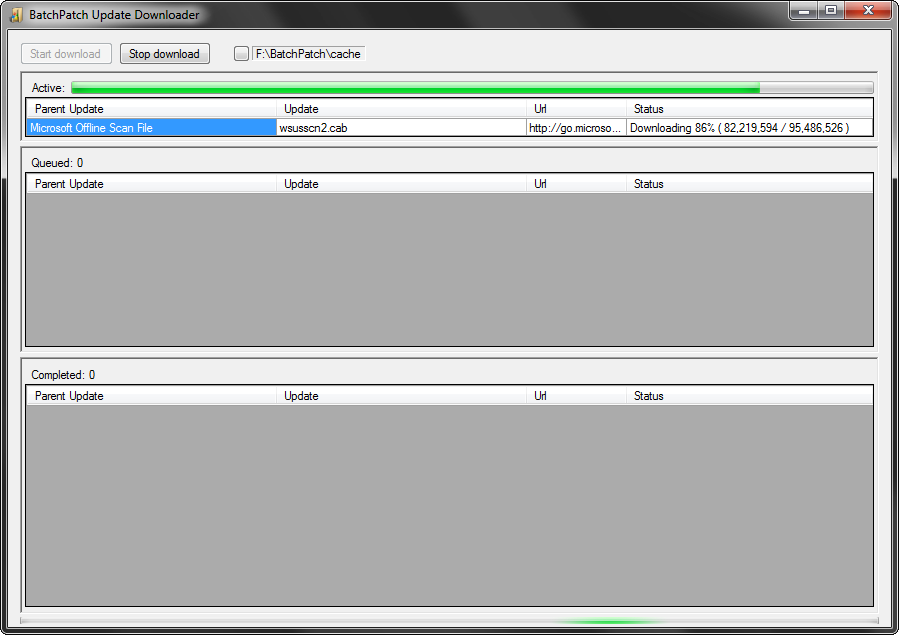
When cached mode is enabled, the computer that is running BatchPatch will download updates for all target computers directly to its local cache directory. Target computers will not individually download their own updates from Microsoft or a WSUS. Instead BatchPatch will distribute updates to target computers from its cache. The advantage of cached mode in this case is that it can save internet bandwidth if updates are being downloaded from Microsoft’s public server. The reason for the bandwidth savings is because BatchPatch will download only one copy of each update, which it can then distribute infinitely to target computers, rather than needing every single target computer to download its own copy of each available update.

Cached mode can also be used in conjunction with offline mode, which enables an administrator to apply Windows Updates to computers that don’t have internet access or access to a managed update server such as WSUS. For more on ‘cached mode’ and ‘offline mode’ usage, please see: Cached Mode and Offline Updates

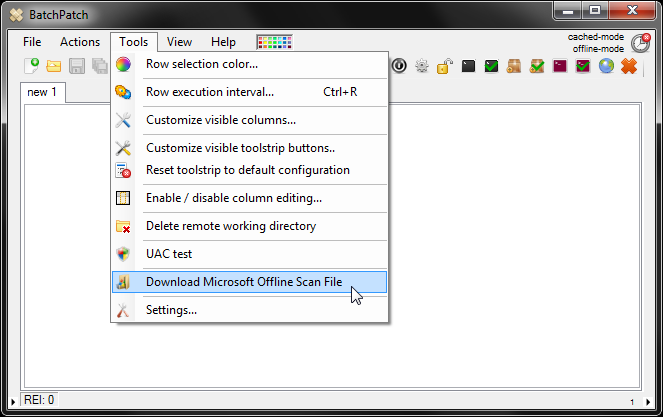
This tutorial demonstrates how to use BatchPatch in cached mode to download and install updates on multiple computers. In this example all computers are required to have internet access. The computer that runs BatchPatch will instruct all target computers to perform an online search for updates. The list of available updates from each target computer is transferred back to the BatchPatch computer, and then BatchPatch downloads a single copy of all available updates to its local repository. After it downloads the updates, it copies them to the target computers and initiates the installation process.

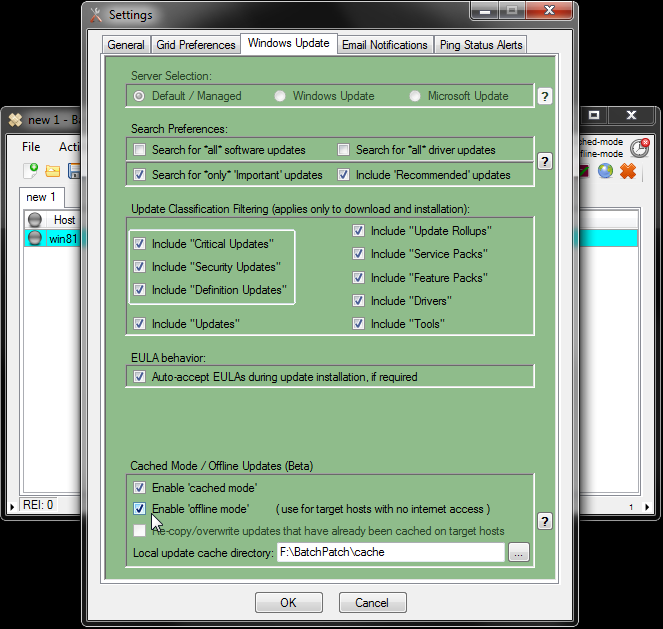
  1. Enable cached mode. Go to Tools > Settings > Windows Update, and then check the box to enable cached mode. Also set the Local update cache directory to a folder on your computer that has enough free space to store numerous Windows Update files. The amount of space required completely depends on how many updates need to be applied to target computers, the size of each update, the number of different operating systems you are deploying to, and whether or not you choose to retain cached files after they have been distributed to target computers. When cached mode has been enabled, an indicator is placed in the upper-right corner of the BatchPatch window.
    BatchPatchToolsSettingsWindowsUpdateCachedMode
  2. In the same Tools > Settings > Windows Update window, also take note of the Server Selection option. When cached mode is enabled but offline mode is disabled, target hosts will perform an online search for updates against the selected server. The target hosts will then report back to BatchPatch with their lists of available updates. BatchPatch will then download the updates from the same location that is configured in the Server Selection setting.
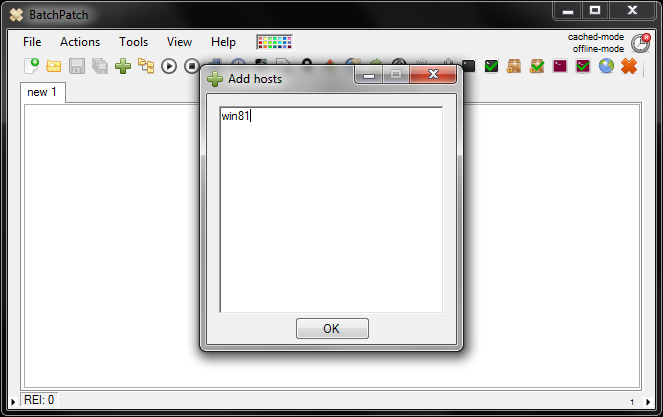
  3. Add hosts to the BatchPatch grid using File > Add hosts…
    BatchPatchAddHostsCachedMode
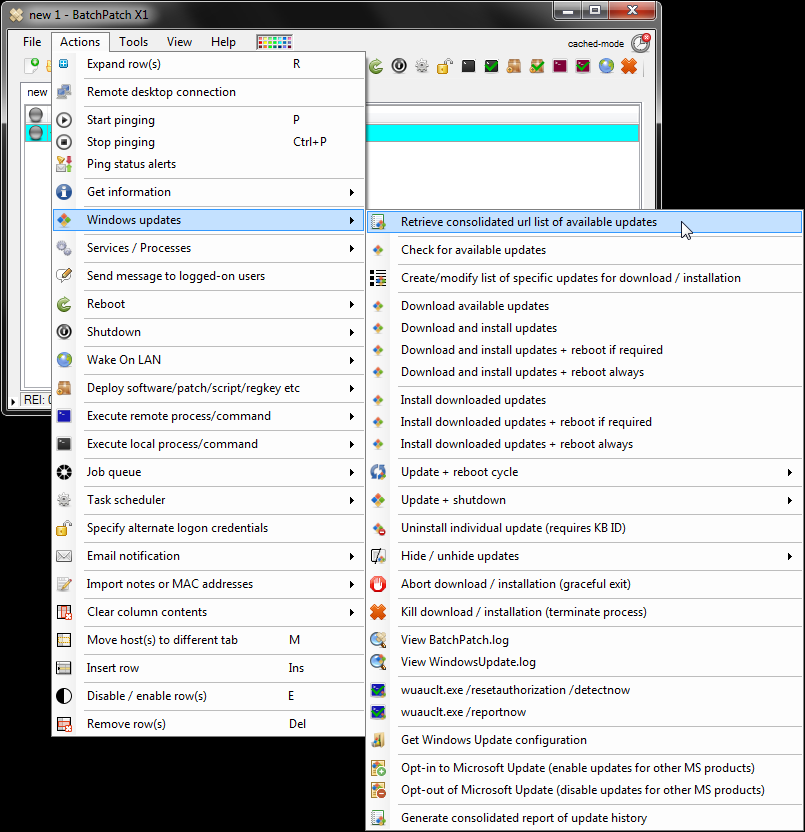
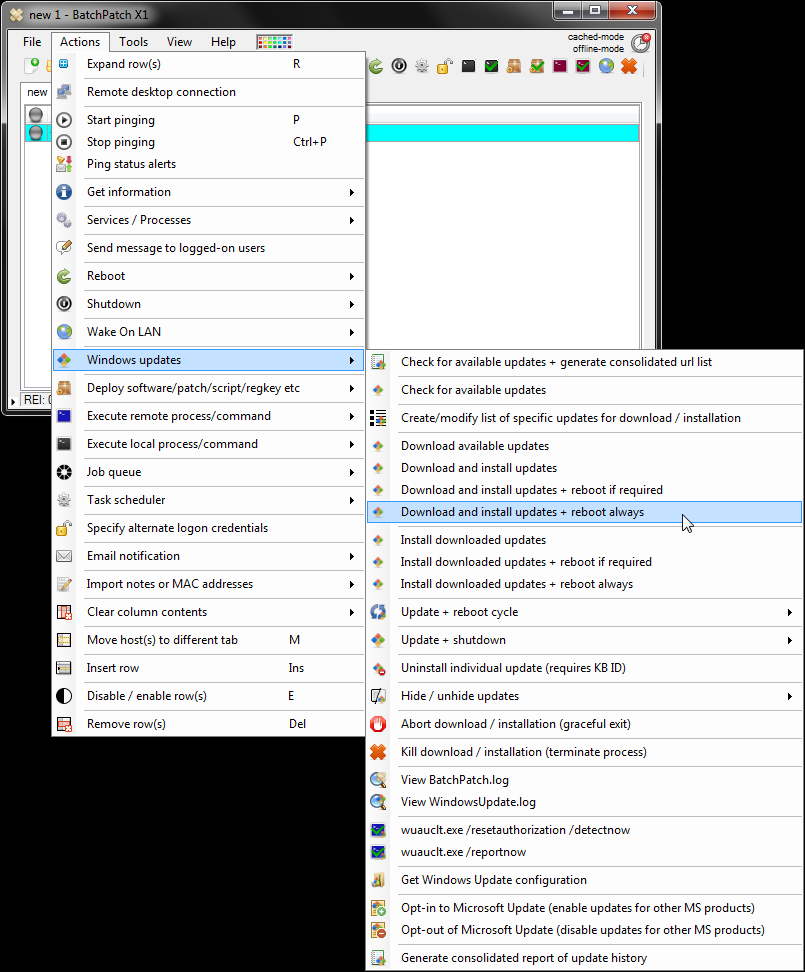
  4. Highlight the host(s) and select the desired action. For the sake of this example let’s assume we want to download and install updates and then reboot the target if a reboot is required to complete the updates installation. So, we select Actions > Windows Updates > Download and install updates + reboot if required
    BatchPatchDownloadAndInstallUpdatesCachedModeMenuItem
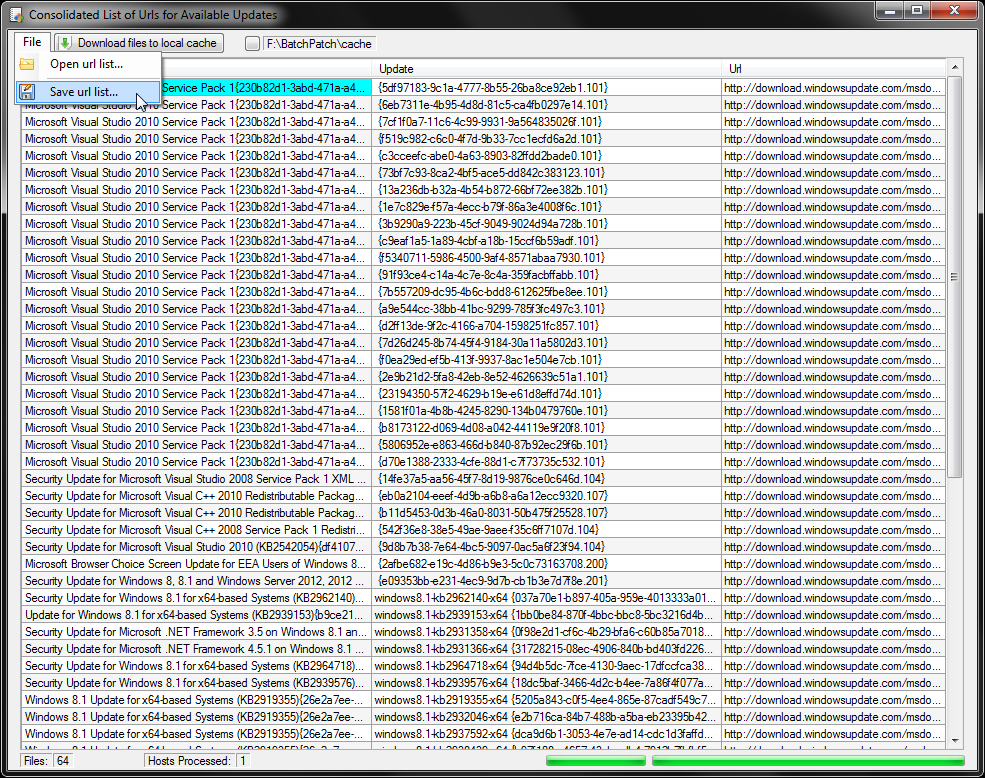
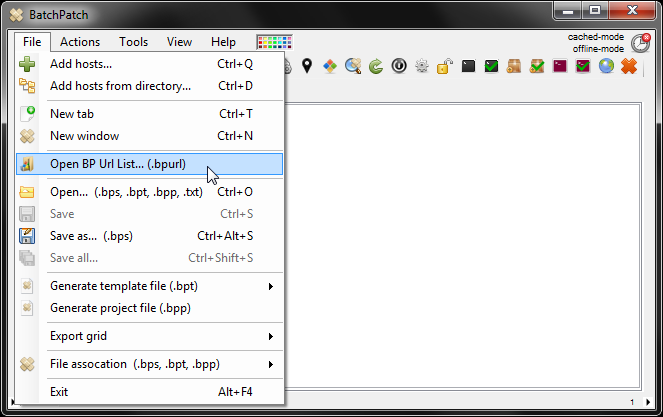
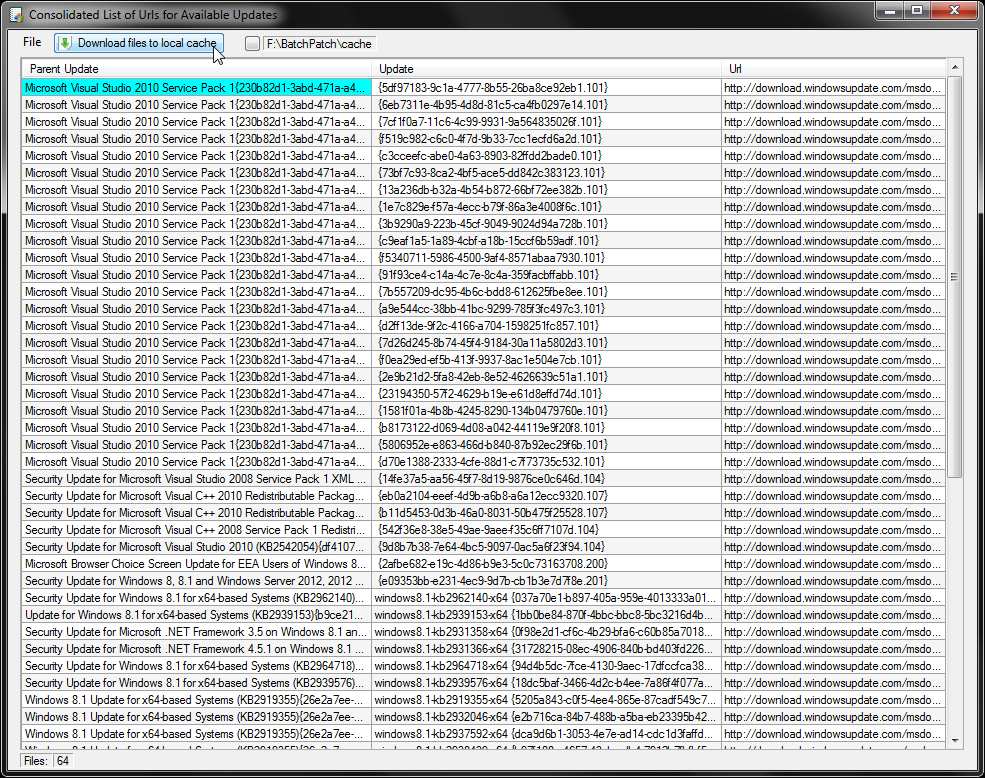
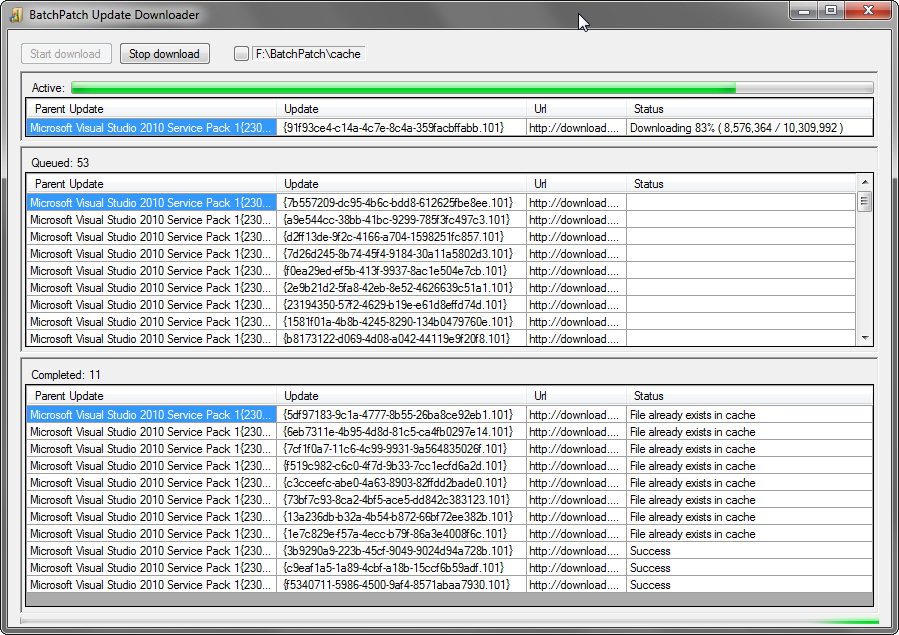
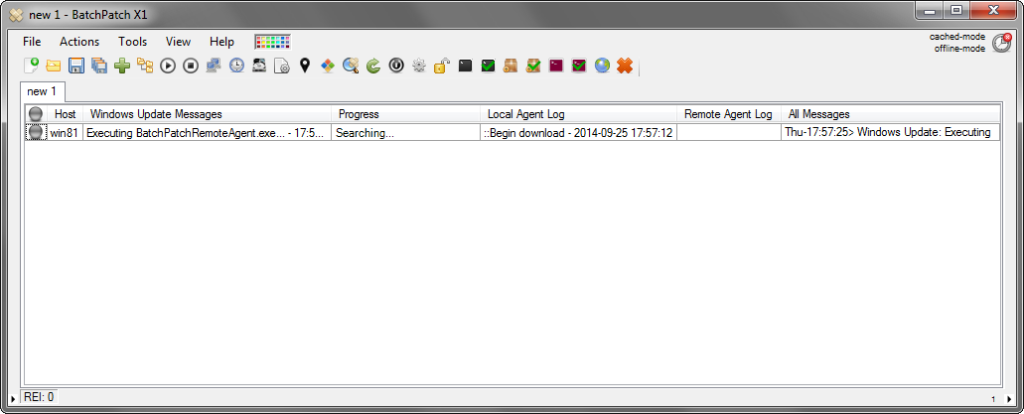
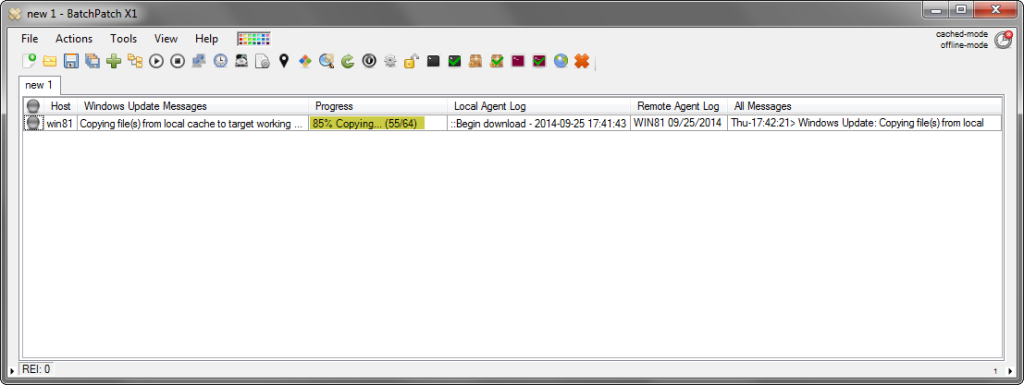
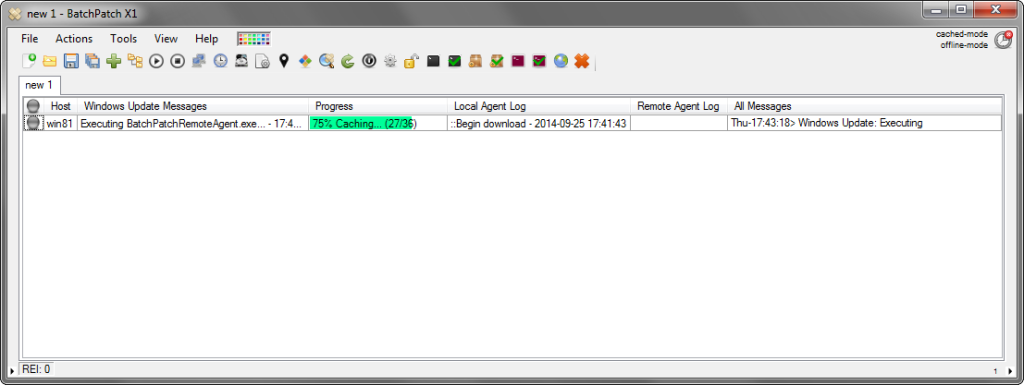
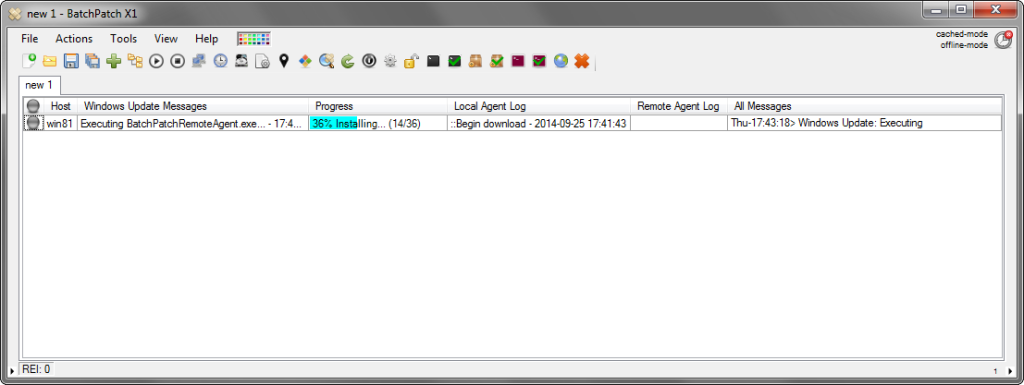
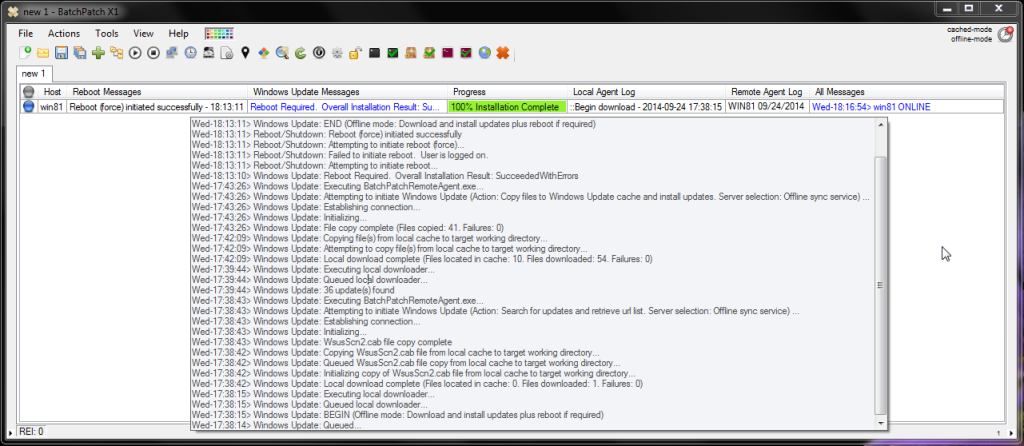
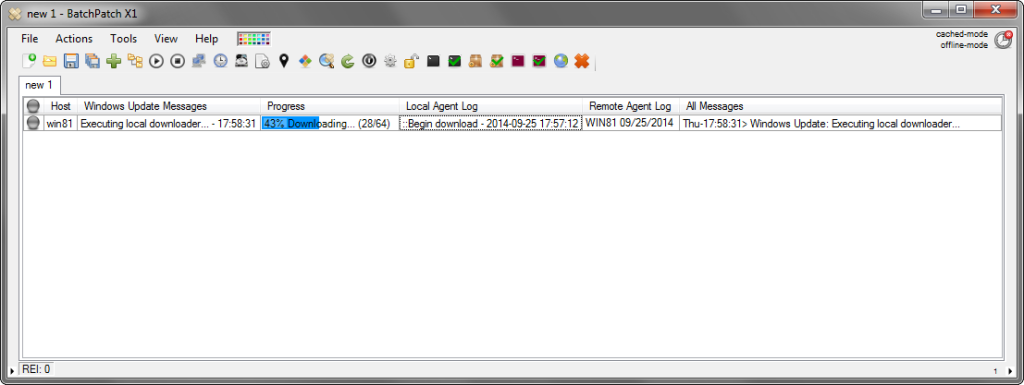
  5. I have included a series of screenshots below to show the whole process. Upon completion we have the overall content logged to the ‘All Messages’ column, with detailed information in the ‘Local Agent’ and ‘Remote Agent’ logs. In this case the local agent was responsible for downloading updates to the cache directory and then copying the updates to the target machine. The remote agent was responsible for moving the updates into the Windows Update cache and then installing the updates on the target host. In the final screenshot below we can see the ‘All Messages’ log content. I have not included screenshots of the other local or remote agent logs simply because they are too large to view in a meaningful way within a small screenshot.
    BatchPatchCachedModeSearching
    BatchPatchCachedModeDownloading
    BatchPatchCachedModeCopying
    BatchPatchCachedModeCaching
    BatchPatchCachedModeInstalling
    BatchPatchCachedModeDownloadInstallRebootAllMessagesLog
Posted in Blog, General, Tutorials | Tagged , , , , | Comments closed

Using BatchPatch To Remotely Install Windows Updates

This tutorial illustrates how to use BatchPatch in its default configuration to remotely install Windows Updates on your computers. If you prefer a video tutorial, please check out this link: Remotely Installing Windows Updates – Video Tutorial.

Please review the Getting Started page as well as the Authentication Details page to get acquainted with the prerequisites for BatchPatch to work smoothly in your environment.

  1. Examine and optionally modify the Windows Update settings in BatchPatch. Go to Tools > Settings > Windows Update. In the Server Selection field, select the location you want target computers to search for updates. Selecting Default / Managed will instruct target computers to search for updates in whatever location they are already configured to search. This can be your local WSUS server or Microsoft’s public update server. If you instead select Windows Update or Microsoft Update, target computers will ignore/bypass their own configurations and instead search Windows Update or Microsoft Update. Windows Update includes only operating system updates. Microsoft Update includes operating system updates plus updates for other Microsoft applications. Note, before you can use Microsoft Update you must opt-in to the service. Use Actions > Windows Update > Opt-in…, which is equivalent to manually launching the Windows Update GUI on each target computer and opting-in to the Microsoft Update service.
    BatchPatchWindowsUpdateSettings
  2. Add hosts to the BatchPatch grid using File > Add hosts…
    BatchPatchAddHosts
  3. Highlight the host(s) and select the desired action. For the sake of this example let’s assume we want to download and install updates and then reboot the target if a reboot is required to complete the updates installation. So, we select Actions > Windows Updates > Download and install updates + reboot if required
    BatchPatchWindowsUpdateActionMenuItem
Posted in Blog, General, Tutorials | Tagged , , , | Comments closed

BatchPatch New Build – 20140908

Hey guys/gals – I just wanted to inform you of the new build we posted last week. There were a number of minor bug fixes, updates to logging and error reporting, plus a few functionality enhancements. Also, note that in the next month or so we will be publishing another release with a much more significant addition that we’re really excited about. Stay tuned for more on that. In the meantime, please see below for a description of the additions in the currently published build.

New ‘Tools > Settings > Windows Update’ server selection options: Default, Windows Update, and Microsoft Update

Previously if you wanted to bypass your default/managed WSUS server to search for updates directly on Microsoft’s public server, you couldn’t specify whether you wanted to use Windows Update or Microsoft Update. However, now we’ve given you the option to use any of the 3 search locations. Note that ‘Windows Update’ includes only updates for Windows operating systems. ‘Microsoft Update’ not only includes updates for Windows operating systems but also includes updates for other non-OS Microsoft products/applications. The ‘Default/Managed’ option will tell BatchPatch to use the target computer’s existing configuration to determine where to search for updates. This means that if the target machine is configured via GPO or manually configured to search for updates on a WSUS server, then that is what will be used. Or if the target machine is configured to use ‘Windows Update,’ then that is what BatchPatch will use. We know that quite a few of you will be pleased with this addition. Note that in order to use Microsoft Update you must first “opt-in” to the Microsoft Update service. You can do this using Actions > Windows Updates > Opt-in.
Settings-WindowsUpdateOptions

New option to Restart service by name

This action is available under Actions > Services/processes. This means you no longer have to execute ‘Stop service’ followed by ‘Start service.’ Now you can simply execute ‘Restart service.’
RestartServiceActionsMenuItem

Improved logging and error reporting

We are continuing to improve the logging and error reporting to be easier to digest and more explicative.

Bug fixes and other minor updates

We’ve fixed numerous other bugs, and there are a number of other minor updates included in this release. Many of the updates will enable us to better provide upcoming functionality. We have some exciting stuff in the works for the next release, so stay tuned.

Posted in Blog, General | Tagged , , , , , | Comments closed

Remote Script Deployment – Install Multiple .MSU Files in a Single Action on Remote Computers

One of the common questions we receive is “How does one go about deploying and installing multiple updates to offline computers?” If you’re looking for a way to apply Windows Updates to detached network environments or to environments that don’t have access to a WSUS or the internet, take a look at BatchPatch’s Cached Mode and Offline Update features. While it will address the bulk of requirements that most users have for deploying Windows Updates to computers that do not have access to the internet or a WSUS server, there is still an open question of how does one go about deploying multiple .MSU files to a computer without having to do a separate BatchPatch deployment for each .MSU file.


  1. Prepare the script. In this example we are going to install 5 .MSU files in succession, with a single script that will be deployed with BatchPatch. I’ve already downloaded the 5 .MSU files from Microsoft. They are stored in a folder on my computer called “5_MSU_Files.” Additionally, I’ve created a batch file called “Install_Multiple_MSU_Files.cmd” which is included in the same directory. Note the directory contents and the script contents below:
    Install_Multiple_MSU_Files_Batch
    MSU_Files_In_A_Folder
  2. Prepare the deployment. Select Actions > Deploy software/patch/script/regkey etc > Create/modify deployment. Note that after we select the Install_Multiple_MSU_Files.cmd in the first field, we also check the box to “Copy entire directory contents in addition to the specified file.”
    Deploy_Multiple_MSU_Files
  3. Execute the deployment. When we click the ‘Execute’ button, BatchPatch will copy the script file along with the 5 .MSU files to the target computer’s working directory. BatchPatch will then remotely execute the script, which will install the 5 update files sequentially.
    Deployment_exit_code_0
  4. That’s all there is to it. As you can see, the process is actually pretty simple. Now of course when we installed these updates we used the /norestart option, so now that the script completed, we will want to finalize the installation by rebooting the target machine. We can do this using the Actions > Reboot option in BatchPatch.

Posted in Blog, General, Tutorials | Tagged , | Comments closed

Remotely Uninstall Windows Updates From Multiple Computers

Over the past couple of weeks there’s been a lot of press about problematic Windows Updates causing stability issues for many users. As such, Microsoft recommends that users uninstall the offending updates. We think it’s a good idea for all users to remove these updates even if they haven’t experienced any specific issues that many users encountered as a result of installing them.

You can read more about Microsoft’s recommendations here: https://support.microsoft.com/kb/2982791

The updates that should be removed are:

  • KB2982791
  • KB2970228
  • KB2975719
  • KB2975331

Using BatchPatch to Remove Individual Windows Updates, by KB ID, from Windows 7/2008R2 and newer OSes:

The good news is that BatchPatch makes it very easy to remove individual Windows Updates from multiple computers simultaneously. You may want to first scan your computers to see which ones have the offending updates installed.

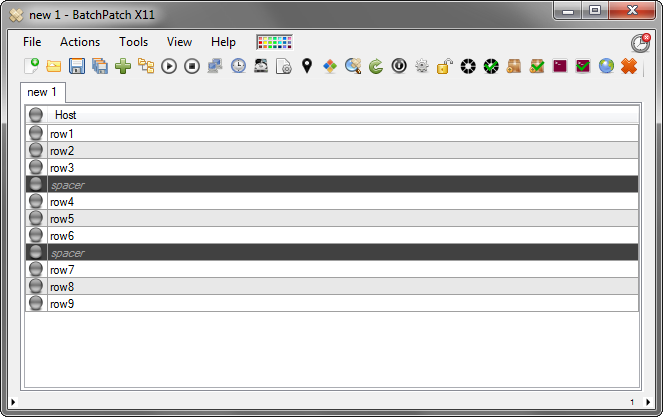
The first three steps here are not absolutely necessary/required for our particular needs at the moment, but it’s good to know that we can search for update history on our machines to verify if they even have the offending updates installed in the first place, so I’ll run through what that looks like.

Optional: Scan Machines to Retrieve the List of Installed Updates

  1. Highlight your hosts in the grid, and then select Actions > Windows Updates > Generate consolidated report of update history
    GenerateConsolidatedReportOfUpdateHistoryA
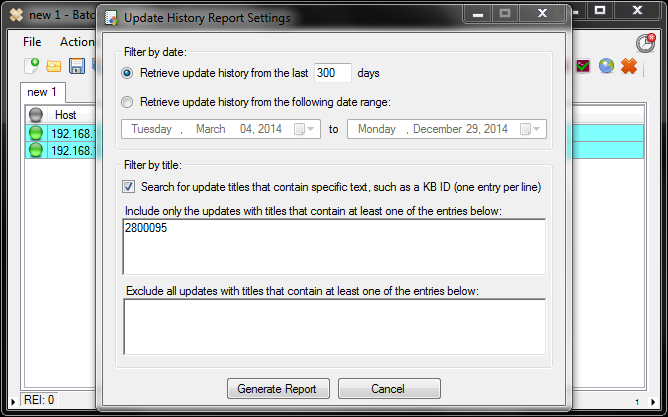
  2. Select the date range that you want to include in the search. Optionally, if you’re looking for specific updates, you may enter them in the field provided, so that the results output includes only the particular updates in question. However, you don’t need to specify updates at this point and may simply search for all installed updates instead, which is what I’ve done in the screenshot below.
    GenerateConsolidatedReportOfUpdateHistoryB
  3. You can see the results for my search in the screenshot below. In this case, none of the offending updates are installed on my lab VM. However, we’ll move forward and uninstall one of the updates that is installed, so that you can see how it’s done.
    GenerateConsolidatedReportOfUpdateHistoryC

Required: Uninstall the Offending Updates:

  1. The test machine that I’m using in the lab here does NOT have any of the offending updates from a couple of weeks ago installed, so for the sake of this example I’ve selected to uninstall KB972270. When you’re removing updates from your own computer, you simply need to specify the KB ID for the update that you want to remove. Select Actions > Windows Updates > Uninstall individual update
    UninstallIndividualUpdateA
  2. Enter the KB ID that you want to remove.
    UninstallIndividualUpdateB
  3. Click ‘OK’ to proceed with the uninstallation

Using BatchPatch to Remove Individual Windows Updates, by KB ID, from Windows XP/2003:

Windows XP and 2003 do not support WUSA.exe, so we use an alternate method to remove individual updates from these older OSes:

  1. Highlight your hosts and select Actions > Execute remote process/command > Create/modify remote command 1
    UninstallIndividualUpdateRemoteCommandA
  2. The command that we execute is formatted as follows:
    C:\WINDOWS\$NtUninstallKB972270$\spuninst\spuninst.exe /quiet /norestart
    UninstallIndividualUpdateRemoteCommandB
  3. Click ‘Execute’ to proceed with the uninstallation
Posted in Blog, General, Tutorials | Tagged , , , | Comments closed

Remotely Install Only a Subset of Available Windows Updates

Sometimes you might need or want to only install a specific handful (or more) of updates on remote computers, rather than installing all of the updates that are available for those computers. With BatchPatch we provide a few different ways to accomplish this task.

Method 1:

View a list of available updates, and then select or deselect a checkbox for each update that you want (or don’t want) to install. Then execute the update installation for the only the updates that you selected.

  1. Please review the following tutorial: Filter Which Available Updates Are Included Or Excluded When Downloading Or Installing Windows Updates
    2016-03-08 14_37_57-Individual Update Selection

Method 2:

Create a list of updates to be installed on target computers, and then execute the update installation for only the updates specified in the list.
(For a video demo instead of method 2, please see Installing Specific Updates on 20 Remote Computers Simultaneously – Video Demo.)

  1. Let’s start by checking the target host(s) to see what updates are available to install. Highlight the host(s) and then select Actions > Windows Updates > Check for available updates
  2. We can see in the screenshot below that there are 37 updates available on our target host. I’ve expanded the ‘Remote Agent Log’ column by middle-clicking on it, so that we can see the list of available updates.
    CheckForAvailableUpdates
  3. For the sake of this tutorial, let’s select 3 of the available updates to install. We’ll use KB2956575, KB2920189, and KB2964736.
  4. Select Actions > Windows Updates > Filter which updates are included or excluded when downloading/installing > Include specific updates (textual)
  5. Copy the KB IDs for the three updates into the provided field, with one KB per line. Then save the list. We do not strictly have to use KB IDs because the update filtering is actually done by comparing the title of the update to the entries in our list. If an available update’s title contains the text of an entry in our list, it will be installed. However, generally speaking, to guarantee uniqueness in our entries, it’s always best to use KB number whenever possible so that we don’t end up installing more updates than we actually want to install. For example, if we simply entered “Security update for Windows” in the list, then any available update that has “Security update for Windows” in its title would end up getting installed, which is not what we want in this case.
    CreateModifyListOfSpecificUpdatesForDownloadInstallation
  6. Now that are list of specific updates has been saved, the last thing left to do is install the updates. I will select Actions > Windows Updates > Download and install updates + reboot if required
  7. After the task completes, we can review the ‘Remote Agent Log’ column again to see that only the 3 specific updates were installed on the target host.
    ReviewInstalledUpdates

Method 3:

Create a list of updates to hide on target computers, hide only those specific updates, and then install all remaining visible updates.

  1. In this method, instead of first selecting the specific updates that we want to install, we instead first select all of the updates that we want to exclude. Let’s start by checking the target host(s) to see what updates are available to install. Highlight the host(s) and then select Actions > Windows Updates > Check for available updates
  2. We can see in the screenshot below that there are 34 updates available on our target host. I’ve expanded the ‘Remote Agent Log’ column by middle-clicking on it, so that we can see the list of available updates.
    CheckForAvailableUpdates2
  3. In this example, let’s select 4 of the available updates to exclude by hiding. This means that after we hide 4 updates, we’ll have 30 leftover to install. Let’s hide KB2962409, KB2967917, KB2971239, and KB2981655.
  4. Select Actions > Windows Updates > Hide/unhide updates > Create/modify list of specific updates for hiding
  5. Copy the KB IDs for the four updates into the provided field, with one KB per line. We do not strictly have to use KB IDs because the update filtering is actually done by comparing the title of the update to the entries in our list. If an available update’s title contains the text of an entry in our list, it will be installed. However, generally speaking, to guarantee uniqueness in our entries, it’s always best to use KB number whenever possible so that we don’t end up hiding more updates than we actually want to hide. For example, if we simply entered “Security update for Windows” in the list, then any available update that has “Security update for Windows” in its title would end up getting hidden, which is not what we want in this case.
    CreateModifyListOfSpecificUpdatesForHiding
  6. Click on the ‘Execute’ button. The four updates in our list will be hidden on the target host, leaving the other 30 updates available. We can examine the ‘Remote Agent Log’ column once again to confirm this.
    ReviewHiddenUpdates
  7. The last step is to install all of the remaining 30 updates. We can do this by selecting Actions > Windows Updates > Download and install updates + reboot if required. Only the visible updates will be installed. The hidden updates will remain hidden indefinitely, though we can unhide them at any time in the future if we want/need to install them.

    IMPORTANT NOTE ABOUT HIDING UPDATES:It’s important to note that Microsoft can effectively unhide an update that you have previously hidden simply by republishing it at a future date. That said, if you hid an update on target computer at some point in the past days/weeks/months, it’s always good when starting a new session to first check for available updates to make sure that a previously hidden update that you still do not want to be installed has not been republished and unhidden by Microsoft in between your last session and your current session.
Posted in Blog, General, Tutorials | Tagged , | Comments closed

Executing Remote Commands with BatchPatch

One of the tasks that BatchPatch can help with is executing remote commands or processes across many computers at the same time. For systems administrators this is a common need, and our goal was to make it extremely easy to perform this task in BatchPatch. This way you can avoid manually writing a script that steps through each target computer one at a time, and instead you can use BatchPatch to execute the same command across your entire network of computers, simultaneously, in just a few seconds.

In the BatchPatch actions menu we have two different methods for executing remote commands. One method (Remote Commands 1 and 2) will simply execute the command or process and then report the exit code. The second method (Remote Commands 3 and 4) will execute the command or process and attempt to retrieve any output that the command or process created. Under the hood, the actual code used to execute remote processes differs with these two methods. As such, in some cases you may notice the behavior of the two different methods is a bit different. This is expected. In some cases it’s possible that a remote command will execute successfully under one method but not the other, though in many cases a remote command can be executed using either option. Because the process execution and parsing differs under the hood for the two methods, we’ve included both the non-logged and logged-output options to help maximize compatibility with remote commands.

We generally recommend that if you need to execute a command on a set of computers but you don’t need to see the output of the command, that you use the Remote Command 1 or 2 actions. An example command for this type of use case might be something like ipconfig /flushdns where you need to flush the DNS Resolver Cache on target computers. In that case you simply need the command to execute successfully, but the command itself doesn’t produce any output that you care to retrieve.

However, in the case where you actually need/want to see the output of a particular command, you should use the Remote Command 3 or 4 actions, which in BatchPatch are listed with “(logged output)” next to them to indicate that they will attempt to retrieve the output of any command that’s run on target machines. An example of a command you might run in this instance is ipconfig /all where you want to see the output of the IP configuration on target computers.

Executing commands remotely when you do not need to retrieve output from the command:

  1. Highlight your hosts in the BatchPatch grid and select Actions > Execute remote process/command > Create/modify remote command 1
  2. Enter your command in the new window that appears. In this example we’ll use ipconfig /flushdns
    BatchPatchRemoteCommand1
  3. Execute the command by clicking the “Execute” button. This option will actually save the command to the grid and then execute it immediately. However, if you instead choose to skip the immediate execution option and select to only save the command using the “Save” button, you can still execute it later by using Actions > Execute remote process/command > Execute remote command 1.
    BatchPatchRemoteCommand1Completion

Executing commands remotely when you need to retrieve output from the command:

  1. Highlight your hosts in the BatchPatch grid and select Actions > Execute remote process/command > Create/modify remote command 3
  2. Enter your command in the new window that appears. In this example we’ll use ipconfig /all
    BatchPatchRemoteCommand3
  3. Execute the command by clicking the “Execute” button. This option will actually save the command to the grid and then execute it immediately. However, if you instead choose to skip the immediate execution option and select to only save the command using the “Save” button, you can still execute it later by using Actions > Execute remote process/command > Execute remote command 3.
  4. You can see in the screenshot below that I’ve displayed the cell contents of the Remote Command Output Log by middle-clicking on the cell. We can see the output of the ipconfig /all command.
    BatchPatchRemoteCommand3Completion
Posted in Blog, General, Tutorials | Tagged , | Comments closed

How To Receive Notifications When Computers Go Offline Or Come Online

Let’s say you’re working through a list of computers to install Windows Update or a third-party software product, but only a percentage of the computers are actually online. The reason, of course, is because your organization provides laptops to its employees, but at any given time there are a lot of people who either aren’t in the office or are disconnected from the network for one reason or another. Wouldn’t it be nice to receive an email or hear an audio alert when the remaining, yet-to-be-updated computers come online so that you can get them updated before the users remove them from the network again? You can use BatchPatch to notify either via email or by playing a sound when a computer goes offline or comes online. Here’s how it works:

  1. Configure email settings: Launch the settings dialog by selecting Tools > Settings > Email Notifications. You’ll need to fill in the appropriate fields for your organization, which might include creating an email address specifically for the purpose of sending alerts. Once you’ve got everything filled out, make sure to verify the configuration by clicking the Test email settings button, which will send a test notification to the configured recipients.
    BatchPatch Email Notification Settings
  2. Configure default alert settings: Select Tools > Settings > Ping Status Alerts. The Global default alert settings for NEW rows section controls the default alert configuration of hosts that are added to the BatchPatch grid. However, after a host has already been added to a grid, it’s very simple to modify the settings for that particular host, which we’ll get to in a moment. For now you simply need to make sure that you’ve configured default settings for your installation of BatchPatch. For example, perhaps you love Star Wars and simply can’t help yourself from setting the online audio sound to a classic clip of Yoda speaking to Luke! Or you could opt to leave the default BatchPatch sounds as-is. I promise that no one will think less of you. 🙂
    PingStatusAlertSettings
  3. Configure alert settings for hosts in the grid: In your BatchPatch grid you have the option of configuring different types of alerts for different hosts. For example, you can configure some hosts to send email notifications when they come online, while having other hosts only produce audio alerts when they go offline. Highlight the hosts that you want to modify, and then select Actions > Ping status alerts. In the screenshot you can see that I’ve set host3 through host8 to only send email notifications when the host comes online. The other hosts in the grid are set to produce audio alerts when the hosts go offline or come online.
    BatchPatch Ping Status Alerts
  4. Configure email recipients for hosts in the grid: (Optional) If you want to configure specific rows in the grid to email particular administrators, you can do that by overriding the default email recipients for any particular row(s). Highlight the hosts and select Actions > Email notification > Override default email notification settings. In the screenshot I have configured host3 through host8 with ‘admin7@yourorganization.com’ as their only recipient for email alerts.
    Override email recipients
  5. Ping the hosts: The only thing left to do is start pinging the hosts in BatchPatch. Highlight the hosts and then select Actions > Start pinging. Hosts will only send email alerts or produce audible alerts while they are being actively pinged in BatchPatch. As soon as a given host’s ping changes from ‘TimedOut’ to ‘Reply from…’ you’ll receive an email notification or hear an audio alert, depending on the settings you configured for the row.
Posted in Blog, General, Tutorials | Tagged , | Comments closed

Hiding Windows Updates Remotely In a Non-WSUS Environment

If you’re using BatchPatch in an environment that has no WSUS server, there might be times when computers show more available updates than you actually want to install. For example, perhaps you don’t want to install new versions of IE or .NET when you’re installing Windows Updates, but you do want to install updates to the existing versions of IE and .NET. Well, if you had a WSUS server, the procedure would be as simple as removing the approval for the particular update on your WSUS server. This approval removal would then be seen by computers that report the WSUS server, and it would then no longer appear in the list of available updates on those computers. However, for those of you working in environments that do not include a WSUS server, you need a way to hide these updates. Fortunately, with BatchPatch it’s a simple process to hide specific updates, by name, so that they no longer appear as available or visible updates on target computers. In the same way that updates can be hidden, they can also easily be unhidden at any time with just a few clicks.

To hide an update on target computers using BatchPatch:

  1. First, let’s check for the list of available updates, so that we can see the titles of all the updates that are ready to be installed on the computer. Highlight the host and then select Actions > Windows Updates > Check for available updates. In the screenshot below we can see the list of updates on available on my computer at the moment.
    CheckForAvailableUpdates
  2. For the sake of this example, let’s hide the first update in the list, titled “Update for Windows 7 for x64-based Systems (KB2952664).” Highlight the hosts that you want to hide the update on and then select Actions > Windows Updates > Hide / unhide updates > Create/modify list of specific updates for hiding.
  3. In the new windows that appears, we have the option of either listing the exact title of the update or just a piece of the title. We can enter one entry per line. BatchPatch will examine the list of updates that are available, and if any of those updates contains one of these entries in the update title, the update will be hidden. Generally speaking, the simplest way to proceed is to enter the KB ID number for each update that we want to hide. However, occasionally an update title might not contain the KB ID, in which case we would simply copy and paste the exact title into the list. In this example I’ve input the KB ID of the update that we want to hide.
    CreateListForHidingUpdates
  4. Once we’ve added the update(s) to our list, we are ready to execute the action to hide the update. There are two ways to do this. We can either simply click the Execute button, which will hide the update on all selected hosts, or we can click the Save button, which will save this “Hide list” for all of the highlighted rows. Once the “Hide list” has been saved for a given row or set of row(s), to actually hide the update we would click on Actions > Windows Updates > Hide / unhide updates > Hide updates.
    HideUpdates
  5. We can see in the screenshot above that the update has been hidden. Now when we execute a new “Check for available updates,” the hidden update doesn’t appear in the list. When we install the available updates, the hidden update will not be installed. If at some point we decide that we want to view the list of installed updates and/or unhide the update, we can do so very easily by using Actions > Windows Updates > Hide / unhide updates > List hidden updates along with Actions > Windows Updates > Hide / unhide updates > Unhide updates.

    ListHiddenUpdates

Posted in Blog, General, Tutorials | Tagged , , | Comments closed

Create a Consolidated Report of Windows Update History

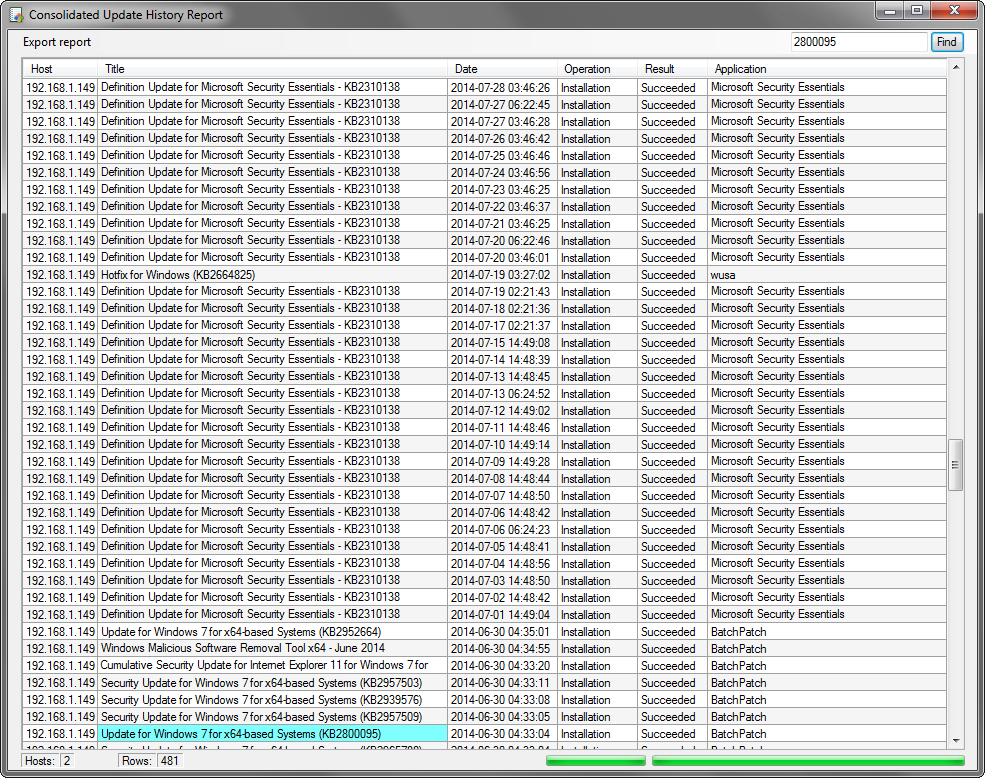
We have received numerous requests for the ability to create Windows Update history reports with BatchPatch. I’m happy to announced that the latest build of BatchPatch (2014.07.01) has a new reporting option that enables you to quickly retrieve the entire history of Windows Update actions from target computers. The output is consolidated so that you can look at all updates across all target computers in a single grid. This means that it’s now simple to retrieve a list of updates that have been installed on a particular computer or set of computers.

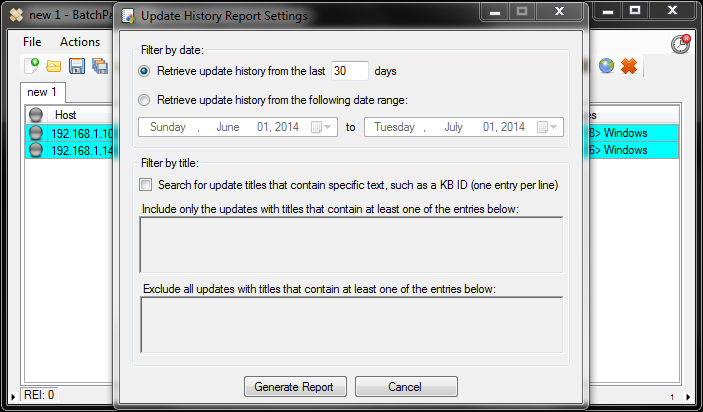
To generate an update history report, add hosts to a BatchPatch grid and then highlight the hosts that you want to include in the report. Next, click Actions > Windows Update > Consolidated report of update history. This will launch the Update History Report settings form.

BatchPatch_ConsolidatedUpdateHistoryReport

The report settings allow you to easily view just a specific date range, with the default set to show only the most recent 30 days of history. Additionally, you can choose to specify inclusion or exclusion criteria, so that only updates titles that match the text entries you provide will be included or excluded. This makes it easy to retrieve update history for only a specific update, or to exclude update history information for a particular update. Note that exclusion criteria will override inclusion criteria in the event there is a conflict when both search fields are used simultaneously. Using the inclusion/exclusion fields are completely optional. You may instead choose to simply retrieve all Windows Update history for a given date range, and then you can simply sort the report to view the information that is important to you.

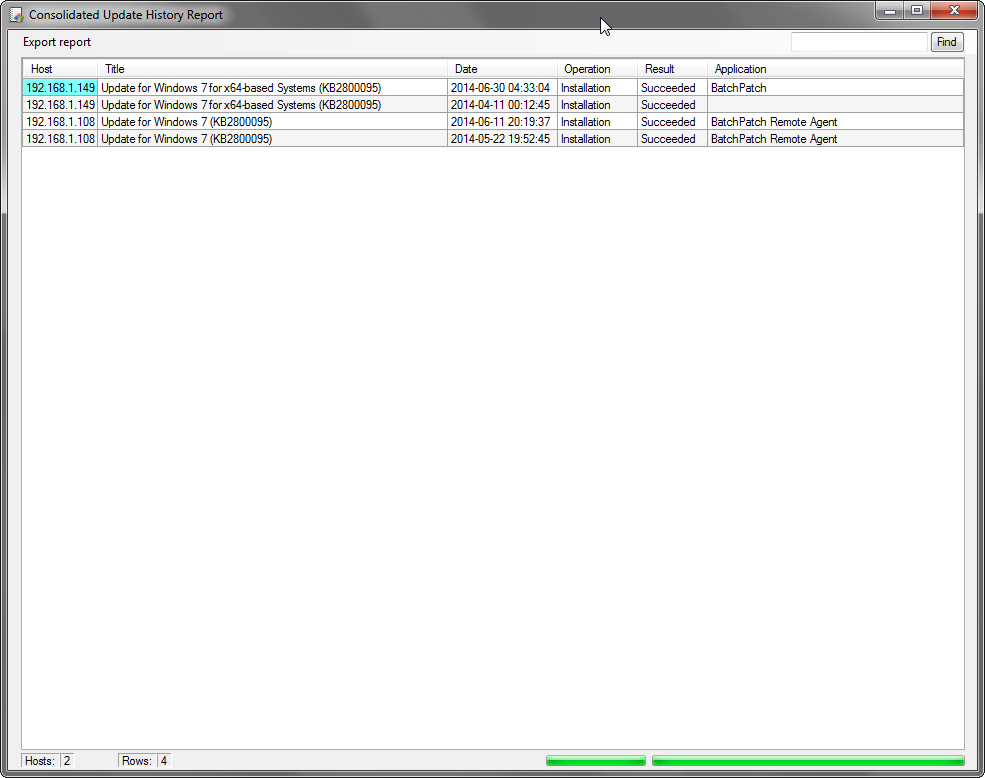
The report is generated in real-time by querying each machine for information about its Windows Update history. The output includes the host name, update title, date installed/uninstalled, action performed (installation/uninstallation), status of the action performed (success/failure/in-progress), as well as the application that performed the action.

The final output is both sortable and exportable, and there is also a find feature that enables you to quickly jump to a cell that contains your search text. The export options give you the ability to create pipe-delimited, tab-delimited, or XML reports, which can then be opened in your favorite spreadsheet application or imported into a database.

Consolidated Update History Report Output

This new report feature should make it easier to monitor the status of Windows Updates on your PCs while maintaining compliance with the security guidelines of your organization. As always, if you have any questions, comments, or issues, please feel free to post a note in the forum or send us an email.

Posted in Blog, General, Tutorials | Tagged , , , | Comments closed