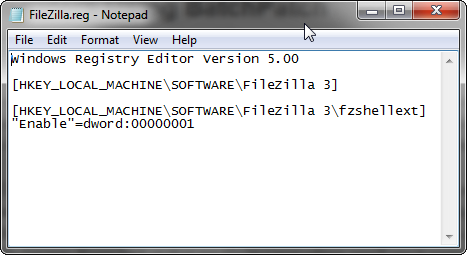
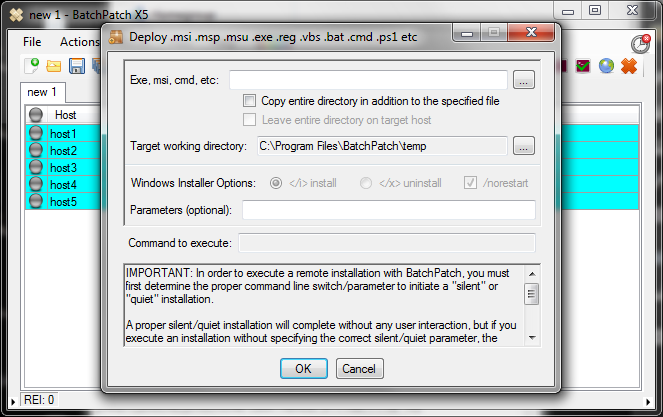
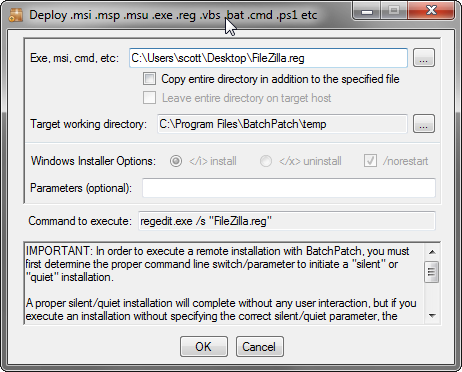
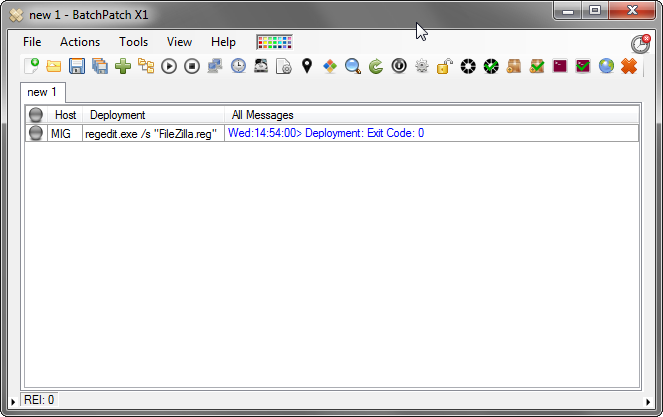
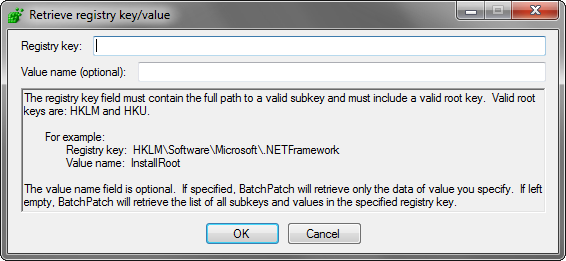
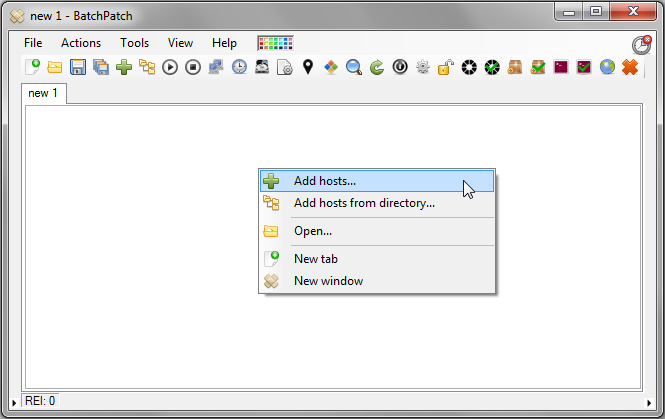
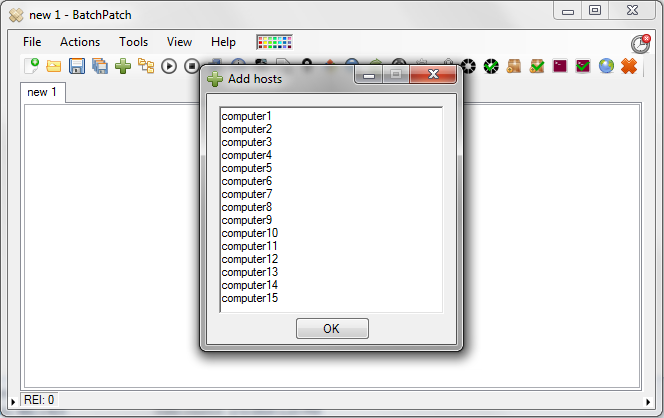
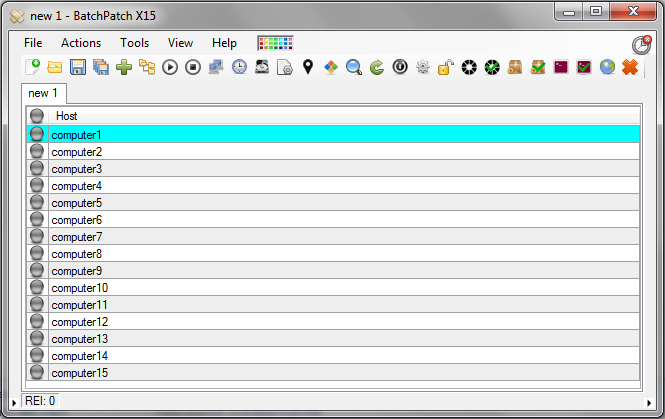
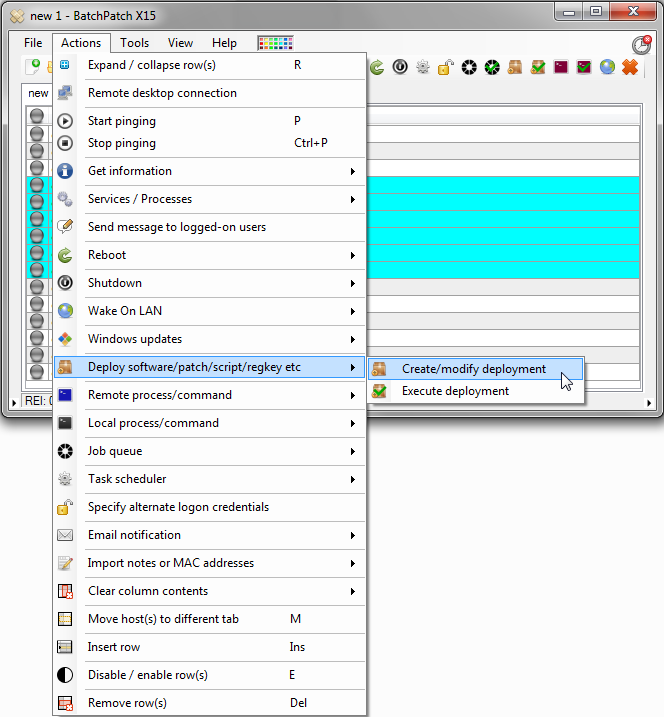
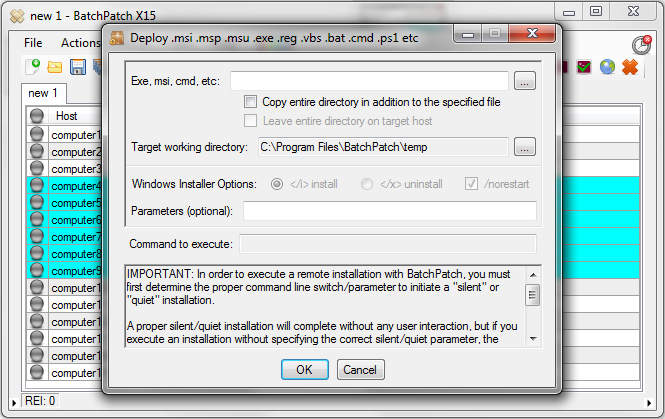
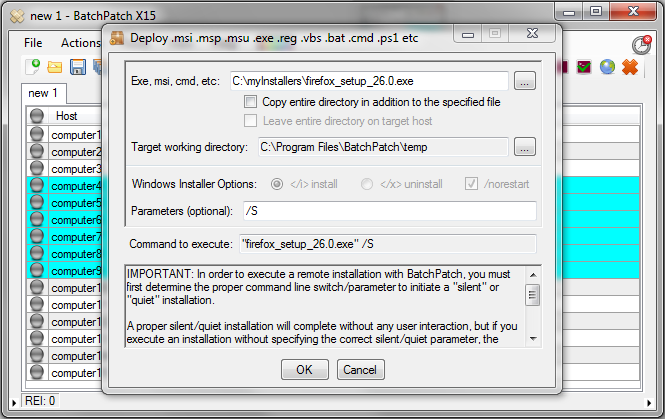
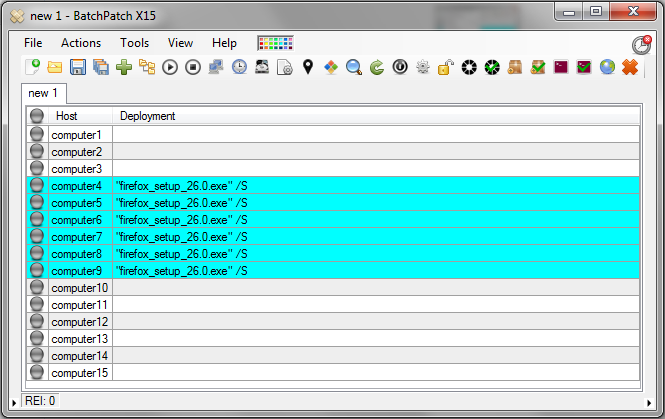
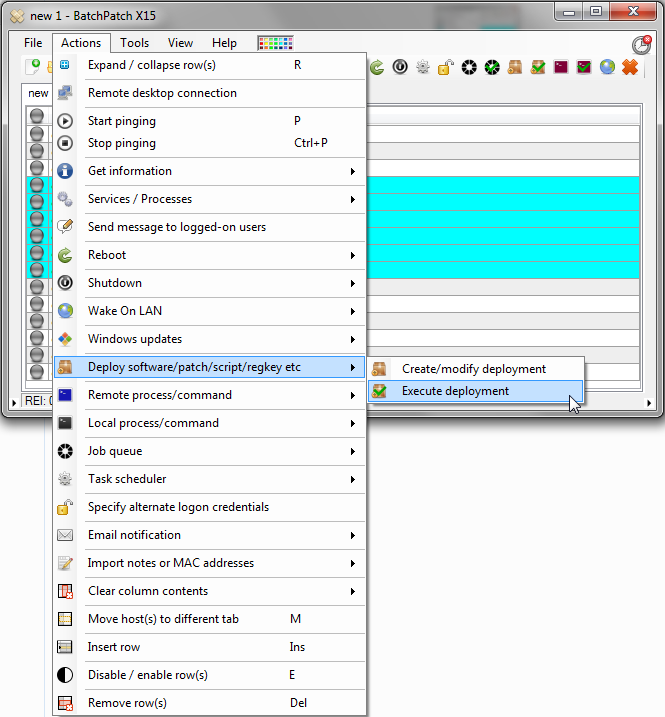
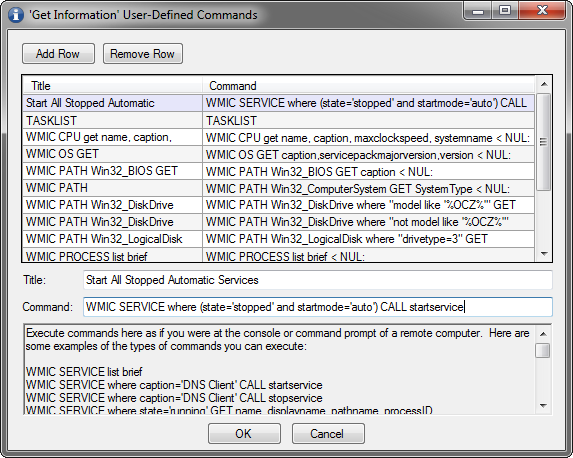
BatchPatch – New Features Released Fourth Quarter 2013

Hey everyone – I just wanted to take a few minutes to blog about some of the new features that we’ve added to BatchPatch over the past several months. We’ve been able to get a lot of good functionality added, and there is still a plenty more to come in the new year. The list of features below only covers the more significant additions.  There have also been a ton of minor updates and improvements made in the past months.

Download and/or Install Specific Windows Updates by Name

Not only can you easily download and install all available Windows Updates, but now it’s also very easy to choose specifically which Windows Updates you want to download and/or install on target computers simply by inputting a list of KB numbers or update titles.  See Actions > Windows Updates > Create/modify list of specific updates for download / installation.

Hide / Unhide Windows Updates

If you’re not using a WSUS server, you might find that you want or need to hide updates that you don’t want to install in order to prevent them from constantly re-appearing in the list of available Windows Updates on your network of computers.  BatchPatch lets you easily choose which updates to hide or unhide.  See Actions > Windows Updates > Hide / Unhide updates.

Bypass the Default/Managed Update Server and Use Microsoft Update Instead

If you are using WSUS or SCCM in your environment, there are times where you may still want to have computers check-in with Microsoft Update instead of your own managed update server.  BatchPatch now has an option to bypass your managed server so that you can search, download, and install available updates from Microsoft Update instead.  See Tools > Settings > Remote Agent (or Tools > Settings > Windows Update Agent).

New PDF BatchPatch Administrator’s Guide

It’s now much easier to get help with the new searchable PDF Administrator’s manual.  The support forum is, of course, still available, and you can always email us too.  See Help > BatchPatch Admin Guide.

Emulate Microsoft’s Delivery of “Important” and “Recommended” Updates

BatchPatch now has search options that allow you to search only for Important updates or Important + Recommended updates.  See Tools > Settings > Remote Agent (or Tools > Settings > Windows Update Agent).

View BatchPatch.log and WindowsUpdate.log Files in the System Default Viewer Instead of the BatchPatch Built-In Log Viewer

If you have a log file viewer that you prefer to use, such as CMTrace, you are now able to have BatchPatch launch log files in that viewer rather than in the built-in viewer.  See Tools > Settings > General.

Email Notifications

BatchPatch now includes functionality to send email notifications either in a BatchPatch Job Queue or as a BatchPatch Scheduled Task.  Notifications may be sent per-row, per-grid, or per-all-grids in a given instance of BatchPatch.

Export BatchPatch Grids to HTML

Use the File > Export grid option to save a grid or grids at HTML files.  This option gives you a nice view of a BatchPatch grid and all the cell contents in an easy to digest format.

Retrieve the Pending Reboot Status of Target Computers

There is no longer any need to question if your computers are waiting to be rebooted.  BatchPatch can reach out to target machines and check all of the places that Windows stores pending reboot information, so that you can know exactly what the status of your machines are.


Posted in Blog, General | Tagged , , , , | Comments closed

Installing Specific Windows Updates on 20 Remote Computers – BatchPatch Video Demo

Posted in Tutorials, Videos | Tagged , , , , , , , | Comments closed

Using BatchPatch with Windows Firewall

BatchPatch uses a combination of Windows Management Instrumentation (WMI) and PsExec to access remote computers, plus ICMP for pinging.  If you need to use BatchPatch in an environment where your remote computers have Windows Firewall enabled, here’s what you need to do to make everything work. (For specific information about port requirements, please see BatchPatch Port Requirements)

In general, if you’re using Windows firewall and you encounter any issues that you need to troubleshoot, it is a good idea to enable logging so that you can troubleshoot any potential issues. This link explains how to do that: Enable logging for Windows firewall

Note, if desired you can apply a scope or IP address range to the rules you create below so that the rules only allow inbound connections from a computer with a particular IP address. This enables you to run BatchPatch from a particular computer so that only that BatchPatch computer’s IP address can utilize the firewall rules you create. After you create the firewall rules described in the tutorial below, optionally use this tutorial to apply an IP address range to the scope for each firewall rule you create.

Using Group Policy to Configure the Windows Firewall:

It is sufficient to use Group Policy to allow “Remote Administration” and “File and Printer Sharing” on the remote computers. See screenshot:


Configuring the Windows Firewall Directly on Target Computers:

If Group Policy is not an option and you instead need to manually adjust the remote computer settings, here’s how:

When the remote system is Windows 7/2008R2, Windows 2012/2012R2, Windows 10/2016:

Go to Control Panel > Windows Firewall > Allow an app or feature, and then check the boxes for “File and Printer Sharing” and “Windows Management Instrumentation (WMI)” and then click “OK.”

Win2012_FirewallConfig


When the remote system is Windows 2012 Core (no GUI) or Windows 2016 Core (no GUI):

At a PowerShell prompt use the following two commands:

enable-netfirewallrule -displaygroup "file and printer sharing"
enable-netfirewallrule -displaygroup "windows management instrumentation (wmi)"

FirewallSettingsServerCore


When the remote system is Windows 2008 (non-R2):

Go to Control Panel > Windows Firewall > Change Settings >Exceptions > check the box for “File and Printer Sharing” and “Remote Administration” and then click “Apply” or “OK.”


When the remote system is Windows 2003:

1. Go to Control Panel > Windows Firewall >Exceptions > check the box for “File and Printer Sharing” and then click “OK.”

2. Open a command prompt and type:

netsh firewall set service type = remoteadmin mode =  enable
Posted in Blog, General, Tutorials | Tagged , , | Comments closed

BatchPatch August 2013 – New Release

News!
I’m excited to announce that we’re in the final stages of testing for the new release of BatchPatch, expected to “drop” in August. We’ve got all sorts of new features lined up plus lots of other little enhancements, as well as bug fixes. Some of the new features are listed below.

—————————————————————————————————————————-
—————————————————————————————————————————-

Tabbed Interface
The new tabbed interface is great for those folks who are dealing with lots of hosts or lots of host groupings. This should make it much easier to manage your BatchPatch grids to be even more efficient with your patching.
TabbedInterface
Multi-grid Interface
The new multi-grid interface gives you an alternate view of your tabs, allowing you to look at them all simultaneously, tiled inside the main BatchPatch window. You can easily switch between the multi-grid and regular tabbed interfaces.
MultiGridInterface
Custom User-defined Commands
You can now create and save as many commands as you want, allowing you to easily execute and view the result of any command on a target host with just a single click. This option allows you to fully customize BatchPatch, making your own custom commands appear hard-coded into the menu.
UserDefinedCommands
Remote Console Output
There are now plenty of ways for you to view all the console output of commands that are executed remotely.
LoggedOutput
Improved Deployment Options
Deploying software and patches or standalone updates like MSI, MSU, MSP files has never been easier. BatchPatch can remotely deploy/execute just about any type of file, including EXE, VBS, REG, BAT, CMD, PS1, etc. If you need to install software or run a package on many computers simultaneously, you can do it with BatchPatch’s Deployment feature and just a few clicks.
Deployment
Update and Reboot Cycle
BatchPatch now gives you an easier, automated way to execute a patch and boot cycle on your computers. For example, let’s say you want to install Windows updates on a list of computers, then reboot, then download and install any new Windows updates, then reboot again. It’s extremely easy to do this with BatchPatch. If you need the cycle to repeat 3 times, 4 times, or 10 times, no problem! It only takes a few clicks to customize the cycle to suit your needs.
UpdateRebootCycle
Improved Scrollable ToolTip
The primary tooltip that is displayed when you middle-click on any cell is now scrollable, resizable, and moveable with right-click-drag or middle-click-drag. It also supports ctrl-c to copy text to the clipboard.
ScrollableToolTip

Concurrent Thread Maximum
The new concurrent thread maximum setting gives you more control over performance when patching. As you choose more actions to run they are added to the queue, to be executed only when there is a free thread available.

Scheduler
The scheduler now supports a new option to execute a task immediately upon detecting a target computer online, rather than having to set a specific date/time. This makes it easy when deploying to a large group of users who do not always have their computers on the network. BatchPatch will simply wait until the computer is available on the network before executing the desired task.

Start and Stop Services by Name
Just as it sounds, the new version enables you to start and/or stop individual services on target computers

Kill Remote Processes by Name or PID
Kill any remote process on target computers by specifying either the process name or the process ID.

More Features Coming Soon!
We have more features planned, so please stay tuned. And of course, as always, if you’d like to request a feature or submit a bug, please either post in the forum or contact us directly.

Posted in General | Tagged , , , , | Comments closed

Remotely installing software, patches, hotfixes, or updates with BatchPatch

Installing Applications or Patches Remotely with BatchPatch:

Posted in Blog, General, Tutorials, Videos | Tagged , , , | Comments closed

Remotely Installing Windows Updates

Installing Windows Updates Remotely with BatchPatch:

Posted in Blog, General, Tutorials, Videos | Tagged , , , | Comments closed

How to push .NET (or just about anything) to remote hosts using BatchPatch

Here’s how to use BatchPatch to push the .NET framework to remote hosts that don’t already have it installed.  You can easily modify this example to push Adobe updates, Java updates, or just about anything else to remote hosts.

When the remote host is XP/2003:

1. Add your remote host(s) to the BatchPatch grid, highlight the row(s), and then choose “Create/modify patch deployment”

2. Select the .NET installer and add “/q /norestart” to the parameters field

3. Choose “Execute patch deployment” to begin the process.The installer file will be copied to the remote host and executed.

4. After a few minutes, we see “Exit code: 0,” which signifies success.If you receive a different exit code, you should Google it to find out what it means.Windows installers can return a host of different numbers to indicate various things like “reboot required,” for example.


When the remote host is Windows 2008:

Windows 2008 makes .NET a “feature” that you can install from the command line, so we simply have to execute the proper command on the remote host(s)

1. Add your remote host(s) to the BatchPatch grid, highlight the row(s), and then choose “Create/modify custom PsExec command”

2. Type “servermanagercmd -install net-framework” with no quotes, of course, in the field.

3. Choose “Execute custom PsExec command” to begin the process.

4. After a few minutes, we see “Exit code: 0,” which signifies success.If you receive a different exit code, you should Google it to find out what it means.Windows installers can return a host of different numbers to indicate various things like “reboot required,” for example.

Posted in Blog, General, Tutorials | Tagged , | Comments closed