

Unfortunately there are cases where remotely removing an update from numerous computers can prove to be more challenging than it seems like it ought to be, especially when you have a great tool like BatchPatch at your disposal. BatchPatch has a built-in feature Actions > Windows updates > Uninstall individual update (requires KB ID) – Windows 10/2016 for uninstalling individual updates from Windows 10 and Windows 2016 target computers, but it is not always successful. Today I’m going to describe why it doesn’t work 100% of the time, and I’m going to show you how you can complete the task of removing an update from multiple Windows 10 or Windows 2016 computers, using BatchPatch, when the BatchPatch built-in feature for this purpose fails.
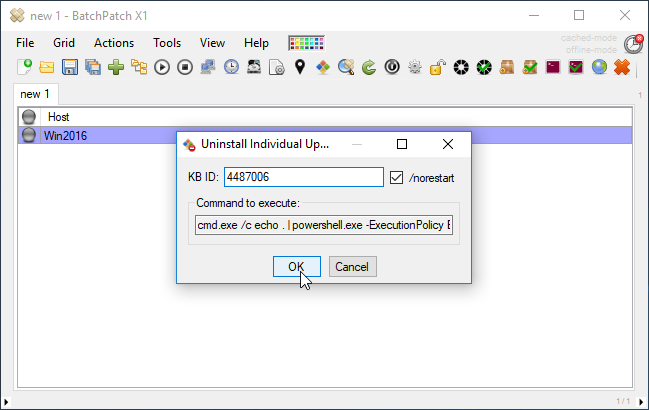
For the sake of this tutorial we are going to remove KB4487006 from a single Windows 2016 computer in our lab, but of course you can use this same method to remove an update from numerous remote computers, simultaneously, simply by selecting multiple computers in your BatchPatch grid when you execute the action.
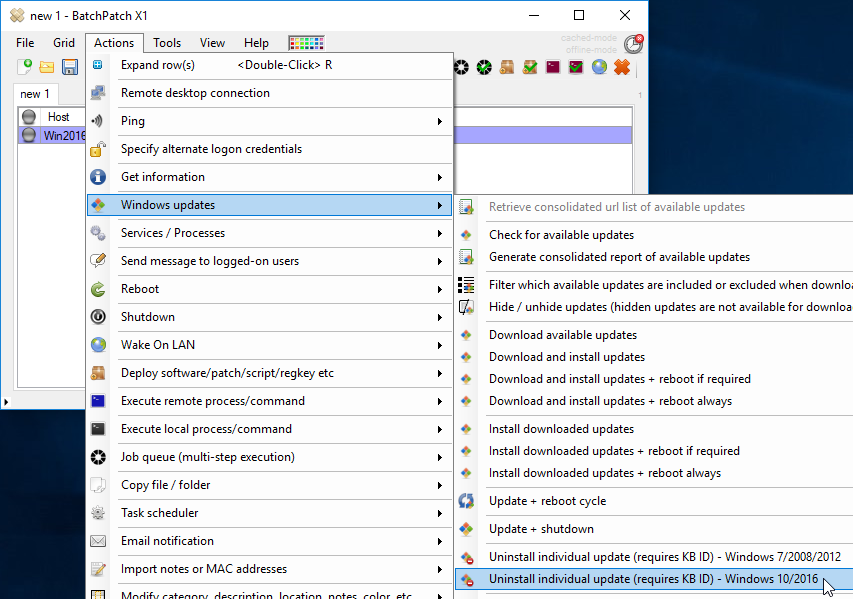
Demonstrating the failure to remove an update using the built-in option in BatchPatch:
First let’s try to remove the update using the built-in function in BatchPatch. I know in advance that it will fail, but I want to show you what the failure looks like. I’m going to select Actions > Windows updates > Uninstall individual update (requires KB ID) – Windows 10/2016, and then I’ll enter the KB ID into the form that is presented before clicking OK. The screenshots below illustrate this process.
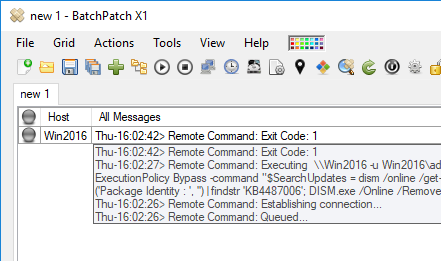
In the screenshot below you can see that the command took only 15 seconds to run before returning ‘Exit Code: 1’. Not surprisingly, it’s also the case that the update was not actually removed from the target computer.
Why the built-in removal method did not work:
The first question we need to answer is why was the update not removed? Here is a copy of the actual command that BatchPatch executed on the target computer:
powershell.exe -ExecutionPolicy Bypass -command "$SearchUpdates = dism /online /get-packages | findstr 'Package_for'; $updates = $SearchUpdates.replace('Package Identity : ', '') | findstr 'KB4487006'; DISM.exe /Online /Remove-Package /PackageName:$updates /quiet /norestart" |
Essentially what the command above does is identify the update’s package identity in Windows, using DISM.exe and findstr. The way that we discover the package identity is by searching for the string ‘KB4487006’ in a list of all of the packages that have been installed. After the package identity has been discovered, DISM.exe is used once again but this time to remove the update by passing the package identity of the update to the DISM /remove-package command. This works great when the package identity contains the KB ID. The problem, unfortunately, is that the package identity will not always include the KB ID. It’s almost as if Microsoft’s goal was to make this as difficult as possible for us!
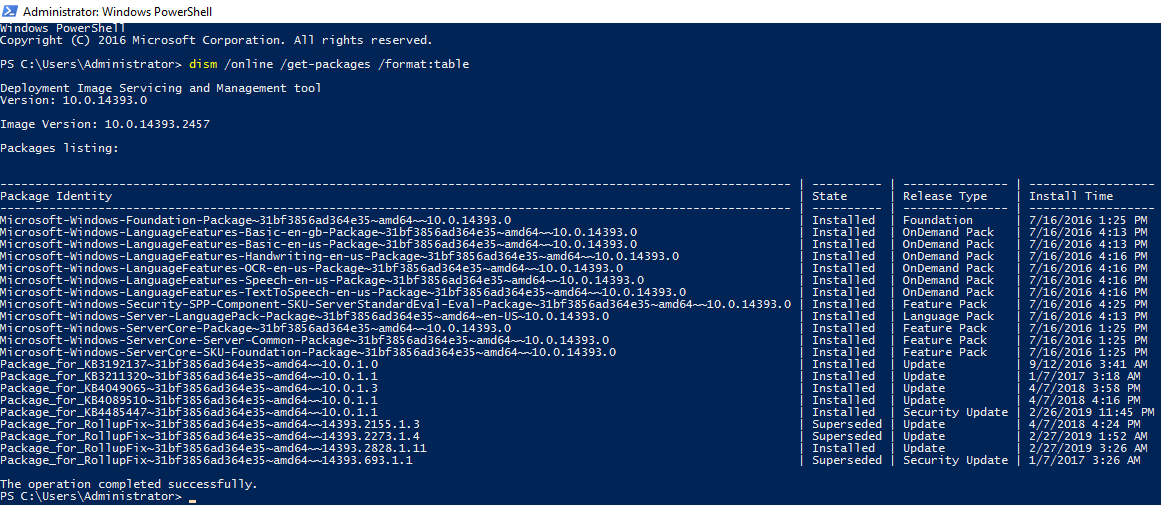
In the screenshot below I have executed the following command at the PowerShell prompt of the target computer in order to view the list of all packages, including their package identities, that have been installed:
dism /online /get-packages /format:table |
We can further refine the list of packages to only include packages for Windows updates because all of the updates begin with the text Package_for. We use the findstr command for that purpose, as you can see in the command and screenshot below.
dism /online /get-packages | findstr 'Package_for' |
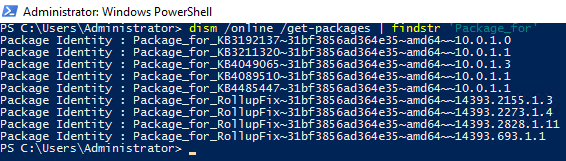
You can see in the screenshot above that not all of the updates contain the KB ID, and in particular the KB4487006 that we are trying to remove is not identifiable by KB ID in that list. This is why the BatchPatch built-in function ‘Uninstall individual update Windows 10/2016’ fails to remove update KB4487006. It can’t find it!
One other important consideration is the display language setting in your operating system. For example, if Windows is configured to display in German instead of English, then instead of Package Identity the DISM results will display Paketidentität and Paketidentit?t like in the screenshots below. Since the DISM commands that we are using for update removal rely on the PowerShell findstr command and .Replace() method, if there is a language mismatch in the search string as compared to the OS display language, the command will fail.
![]()
How to remove the update using BatchPatch with a custom command:
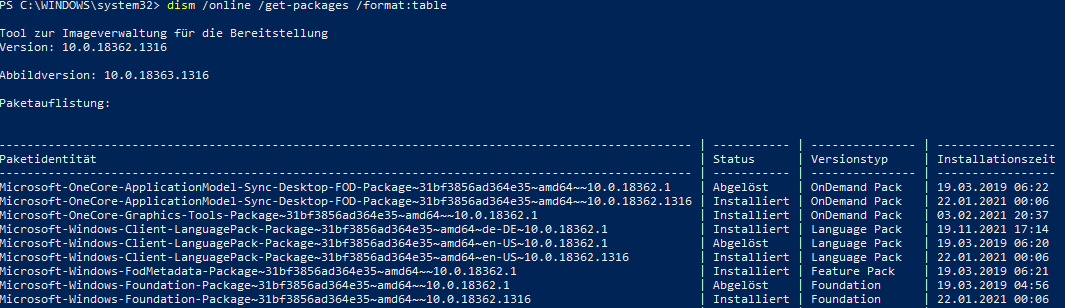
Unfortunately in order for us to be able to remotely remove the desired update from our target computers using BatchPatch, we have to first identify the package identity for KB4487006. This requires some manual effort. We start by listing out all of the installed update package identities on a target computer where KB4487006 is known to be installed. We use the following command to do that:
dism /online /get-packages | findstr 'Package_for' |
We know that KB4487006 is installed on the computer, and so we can deduce that its package identity must be one of the ones that begins with ‘Package_for_RollupFix‘. Furthermore, it happens to be the case that these rollups supersede previously installed rollups, so if you are trying to remove the most recently installed rollup due to the fact that after you installed it recently it started causing problems for you, you can use the ‘State’ column in the table in the screenshot below to see that of the four rollups listed, three of them are showing the state value as ‘Superseded‘ while just one is showing ‘Installed‘. In this case since I know the most recent rollup is the one that I’m trying to remove, I already know that the one showing ‘Installed‘ is the KB4487006.
dism /online /get-packages /format:table |
However, to further confirm/verify that the KB4487006 is Package_for_RollupFix~31bf3856ad364e35~amd64~~14393.2828.1.11, let’s check out the KB4487006 page on Microsoft’s website. You can simply google KB4487006 to find this page:
https://support.microsoft.com/en-us/help/4487006/windows-10-update-kb4487006
At the top of the page we can see Build 14393.2828:
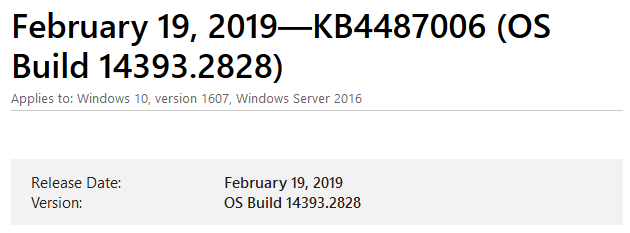
So now we have confirmation that KB4487006 is Package_for_RollupFix~31bf3856ad364e35~amd64~~14393.2828.1.11 Just in case you missed it, the reason is because the package identity contains the build number 14393.2828.
So now if we want to remove this update from multiple target computers using BatchPatch, we can do it by executing a remote command in BatchPatch with the following syntax. Note the command below is identical to the command that BatchPatch’s built-in function runs with one exception, which is that instead of using KB4487006 as our search string, we substitute it with 14393.2828:
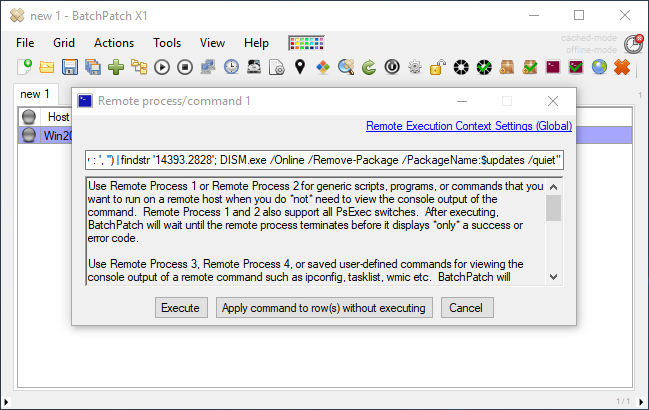
powershell.exe -ExecutionPolicy Bypass -command "$SearchUpdates = dism /online /get-packages | findstr 'Package_for'; $updates = $SearchUpdates.replace('Package Identity : ', '') | findstr '14393.2828'; DISM.exe /Online /Remove-Package /PackageName:$updates /quiet /norestart" |
NOTE: The command above contains /norestart, which will prevent the target computer from restarting after the command executes. For most updates a reboot will be required to complete the uninstallation, so if you use the /norestart switch you will need to issue a reboot command after it finishes. Alternatively you may remove /norestart from the command so that the target computer reboots itself to complete the uninstallation process.
ALSO NOTE: As described earlier in this posting, if you’re using a different OS display language, you’ll have to modify your command accordingly. For example, if the display language is German, the above command would have to be changed to this instead (we replaced Package Identity with Paketidentit?t) :
powershell.exe -ExecutionPolicy Bypass -command "$SearchUpdates = dism /online /get-packages | findstr 'Package_for'; $updates = $SearchUpdates.replace('Paketidentit?t : ', '') | findstr '14393.2828'; DISM.exe /Online /Remove-Package /PackageName:$updates /quiet /norestart" |
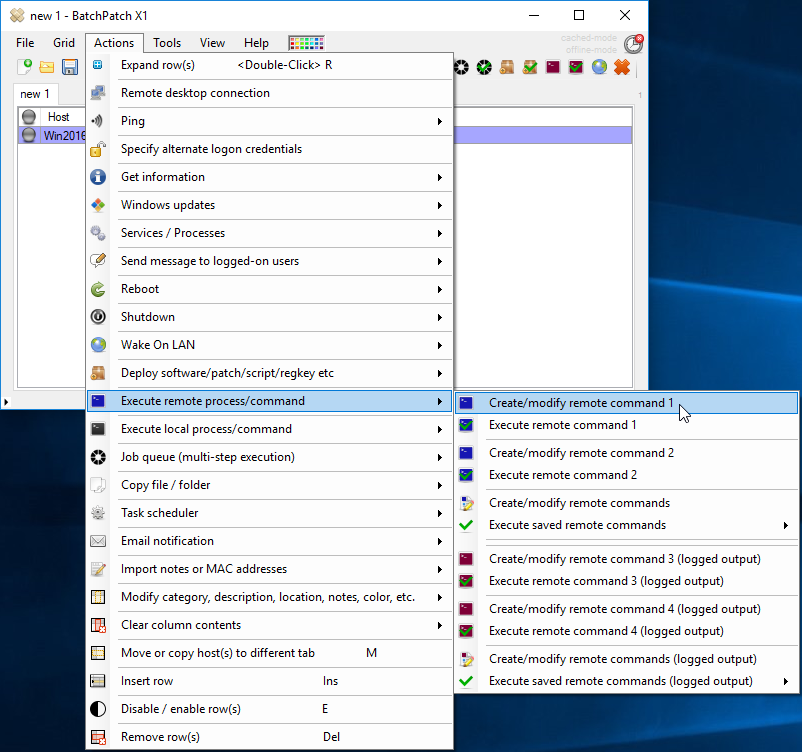
To execute the command in BatchPatch select ‘Actions > Execute remote process/command > Create/modify remote command 1‘. Then enter the command and click ‘Execute’ to execute it on the selected rows.
Note, this command seems to always return Exit Code: 1, even when it completes successfully. Also note, removing update rollups like this one can take a long time for processing to complete *after* the command executes. That is to say that if you execute the command without /norestart, the computer will automatically reboot, but it might not be accessible after that for a couple of minutes while it goes through the typical “configuring updates – don’t turn off your computer” screen. One thing to consider doing is issue a ping command in BatchPatch before you execute the uninstallation command. This would enable you to easily see when the computer goes offline and comes back online. Alternatively if you issue the command with the /norestart switch, you could put it in a job queue and have the job queue execute a reboot when the command completes.
Also note, if you attempt to execute this command directly on a selected computer at the command line, as opposed to running it in BatchPatch, you will need to run the command in a cmd prompt, not in a powershell prompt. The syntax provided above for running it in BatchPatch is the same syntax that can be used to run it in a cmd prompt, but to run it in a powershell prompt you would need to modify it slightly, otherwise it will fail. You are certainly welcomed to modify it as you see fit, but I just wanted to make sure that you’re aware that it will not work as-is in a powershell prompt.