

We recently received a question about how to successfully run the Windows Disk Cleanup Tool remotely using BatchPatch. The user noted that when running cleanmgr.exe in BatchPatch on a target computer, the cleanmgr.exe would stay running indefinitely. This is essentially the same problem that we discuss in numerous places on this website when it comes to silent application deployment. If you execute a remote deployment without specifying the proper silent/quiet installation switch, the installer package attempts to run interactively, which means that it pops up dialog boxes that it expects the user to acknowledge. The problem is that when a deployment runs remotely, it is hidden. No dialog boxes will be seen, and so instead what happens is the deployment appears to hang indefinitely while the package waits for the hidden dialog boxes to be acknowledged.
In the case of cleanmgr.exe, if you run it without any consideration for the fact that it is being run hidden and remotely, its default mode will pop a dialog that will hang indefinitely since it cannot be acknowledged. However, cleanmgr.exe does have a way of executing silently/quietly without any user interaction: The /SAGERUN switch. However, you can’t simply use /SAGERUN without some setup.
https://support.microsoft.com/en-us/help/253597/automating-disk-cleanup-tool-in-windows
In the above link you can see that the cleanmgr.exe tool has two important switches: /SAGESET and /SAGERUN
The way these switches work is you manually run the following command on a particular computer at the cmd prompt:
cleanmgr.exe /SAGESET:123 |
Note, in the above command I specified the value 123 but you can actually use any integer from 0 to 65535. The number represents a kind of “profile”, for lack of a better term, for the cleanmgr to utilize. What happens when you run the above command is you’ll be presented with the cleanmgr.exe ‘Disk Cleanup Settings’ dialog.
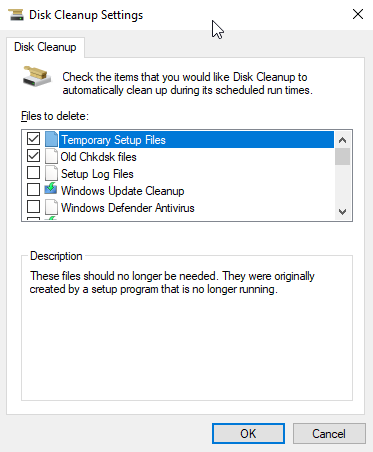
This Disk Cleanup Settings dialog is where you would tick the various selections that you want the tool to clean for you. When you click OK, the tool creates some registry values that contain the settings/selections you chose. Then later if/when you run this command:
cleanmgr.exe /SAGERUN:123 |
The settings that you previously created for the “123” profile are used for the actual cleanup routine. So if you create multiple cleanup profiles, for example, using commands like these:
cleanmgr.exe /SAGESET:123 |
cleanmgr.exe /SAGESET:124 |
cleanmgr.exe /SAGESET:125 |
You can then later at any time execute a cleanup that specifies one of the previously created profiles:
cleanmgr.exe /SAGERUN:123 |
cleanmgr.exe /SAGERUN:124 |
cleanmgr.exe /SAGERUN:125 |
Now, the tricky part here is that if you want to run the disk cleanup tool on numerous computers, you’re not going to want to log on to each computer manually to run the SAGESET command since that defeats the purpose of using BatchPatch to execute the cleanup on numerous computers without having to log on to each computer. So the trick is that you would need to write a script to create the values that the SAGESET command would create if you were to run it for the desired cleanup operations that you select.
After I ran this command:
cleanmgr.exe /SAGESET:123 |
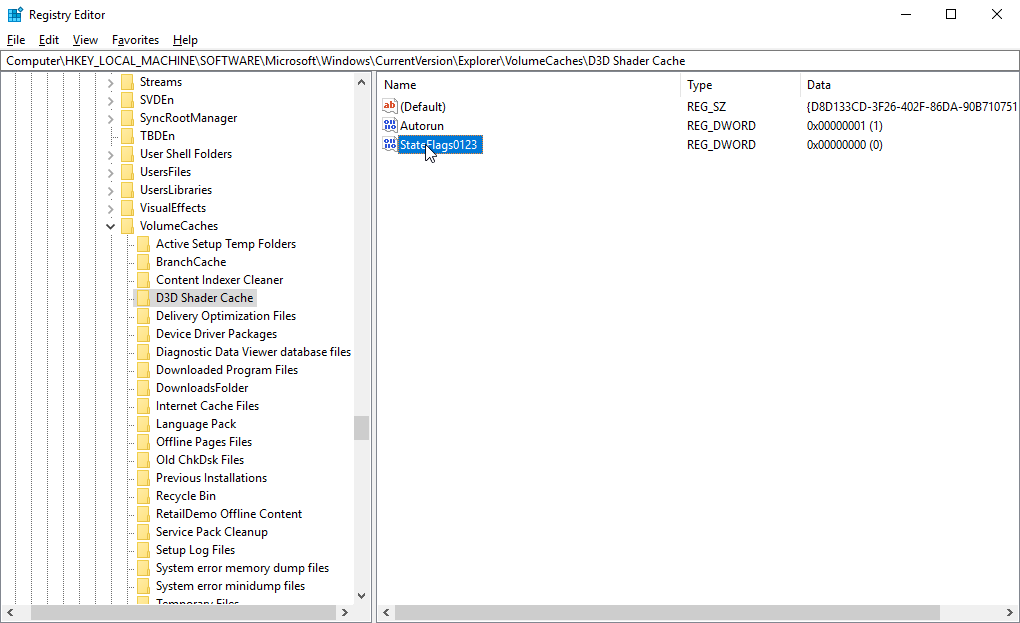
…a number of registry entries were made in the following registry key:
HKEY_LOCAL_MACHINE\SOFTWARE\Microsoft\Windows\CurrentVersion\Explorer\VolumeCaches |
I’ve pasted below just a few of the keys/values, but in particular please note the StateFlags0123 REG_DWORD values that exists in the subkeys. The StateFlags0123 values were created when I ran cleanmgr.exe with the /SAGESET:123 switch. /SAGESET:124 would create registry values titled StateFlags0124.


OK, so what you can do to automate everything is run the cleanmgr tool with /SAGESET on a single computer. Then evaluate which registry values it created, and then write a script that will create the same registry values. This way you can then use a BatchPatch deployment to deploy your script, the script will create the desired StateFlagsXXXX registry values on the target computers, execute cleanmgr.exe with the appropriate SAGERUN switch to make use of the StateFlagsXXXX registry values that were set by the script, and then optionally delete the registry values it previously created.
The script below is just a sample. You should modify it for your needs. In particular please note that it actually creates a StateFlags0123 DWORD with value of 2 in *all* of the subkeys under this registry key:
HKEY_LOCAL_MACHINE\SOFTWARE\Microsoft\Windows\CurrentVersion\Explorer\VolumeCaches |
However, this is not necessarily what you want because if you use /SAGESET:123 and you make only particular selections in that settings dialog for what you want cleaned, you’ll see the result is that only some subkeys get the StateFlags0123 DWORD with a value of 2. Other subkeys will have a value of 0. And some subkeys might have no value at all. Refer to my screenshots above of the registry where you can see that of the three subkey DWORDs I showed, only one of them had a value of 2. If you want the cleanmgr.exe to follow your settings created when you used SAGESET, then you need the registry values to match those that were created by the tool when SAGESET was used.
The script below first creates the registry values, then executes cleanmgr.exe with /SAGERUN specifying the value that corresponds to the registry values it previously created, then finally the script removes the registry values.
# Create registry values $volumeCaches = Get-ChildItem "HKLM:\Software\Microsoft\Windows\CurrentVersion\Explorer\VolumeCaches" foreach($key in $volumeCaches) { New-ItemProperty -Path "$($key.PSPath)" -Name StateFlags0123 -Value 2 -Type DWORD -Force | Out-Null } # Execute Disk Cleanup Tool (cleanmgr.exe) Start-Process -Wait "$env:SystemRoot\System32\cleanmgr.exe" -ArgumentList "/sagerun:123" # Remove the previously created registry values $volumeCaches = Get-ChildItem "HKLM:\Software\Microsoft\Windows\CurrentVersion\Explorer\VolumeCaches" foreach($key in $volumeCaches) { Remove-ItemProperty -Path "$($key.PSPath)" -Name StateFlags0123 -Force | Out-Null } |
If you save the above script to “cleanmgr.ps1” you can then deploy it to numerous computers using the BatchPatch deployment feature. See below for my deployment configuration. I have not made any modifications in the “Command to execute.” It’s simply the default commmand that BatchPatch generates when BatchPatch sees that I am deploying a .ps1 file, and that is all that is needed:
