

Last year I posted this tutorial about how you can deploy a registry key/value to the HKEY_CURRENT_USER (HKCU) registry hive of target computers. Following those instructions will enable you to place a registry key/value into the registry hive of all users who have logged on to the target computers. However, what if you want to deploy a registry key/value to target computers that will appear in the registry hive for users who have not yet ever logged on to the target computers? Is that possible? It sure is!
To deploy a registry key to HKCU for users who have not even logged on to the computer yet, you have to modify the *default* user profile. Windows uses a default profile as a template to create the profile for new users who log on to the computer. If you can successfully modify the default user profile to contain the changes that you want, then when a new user logs on to the computer for the first time, his/her profile will be created based on that default profile, which will include the modifications that you previously made to the default profile. So in this case what we have to do is load the registry for the default user profile on all target computers that we desire the modification to exist, then add our desired registry key/value to it, and then unload it. Pretty simple, actually. The process works like this: We’ll start by creating a batch file on the BatchPatch computer. This batch file is what will actually perform the work. We will use BatchPatch to deploy it to all of the desired target computers. BatchPatch will copy the batch file to each target computer and then execute it, effectively modifying the default user profile on all target computers.
Before we get started, if you have not already done so, please review this link, which explains the relationship between HKCU and HKU. It’s important to understand that HKCU is actually just a view into HKU for a specific user’s registry, which is explained at the aforementioned link.
- Create the batch file. To do this simply open notepad or your favorite text editor, add the following lines, and then save the file with a .bat or .cmd extension. I have called my batch file “Default_User_Reg.cmd”
REG LOAD "HKU\temphive" C:\users\default\ntuser.dat
REG ADD "HKU\temphive\Software\TestKey" /v TestValue /t REG_DWORD /d 1
REG UNLOAD "HKU\temphive"
IMPORTANT: For your file, you’ll need to modify the second line to reflect the registry key/value that you want to create.
As you can see, the second line in the script above is:
REG ADD "HKU\temphive\Software\TestKey" /v TestValue /t REG_DWORD /d 1
This will have the affect of creating a DWORD called TestValue with a value of 1 inside the HKCU\Software\TestKey of the computer that the batch file is deployed to.
You’ll notice the script lines use HKU, not HKCU, so what’s happening here?
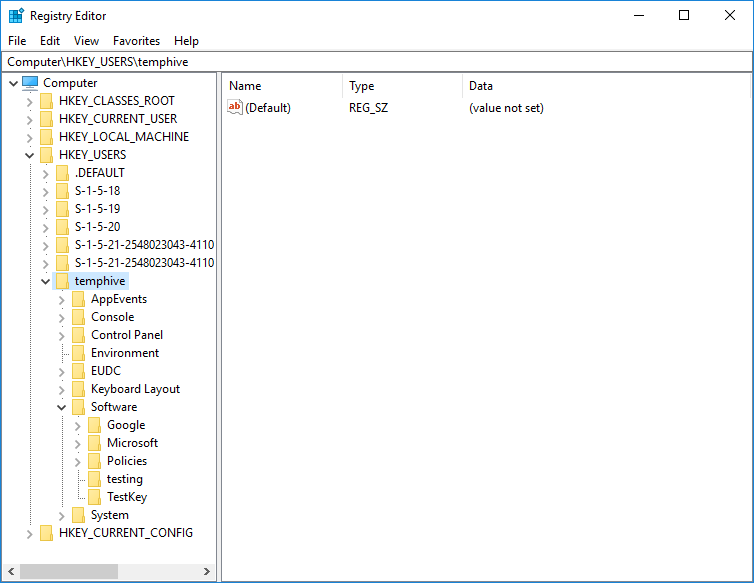
Line 1 of the script loads the ntuser.dat file for the default user temporarily into the registry. The temporary location where we will be able to access the ntuser.dat registry will be HKU\temphive. Have a look at the screenshot below. You can see here what the registry looks like if you were to just run the “REG LOAD” command on its own. Notice how under HKEY_USERS we get a new “temphive” key. This “temphive” key is the HKCU hive for the default user profile, which is stored in the ntuser.dat file that we find in C:\users\default\ntuser.dat. If you have any questions about the syntax for REG ADD review this link from Microsoft.
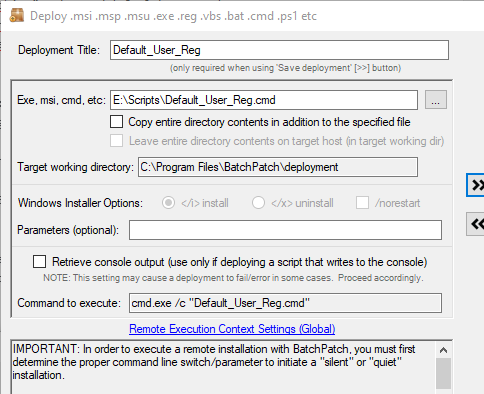
- Once you have created your batch file, you’ll need to create a deployment in BatchPatch. Select ‘Actions > Deploy > Create / modify’, and make your deployment configuration look like mine in the screenshot below, optionally saving it with the double-right-arrow button, if desired:
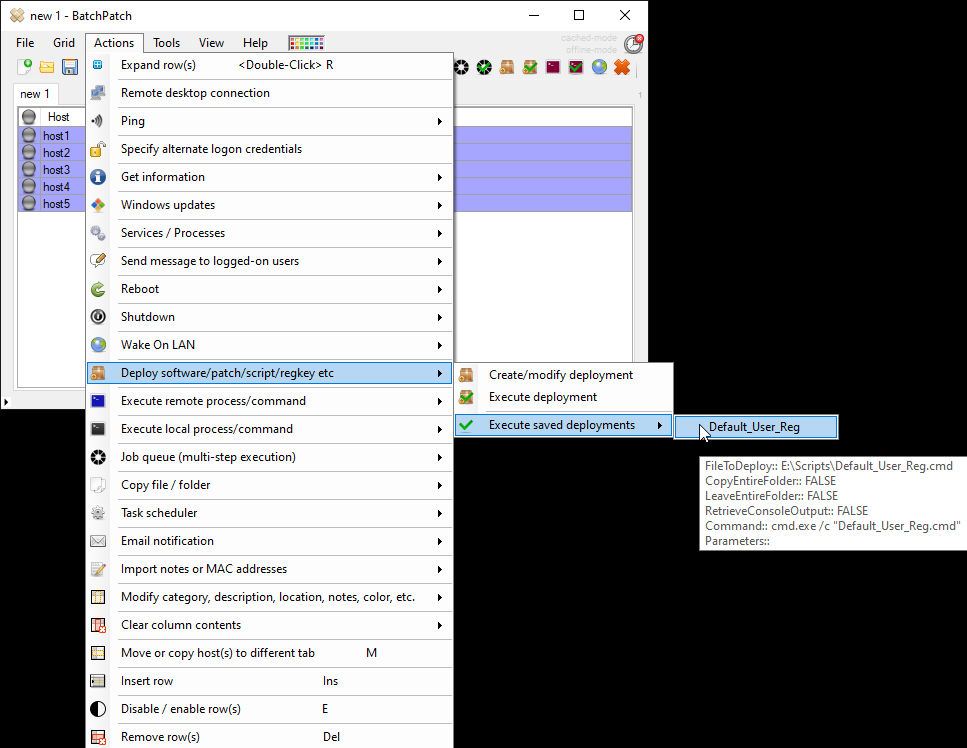
- Now you’re ready to execute the deployment. Select all the desired rows in the grid, and then click on the ‘Execute’ button in your deployment window. Or if you have saved the deployment, then go ahead and execute it by selecting the menu item ‘Actions > Deploy > Execute saved deployments > Default_User_Reg
- If you want to check that the registry key/value has been properly added, go back to one of the computers where the script was deployed, and then run *just* the REG LOAD command in an administrator/elevated cmd prompt. Then launch REGEDIT to check for your changes. When your’re done, close REGEDIT, and then run the REG UNLOAD command to unload the ntuser.dat. The next time a brand new user account is logged on to the computer, it will already have the registry key/value.