We have a more recent tutorial posted here: Remotely Install Java 8 On Numerous Computers Simultaneously
The tutorial below utilizes an installation method that appears to no longer be necessary to remotely deploy Java. The new tutorial linked above should be all that is required at this time to perform the deployment. However, if you are installing an older version of Java and are having problems with the new method outlined in the tutorial above, you may want to try the old method outlined below.
Despite the fact that the Java Runtime Environment (JRE) has continued to be the source of repeated security vulnerabilities both in corporate environments as well as on home computers, we know that Systems Administrators are still frequently tasked with installing, updating, reconfiguring, and uninstalling Java in their environments.
At the time of this writing there seems to be a general consensus in the security community that if you do not need Java, you should uninstall it. However, if you *do* need it, at the very least when you install it you should make sure that it’s disabled in web browsers because that’s where the primary vector for attack lies. Unless you know definitively that you need Java running in your web browser, you probably don’t!
In this posting we’ll address how to remotely install Java to your entire network of computers using BatchPatch. In a future posting we’ll discuss how to remotely disable Java in web browsers.
- Download the Java offline installer package. At the time of this writing you can retrieve this file from the following page: https://www.java.com/en/download/help/windows_offline_download.xml. However, if this link breaks at some point in the future, simply use Google to search for the Java offline installation download location.
- For this example we are going to install Java version 7 update 51. The Java installer comes as a .EXE file, which unfortunately doesn’t support any silent or quiet installation parameters. The trick here is that you actually have to extract the contents of the .EXE in order to get a .MSI file that you can then use in a silent installation with BatchPatch. To extract the .EXE, doubleclick on it to launch it, but instead of completing the installation, after the installation dialog pops up, go ahead and cancel out of it. Then browse to the following location on your computer to find the .MSI file with a Data1.cab:
C:\Users\yourUsername\AppData\LocalLow\Sun\Java\jre1.7.0_51 - Before proceeding to install Java, one important thing to keep in mind is that the Java installer typically needs web browsers to be closed. Failing to close any web browsers before installing or uninstalling Java could cause the process to hang or not complete or it might simply require a reboot in order to complete the process. Consider killing all browser sessions with Actions > Services/Processes > Kill specific running process by name to kill firefox.exe, chrome.exe, and iexplore.exe on target computers.
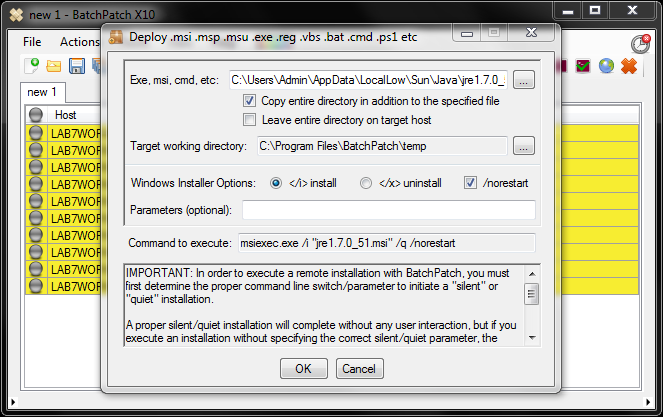
- Now that we have the .MSI and .CAB files extracted from the .EXE, we can setup the deployment in BatchPatch. Highlight the computers you want to push Java to, then select Actions > Deploy software/patch/script/regkey etc > Create/modify deployment.
- In the BatchPatch Deployment window select the directory that contains the Java .MSI and .CAB files, and choose the actual .MSI file to appear in the MSI field in the Deployment window. Finally, tick the box to Copy entire directory in addition to the specified file. The reason we tick this box is because this installation requires the presence of BOTH the .MSI as well as the .CAB file. By ticking the box we are telling BatchPatch to copy all the files in that directory, which in this case is just those 2 files, to the target computers. We also verify the installation parameters, which in this case are /q /norestart.
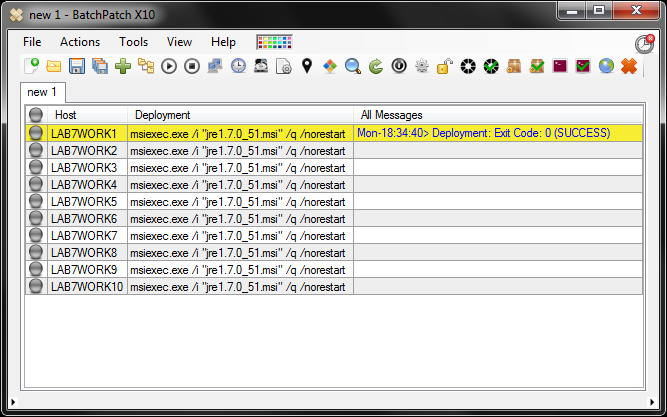
- After clicking OK on the Deployment window you can see that each of our target hosts contains the appropriate command that will be executed after the Java installation files are copied. Highlight the hosts that you are deploying Java to, and then select Actions > Deploy software/patch/script/regkey etc > Execute deployment. Click OK to begin the deployment.
- Soon enough when the installation completes successfully, we see Exit Code: 0 (SUCCESS)