One task that nearly every administrator has to complete at some point or another is the removal of Java. As with many typical sysadmin tasks, removing software on remote computers is very quick and simple with BatchPatch. Today I’d like to show you how to remove Java from many computers using BatchPatch. We have a few different options for executing the uninstallation, so take a look through all options before deciding which one you want to use. IMPORTANT: Always test a destructive process like this on a non-production machine before you attempt to perform an action on one or many production machines!
Method 1 (Preferred Method): Uninstall a specific Java version, by UninstallString:
-
This method provides more precision since it uses the exact uninstall string for the application instead of a name search. However, it also requires a bit more effort.
- First we need to locate the UninstallString value in the registry for the version of Java that we want to remove. Generally one of the following two registry keys will contain the UninstallString value that we are looking for:
HKEY_LOCAL_MACHINE\SOFTWARE\Microsoft\Windows\CurrentVersion\Uninstall
OR
HKEY_LOCAL_MACHINE\SOFTWARE\Wow6432Node\Microsoft\Windows\CurrentVersion\Uninstall
On my test machine I located the UninstallString value for Java 8 Update 31, and it contains the following data:
MsiExec.exe /I{26A24AE4-039D-4CA4-87B4-2F83218031F0}
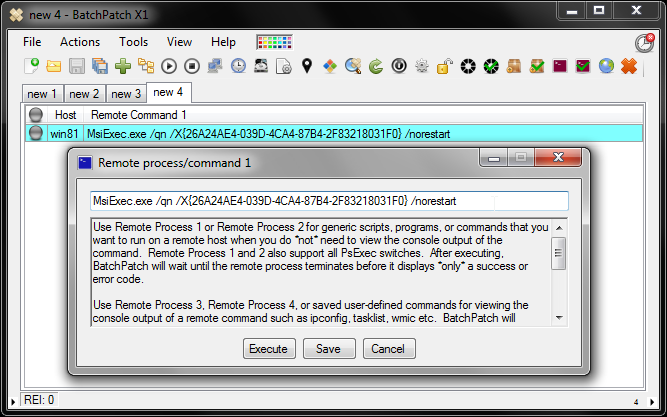
- In BatchPatch, highlight the target hosts and select ‘Actions > Execute remote process/command > Create/modify remote command 1’. Enter the following syntax into the command field, substituting the correct string for the particular version of Java that you are uninstalling:
MsiExec.exe /qn /X{26A24AE4-039D-4CA4-87B4-2F83218031F0} /norestart - Click the ‘Execute’ button
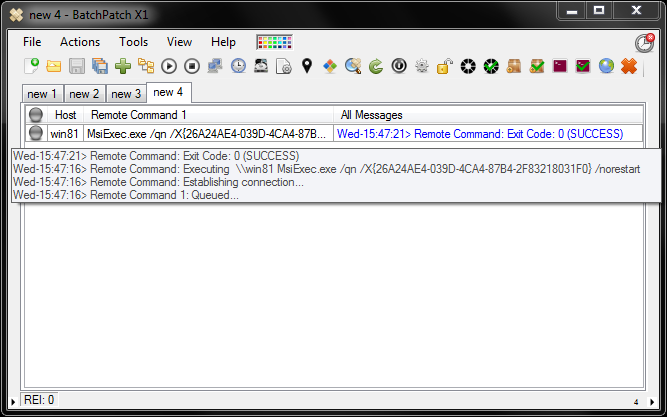
- In the ‘All Messages’ column we see exit code 0, which indicates success.
IMPORTANT NOTE:
Methods 2 and 3 should be used with caution. Both of the following uninstallation methods utilize the Win32_Product class. However, before proceeding with either method, please review this article to learn why some sysadmins are opposed to using the Win32_Product class.
Method 2: Uninstall a specific Java version, by name query:
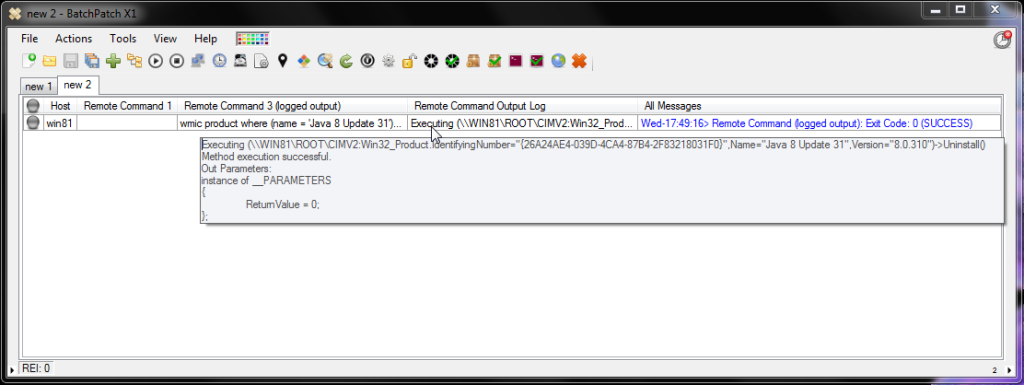
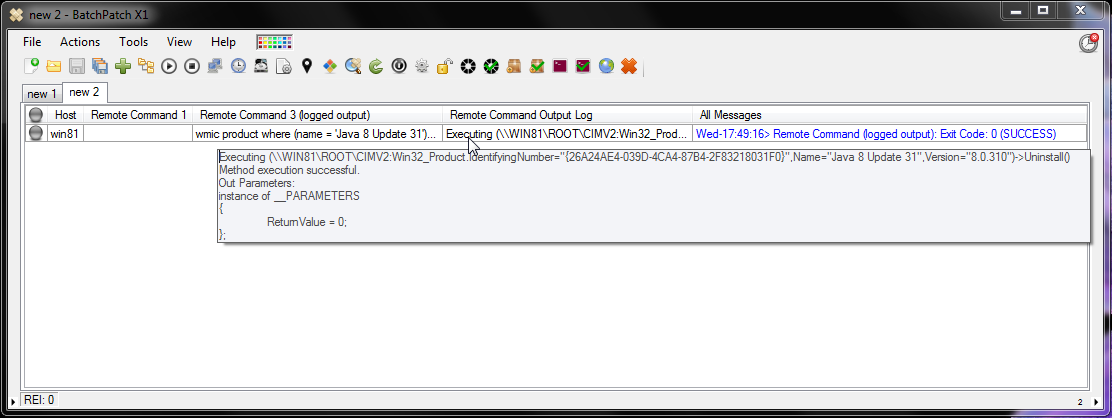
- In BatchPatch, highlight the target hosts and select ‘Actions > Execute remote process/command > Create/modify remote command 3 (logged output)’. Enter the following syntax into the command field, substituting the version of Java that you want to remove. Make sure that the name you use matches the exact name that appears in the ‘Add/Remove Programs’ wizard on the target computer(s):
wmic product where (name = 'Java 8 Update 31') call uninstall - Click the ‘Execute’ button
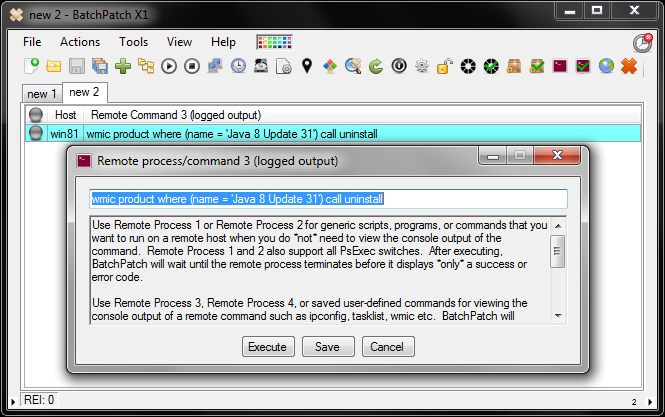
- You can see in the screenshot below that this command returns successfully with exit code 0. Also, the ‘Remote Command Output Log’ column shows the output that was returned by the target, giving us additional confirmation of what was executed.
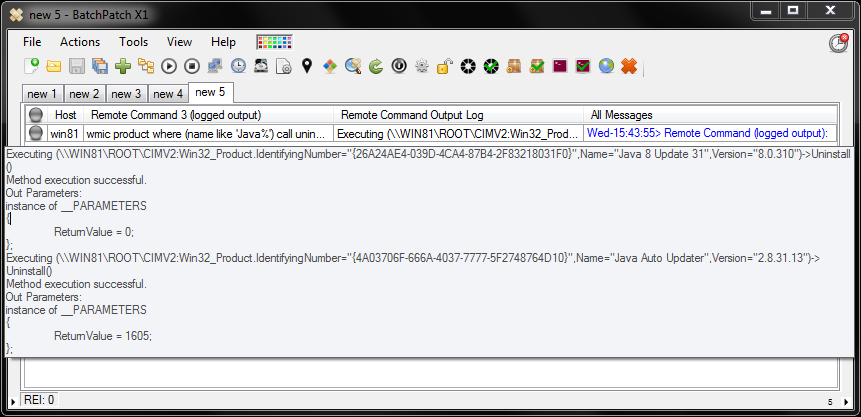
Method 3: Uninstall all versions of Java, by name query
Method 3 and Method 1 are similar, except we change the query in Method 3 to include all software products on the computer that begin with the name ‘Java’
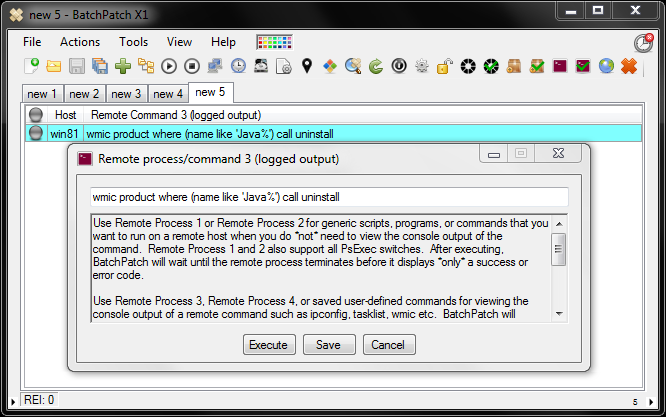
- In BatchPatch, highlight the target hosts and select ‘Actions > Execute remote process/command > Create/modify remote command 3 (logged output)’. Enter the following syntax into the command field:
wmic product where (name like 'Java%') call uninstall - Click the ‘Execute’ button
- You can see in the screenshot below that this command returns successfully with exit code 0. Also, the ‘Remote Command Output Log’ column shows the output that was returned by the target, giving us additional confirmation of what was executed. Note, in this case every app on the computer that has a name beginning with ‘Java’ is removed. The reason we see a return code of 1605 for the ‘Java Auto Updater’ is because the Java uninstallation was executed first, and the Java Auto Updater was removed as part of the Java uninstallation. WMIC didn’t know that, of course, so when it tried to remove ‘Java Auto Updater,’ it returned 1605, because ‘Java Auto Update’ was already removed. 1605 translates to
ERROR_UNKNOWN_PRODUCT - This action is only valid for products that are currently installed.