To install Windows 10 feature update 1903 (as well as the other Windows 10 feature updates) remotely using BatchPatch, you should follow the process outlined below. The standard, built-in Windows update actions in BatchPatch will not work to install these feature updates. Also note FYI even though these are “feature updates” they are actually technically classified as “upgrades” by the Windows Update Agent. The update classification is probably not relevant for the administrator to be aware of in most situations, but I did just want to highlight that in case it comes up when you are researching. EDIT: Starting with the April 2020 release of BatchPatch, feature updates can also now also be installed using the normal Windows update actions, though cached mode must be disabled in order for that to be successful.
- Download (from Microsoft) the Windows 10 Media Creation Tool. Use this link to download the media creation tool directly from Microsoft. At the time of this writing the media creation tool web page contains two options: ‘Update now’ and ‘Download tool now’. Do NOT click on ‘Update now’ because doing so would begin the update process on your computer. Since your goal is to deploy the upgrade to remote computers, instead please click on ‘Download tool now’ to save the tool to your computer. Important: When you run the media creation tool per the next step, you will not have a choice to select which Windows 10 version is used to create the media. This means that if Microsoft releases a new version of Windows 10 when you follow this tutorial, you’ll end up with that version as opposed to the specific version 1903 that is available today at the time of this writing. If you have another channel for obtaining media for a particular Windows 10 version, such as with a Microsoft volume licensing agreement, you may use that instead of obtaining the media through the steps outlined in this tutorial.
- Open the Windows 10 Media Creation Tool that you saved to your computer a moment ago. IMPORTANT: It is NOT sufficient to run the tool as administrator from an account that is logged on without admin privileges. For whatever reason, you must actually be logged on to the computer with an account that is a member of the local administrators group. Otherwise the tool will not allow you to run it to completion. We have no idea why Microsoft made the tool work this way, but it’s what they did. So go ahead and log on to your computer as a local administrator, and then launch the tool and follow the rest of this tutorial.
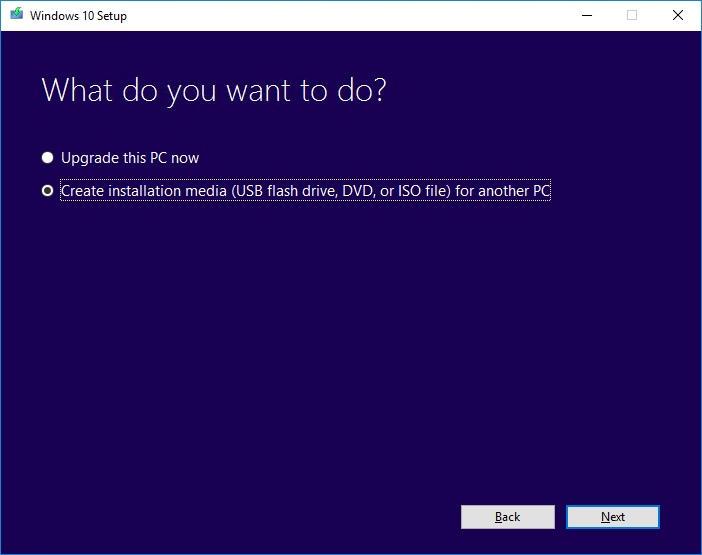
- Create installation media with the Windows 10 Media Creation tool. When the tool is running you’ll have to choose between two options to either ‘Upgrade this PC now’ or ‘Create installation media (USB flash drive, DVD, or ISO file) for another PC. Since you are following this tutorial with the intention of learning how to to use BatchPatch to update other PCs, choose the option to ‘Create installation media…’ and then click ‘Next’.

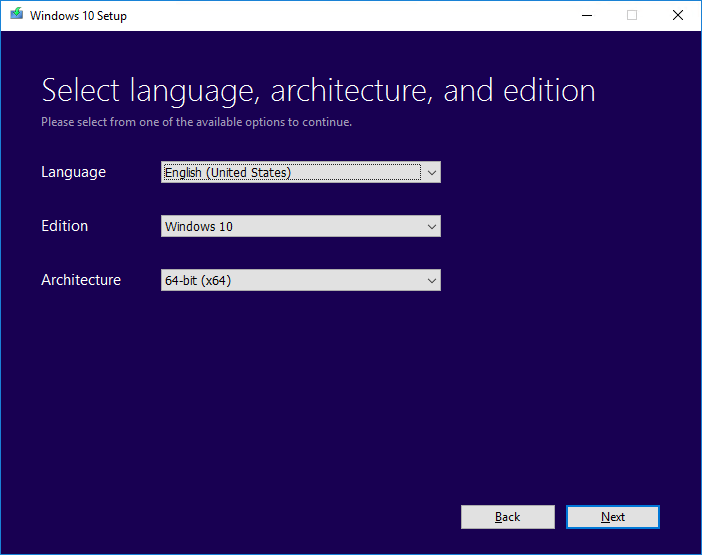
- Choose your language / edition / architecture, and then click ‘Next’.

- Choose the media type. For the sake of this tutorial please select ISO as the type of media. After clicking the ‘Next’ button you will be prompted to choose a location on your computer to store the ISO file that will be downloaded/created. Select a directory/location to store the file, and then do something else until the download finishes. Depending on your connection speed it could take a little while because it’s in the range of 4GB.

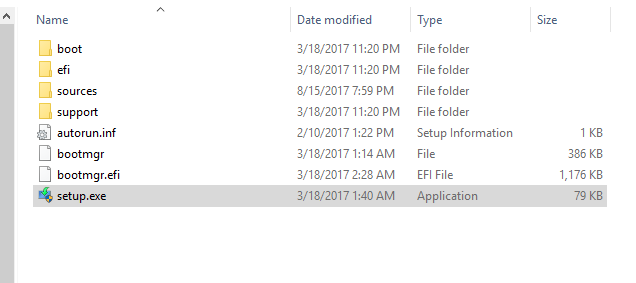
- Extract the ISO contents to a location on your local disk. After the download in the previous step is complete you’ll have to locate the file on disk and then extract the contents of the ISO to another folder. I like to use the free 7-zip for this process, but you may use whichever tool you prefer: 7-zip. After the ISO has been extracted you’ll have all of the installation files for the feature update in a single folder.

- Configure a deployment in BatchPatch. In BatchPatch click on Actions > Deploy > Create/modify. In the window that pops up for the Deployment configuration, click on the ‘…’ button to browse to the location where your ISO contents have been extracted to, and then choose the ‘setup.exe’ file as the file to deploy. Make sure to check the boxes for ‘Copy entire directory‘ and ‘Leave entire directory‘ . After the initial deployment phase is complete, the target Windows operating system will end up rebooting itself at least once but usually more than once while it completes the setup and installation for the feature update. As the process runs it needs to have access to all of the files that BatchPatch will deploy. Having both of the aforementioned boxes checked will ensure that when the upgrade process runs on the target computer that it has all of the files it needs for the installation. After the feature update has completed 100% you may delete the files from the target computer(s). However, please make absolutely sure that the upgrade process is 100% completed before you delete any files. In your BatchPatch deployment configuration screen you will also need to add the following parameters:
/auto upgrade /quiet
- Execute the feature upgrade deployment. In the deployment configuration that you created in the in the previous step you can execute the deployment immediately for the currently selected rows in the grid by just clicking on the ‘Execute now’ button. Alternatively you may save the deployment for future usage by clicking the double-right-arrow button ‘>>’. If you choose to save the deployment instead of executing it immediately, then when you are ready to deploy the feature update to your remote computers, you can begin the process by selecting those computers in the BatchPatch grid and then clicking on Actions > Deploy > Execute deployment, and then choose the deployment that you just created/saved.
You should expect that the entire process will take a bit of time to complete. BatchPatch has to copy the whole installation directory to the target computer(s), which contains several gigabytes, before it can execute the upgrade process on the target(s). IMPORTANT: After the BatchPatch deployment completes for a given target computer BatchPatch will show Exit Code: 0 (SUCCESS). However, this just means that the BatchPatch deployment component is finished. The Windows feature update/upgrade process will take additional time. Please be patient and let the target computer continue upgrading and rebooting as many times as is needed. It might take a little while with multiple automatic reboots before everything is 100% finished.
NOTE: We have had a couple of reports from users who received the following error:
Deployment: Error: Access to the path '\\TargetComputer\C$\Program Files\BatchPatch\deployment\autorun.inf' is denied.
We don’t know the exact cause of this issue, but it seems likely to somehow be related to the way that permissions were applied or inherited during the ISO extraction process. If you encounter this error it can be resolved quickly and easily by just deleting the autorun.inf file from the source directory after extracting the ISO contents but before executing the actual deployment for any target computers. This will prevent the problematic file from ever being copied to target computers. As such, the error will not occur.


