

Did you know that you can deploy Windows Service Packs with BatchPatch? It’s actually very simple, just like deploying software or patches. BatchPatch gives you a simple way to push a service pack installer file to target computers, execute the service pack installation across all the target machines at the same time, and then reboot them with ping monitoring.
Before getting started, there are two items that we should address to help things go as smoothly as possible.
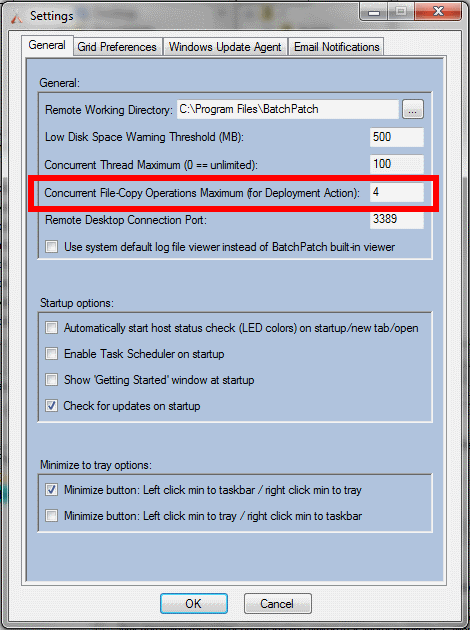
- First, let’s take a look at the Concurrent File-Copy Operations Maximum setting, which can be viewed by clicking Tools > Settings > General. The purpose of this setting is to prevent the network connection from being overloaded when BatchPatch is in the process of copying the service pack installer file (or any file that is being deployed) to target computers. So, let’s say you execute the service pack deployment across 100 machines. Without this maximum setting enabled, BatchPatch would try to copy the 500+ megabyte executable file to all 100 computers simultaneously. For the sake of performance, this probably isn’t the greatest idea. It would make much more sense to copy the file to only one or a few machines at a time.
Note, if you wanted to you could actually use the Concurrent Thread Maximum setting to limit the number of active deployment execution threads in BatchPatch. However, since an individual service pack installation can take quite a while to complete, your overall time needed to deploy a service pack to 100 computers would be significantly increased since only X deployments would execute simultaneously, where X is the Concurrent Thread Maximum value that you specify in Tools > Settings.So, instead of lowering the maximum number of concurrent threads, BatchPatch provides you with the ability to limit just the number of active file-copy operations that BatchPatch will perform. This means that if you execute a deployment simultaneously across 100 target machines, BatchPatch will only attempt to copy the installer file to X number of machines at a time, where X is the number you specify for the Concurrent File-Copy Operations Maximum setting. However, as the file copy completes for each machine, there will be no delay in the execution process as there would be with the Concurrent Thread Maximum setting.
For a large service pack installer file, I recommend keeping the Concurrent File-Copy Operations Maximum setting quite low, possibly even as low as 1, depending on your preference. Somewhere between 1 and 4 is probably a sweet spot, but feel free to use your own judgement. If you were manually going to copy a large file to multiple computers, how many transfer streams would you want to run at one time? As always, testing gives you the most information to make an educated decision, but there is no wrong answer here. It just depends on what you want and what you think will work well. - The second item we need to address is the location of the service pack installer file. Put it somewhere on the same machine that you’re using to run BatchPatch. Avoid deploying the service pack from a different computer’s shared directory. The reason for this is because for each target host that BatchPatch is deploying to, BatchPatch will end up pulling the file down from the network location through the computer that is running BatchPatch, and then finally on to the target host. This will double the amount of data that the BatchPatch computer has to transfer. However, if you start with the exe on the BatchPatch computer, then it can just push it directly to the target hosts.
OK, so let’s get started with the actual deployment. For this example we are deploying Windows 7 Service Pack 1.
- First we need to determine what is the quiet/silent installation switch for the service pack exe. To do this we open a command prompt (Start > Run > cmd.exe) and type
C:\deploymentFiles\windows6.1-KB976932-X86.exe /?where ‘deploymentFiles’ is the location of your service pack installer file. The /? will show us the command line switches that the exe supports. We will use /quiet /nodialog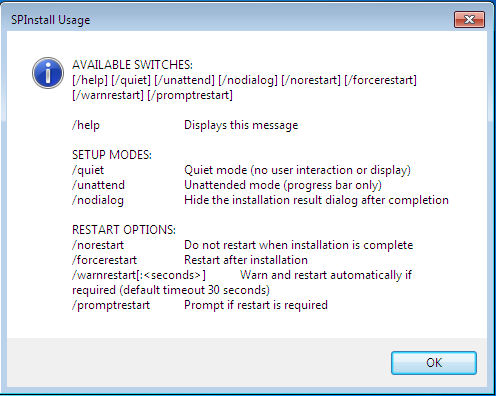
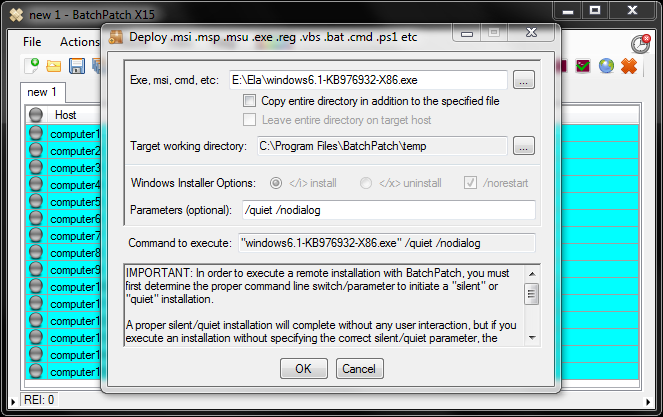
- Now, in the BatchPatch grid highlight the hosts that you want to deploy the service pack to, and then click on Actions > Deploy software/patch/script etc > Create/modify deployment. We need to select the location of the installer exe, and then we need to add /quiet /nodialog to the parameters field.
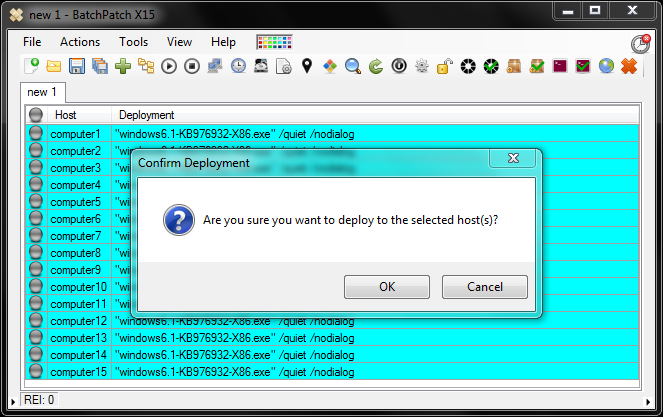
- After clicking OK we can see that each row has a Deployment command populated. Now all we need to do is execute the deployment. Highlight the rows and select Actions > Deploy software/patch/script etc > Execute deployment. Click OK to confirm deployment. That’s it! Now we wait for execution to complete.
- If installation completes successfully we will see Exit Code: 3010, which is a typical exit code for Windows installer files that means the installation was successful but reboot is required to complete it. However, since we didn’t specify the /norestart switch, Windows will actually automatically initiate the reboot for us anyway.