Today I’d like to demonstrate how to create a complete update-plus-reboot sequence where a group of computers must be shutdown and started up in a particular order. You might work in an environment where there is at least one group of servers that are not only reliant on each other for various reasons but where the overall system or service that is provided by this group of servers might be so fragile or so complex that you want to make sure that the group is taken offline in a specific sequence and then brought back online in the opposite sequence. Many of us have worked with systems that for whatever reason aren’t happy if they come online in an unexpected order. These days it’s probably not as common as it was 10 or 20 years ago because systems are coded more robustly than they once were, but still some of us are running old services or poorly coded apps that simply are not robust enough to survive an out-of-order reboot without issues. Typically the reason for this is because one server hosts a database that another server relies upon, but if the database system is offline when the application system is rebooted, the application never runs properly until/unless its host server is rebooted again after the database server is fully online. So today we’ll look at an example of how to deal with updates and reboots for a group of computers when that group needs to be taken offline and brought online in a specific sequence. With BatchPatch you can turn this into a one-click process instead of having to manually handle each computer.
First, for this particular example I’m going to use Wake on LAN (WoL) to boot computers that are shut down. Your needs may vary, and you simply might not need to use Wake on LAN depending on exactly what your goal is, but if you have a situation where you need or want to automate the process of powering up computers that are in a shutdown or powered off state, WoL is the most realistic option in most cases. If you’re going to use WoL, then before you get started you’ll need to make sure that it has been enabled in the BIOS of the target computer as well as in the Windows operating system on that computer too. This link illustrates how to enable Wake on LAN. Once you have enabled WoL on the target systems, make sure to test it so that you know it works before you try to include those systems in a larger sequence, such as the one we are about to create below.
For this example I have host1, host2, host3, host4, and host5. My goal is to download and install Windows updates on host1, and then after updates are installed the system will be shutdown. Then updates will be downloaded and installed on host2, after which host2 will be shutdown. Then host3, host4, and host5 will each do the same, in sequence. After all 5 hosts have been updated and have been shutdown, then we’ll start them back up in the reverse order so that first host5 comes online, then host4, then host3, then host2, and finally host1. We can orchestrate this entire sequence in BatchPatch with just a single action.
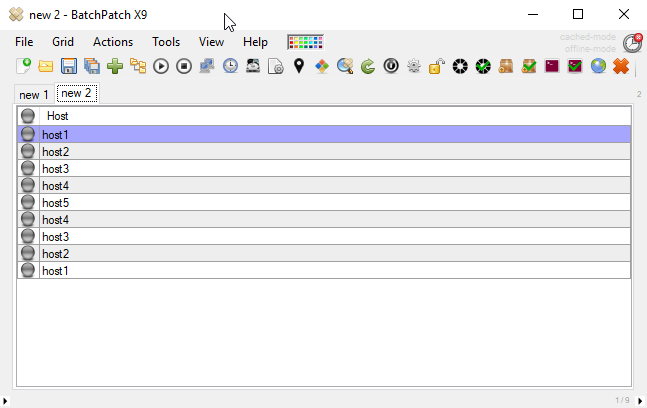
- We’ll start by adding all of our hosts to a BatchPatch grid. Note that I have added the following: host1,host2,host3,host4,host5,host4,host3,host2,host1. Hosts 1 through 4 appear twice, while host5 appears only once. The basic idea here is that we’re going to update and shutdown host1, then update and shutdown host2, then update and shutdown host3, then update and shutdown host4, then update and reboot host5 and wait until it’s online before powering up host4. We’ll wait for host4 to be detected online before powering up host3. Then wait for host3 to be detected online before powering up host2. Then wait for host2 to be detected online before powering up host1. Then we’ll be done. IMPORTANT: We do not recommend running a sequence like this without overseeing it. If you want to run a sequence like this in the middle of the night via scheduled task while you are sleeping, that’s fine. However, it’s important to understand that if something goes wrong with one of the hosts in the sequence, it could prevent the rest of the sequence from proceeding as expected. Therefore we think sequences like this are best used while someone is still monitoring what’s going on, so that if there is an issue it can be dealt with right away.
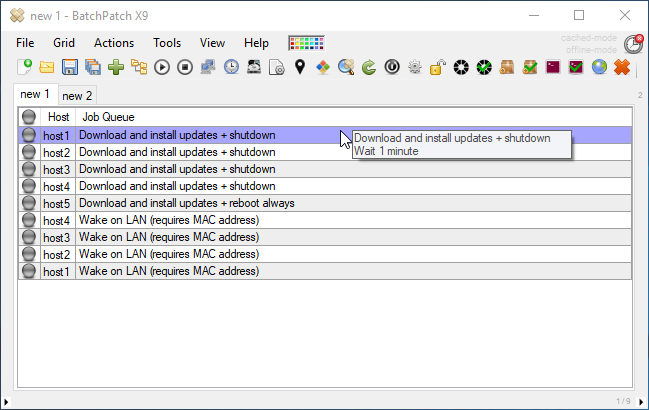
- Now that we have added our hosts to the grid, let’s create the job queues needed for each row. The first four rows in the grid (host1,host2,host3,host4) will all have the following job queue:
Download and install updates + shutdown
Wait 1 minute
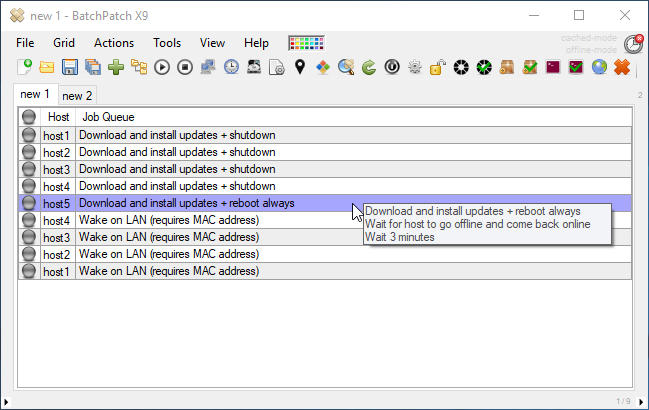
The fifth row (host5) will have the following job queue:
Download and install updates + reboot always
Wait for host to go offline and come back online
Wait 3 minutes
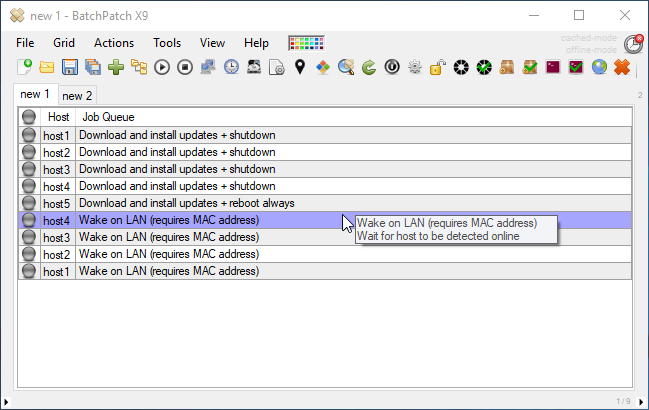
The sixth through ninth rows (host4,host3,host2,host1) will have the following job queue:
Wake on LAN (requires MAC address)
Wait for host to be detected online
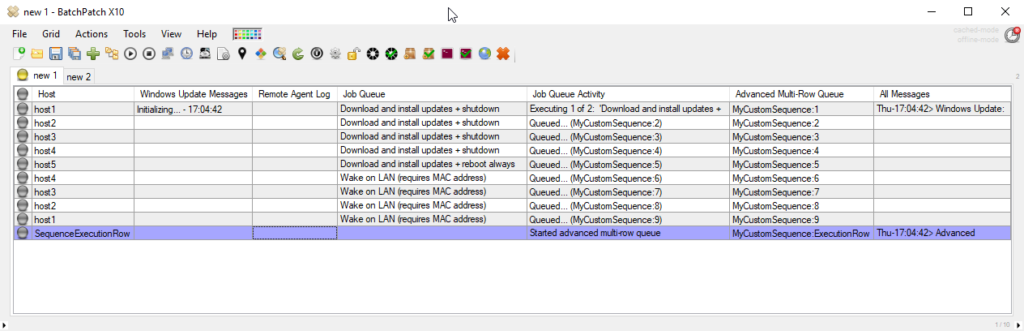
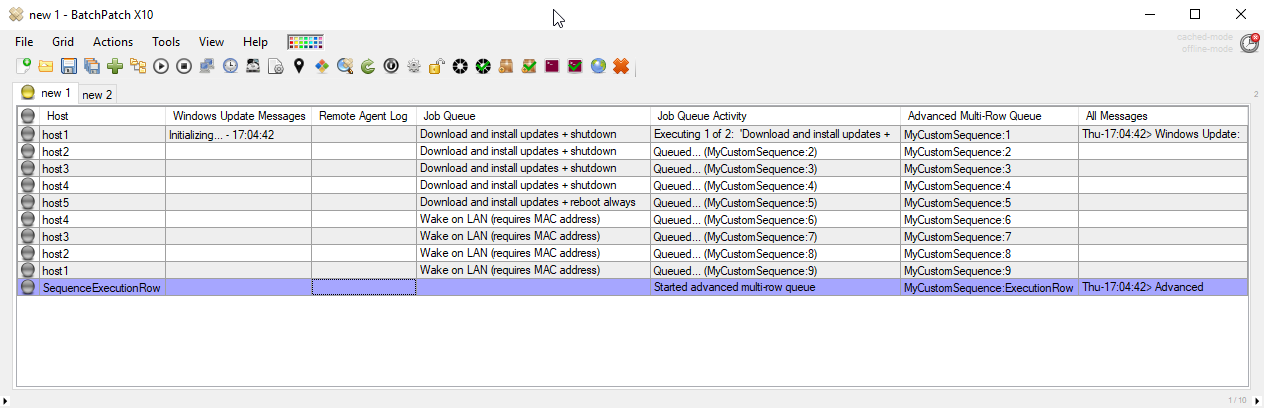
If you’re not familiar with creating job queues, please see this tutorial before proceeding. In all cases when you create the job queues for this sequence you will need to use the option ‘Apply queue to row(s) without executing.’ When all the queues are setup, your grid should look like this. The rows only show the first line of each job queue that is assigned, so I’ve pasted three screenshots below with tooltip windows next to each different queue so that you can see the different queue contents for each row:
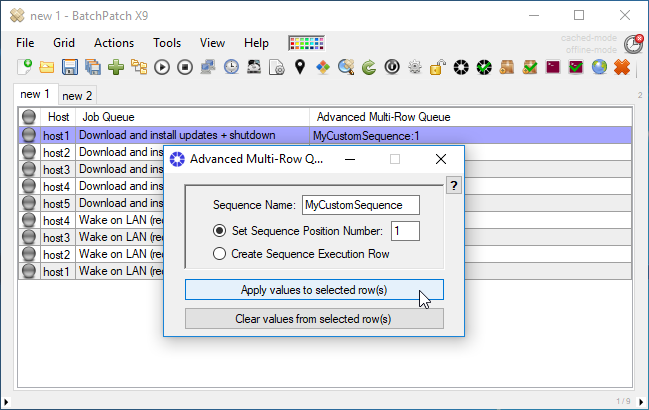
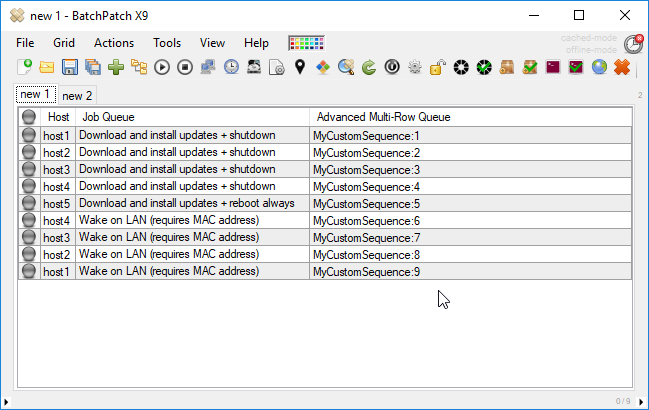
- At this point we are ready to create the actual sequence. In BatchPatch we call this an advanced multi-row queue sequence, since it is a sequence of job queues that will be executed across multiple rows. Select ‘Actions > Job Queue > Create/modify advanced multi-row queue sequence’. Then assign the same Sequence Name to each row, but set the Sequence Position Number from 1 to 9 for each row, so that the first row in the grid is set to position number 1, and then last row is set to position number 9. See the screenshots below for reference.
- The last thing we need to do is create a sequence execution row. This is just a “dummy” row in the grid that is used to execute the advanced multi-row queue sequence. For the sake of this tutorial I’ll actually put the name “SequenceExecutionRow” in the row’s host column, but it can be called anything. Then using the same menu item as in the previous step we just change the radio button to ‘Create Sequence Execution Row’ before we click the ‘Apply values to selected row(s)’ button.

- At this point everything is set up. Now all we have to do is execute the sequence. Highlight just the execution row that you just created in the previous step. Then click on ‘Actions > Job Queue > Execute advanced multi-row queue sequence’ to execute the sequence.