

To schedule a report of the entire grid’s activity to be emailed at a specific time, such as when your Windows updates or patching maintenance window comes to an end on a given day, here’s what to do.
Configure Your Default Email Settings
- Go to Tools > Settings > Email Notifications
- You can use my screenshot below as a template, but substitute your own email server and address settings.
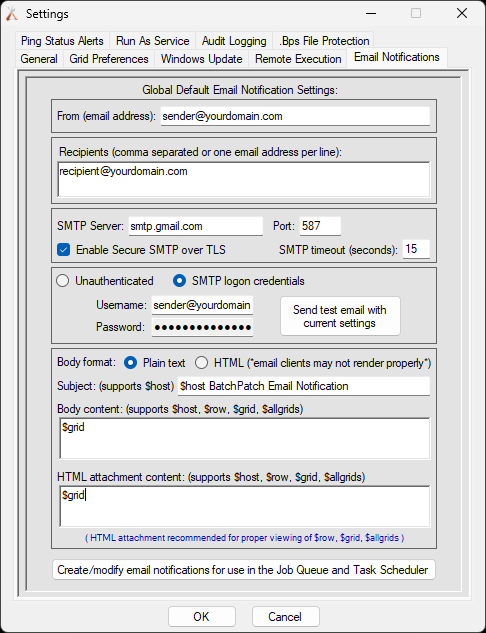
- Use the Send test email with current settings button to ensure that your username, password, SMTP server, port, and other settings are configured properly for your email server.
- Set the Body content and HTML attachment content to $grid. When BatchPatch sends an email notification with the default settings, the $grid value instructs it to send a copy of the entire grid’s contents
- Finally, click OK to save the settings.
Create a BatchPatch Scheduled Task
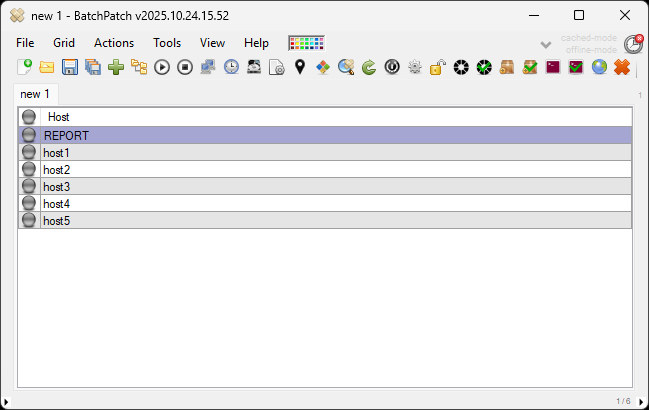
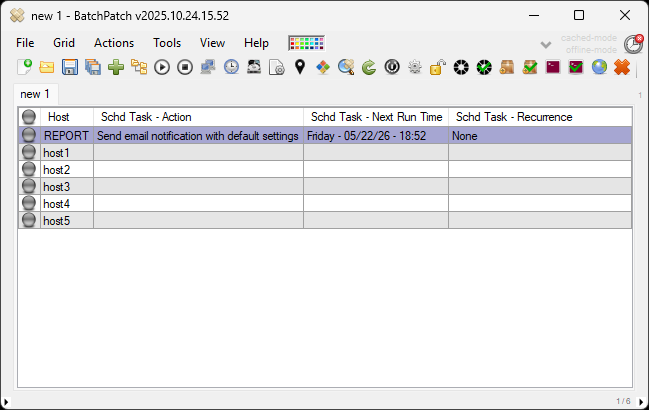
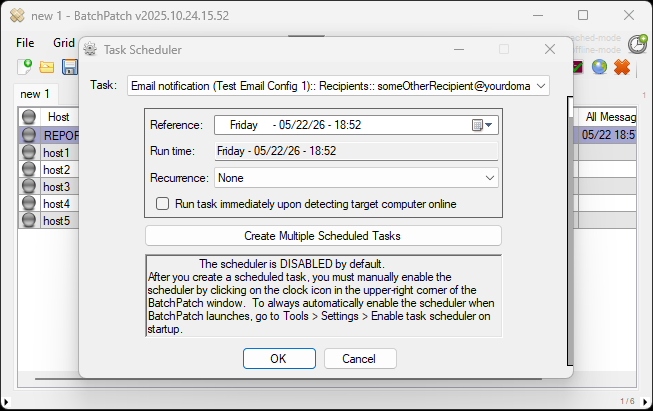
- In my BatchPatch grid I have 5 target hosts, but I also created a separate row with a fake host name REPORT. It will be used strictly to schedule and send the email notification. I don’t actually have a target computer with the name REPORT. Feel free to create a bogus host entry just like I did. Give it any name that makes sense for your situation.
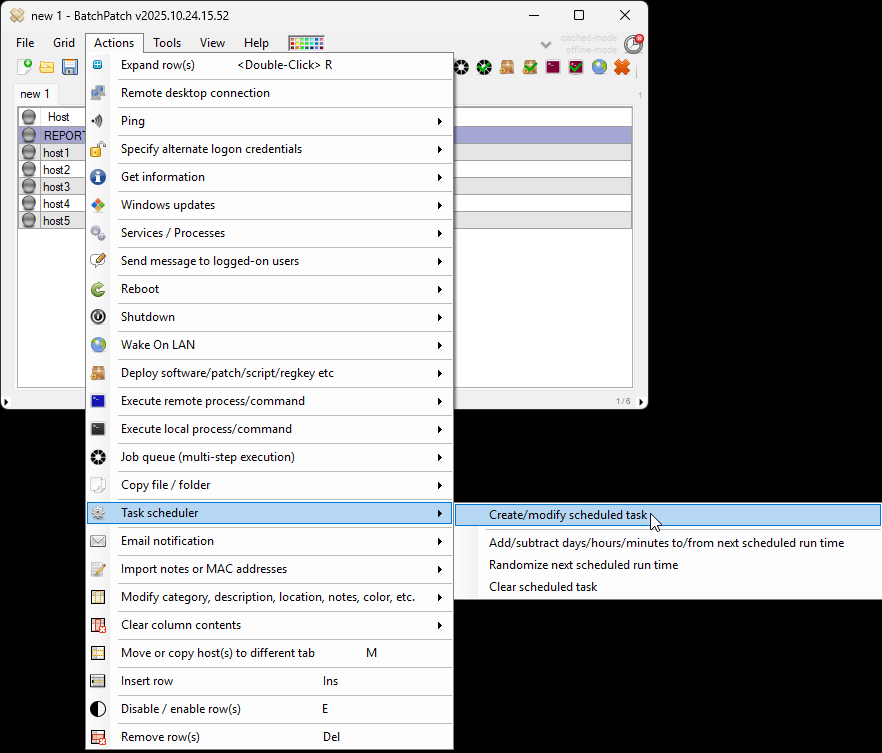
- Highlight the bogus host row that you created, and then click on Actions > Task scheduler > Create/modify scheduled task to open the Task Scheduler form window.
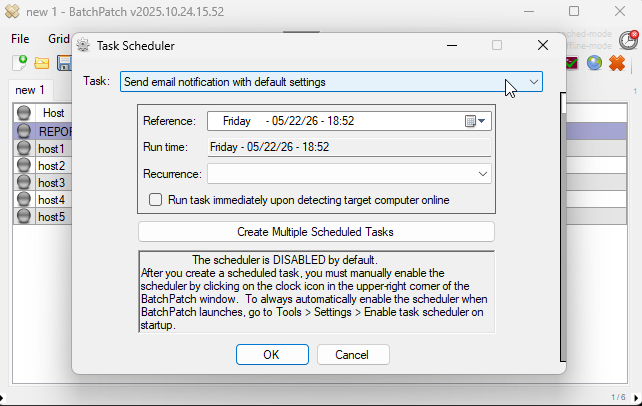
- From the Task drop-down menu, select Send email notification with default settings, and set the desired run time by modifying the Reference: field. Then click OK to apply this task to the selected row in the grid.
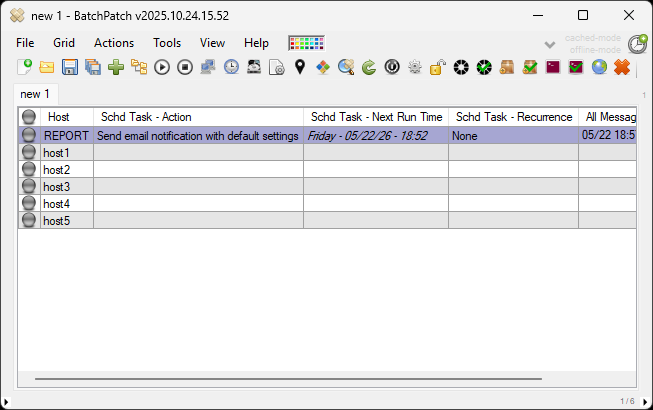
- The only thing left to do is enable the scheduler by clicking on the red clock icon in the upper right corner of the BatchPatch main form window. Clicking the red icon will turn it green, which signifies that it’s enabled. Note in the two screenshots below the change from red to green. Once the icon is green, any scheduled tasks that are configured in the grid will be executed at their scheduled times.
Optionally Create and Save Email Notifications for Other Recipients or with Other Settings
Above we used the default email notification values for our email notification. For most users, this will probably be sufficient. However, some users will want to be able to create multiple different email notifications so that in some cases a notification and/or report can be sent to one recipient group, and in other cases a notification and/or report can be sent to a different recipient group. Here’s how to do that.
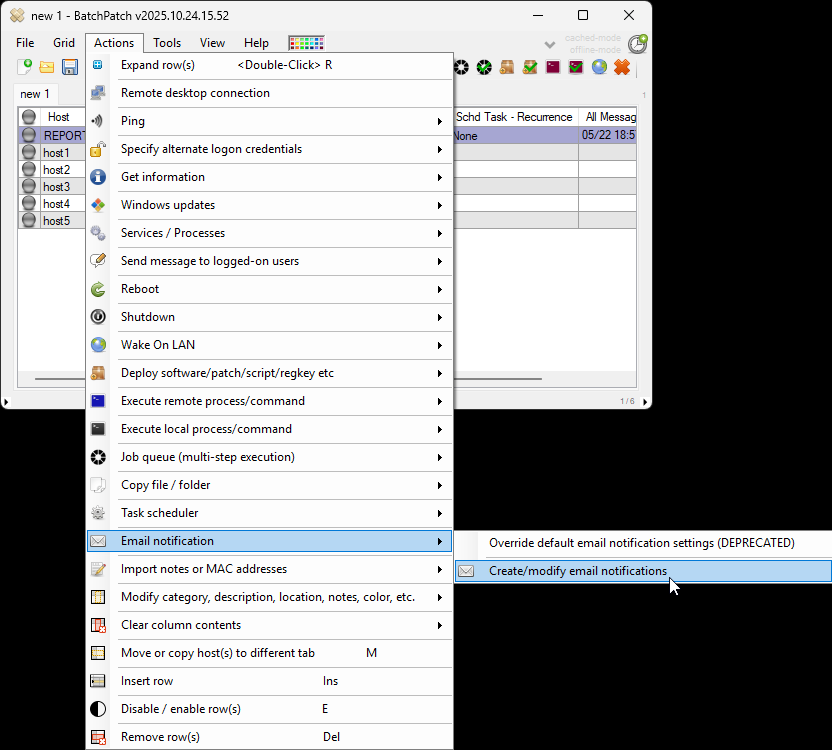
- Select Actions > Email notifications > Create/modify email notifications.
- In the Email Notifications form, set any values that you’d like for your new email notification configuration. Then use the double-right arrow button to save it. The values that you set here will override the default values if you ever use the Task Scheduler or Job Queue to send an email using this new configuration instead of using the default configuration.
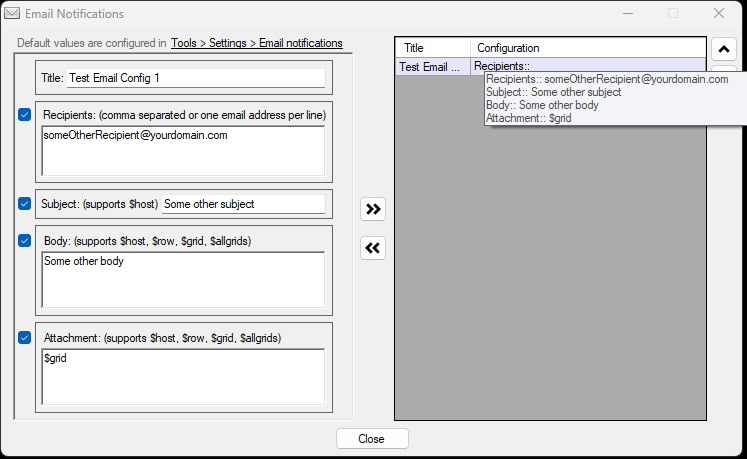
- After an email notification configuration has been saved, you’ll find that it’s an available option in your Task Scheduler drop-down menu in the Task Scheduler form window. If I create a scheduled task with this new email configuration, it will be used instead of the default email configuration that we used previously.
Optionally Using the Job Queue to Send Email Notifications and Reports
-
The above example shows how to send emails from the BatchPatch Task Scheduler. However, you can also send emails from the BatchPatch Job Queue. In the same way that you were able to use Send email notification with default settings as well as your custom email notification template from within the Task Scheduler task drop-down menu, in the Job Queue you can similarly select either of those to add an email notification step to your job queues.
- Select Actions > Job Queue > Create/modify job queue

- If you want to use the default email configuration values to send your email, then select Send email notification with default settings from the Special items menu. Double-click it to add it to your job queue.
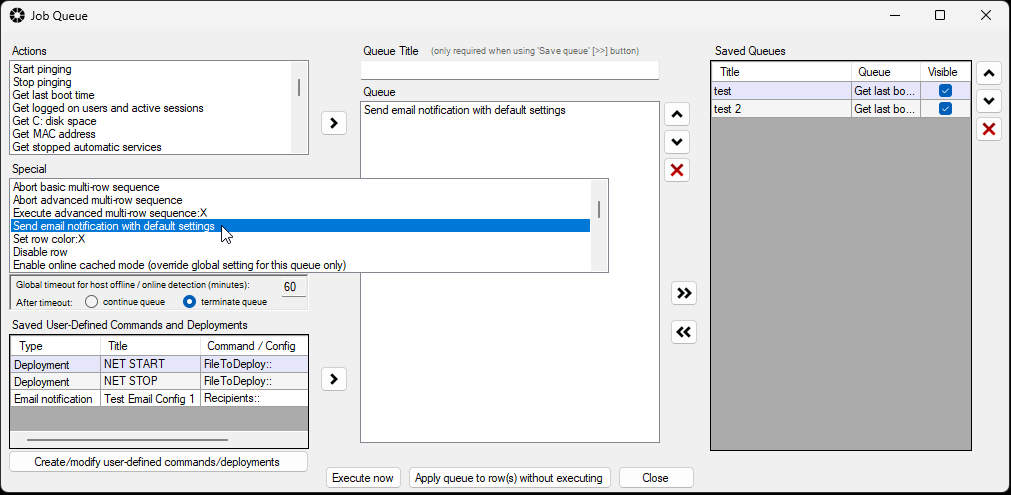
- Or if you want to use the other email configuration that you created and saved, you’ll find that located in the Saved User-Defined Commands and Deployments menu grid in the lower-left area of the job queue window. You can double-click the entry that you created/saved previously to add it to a job queue.
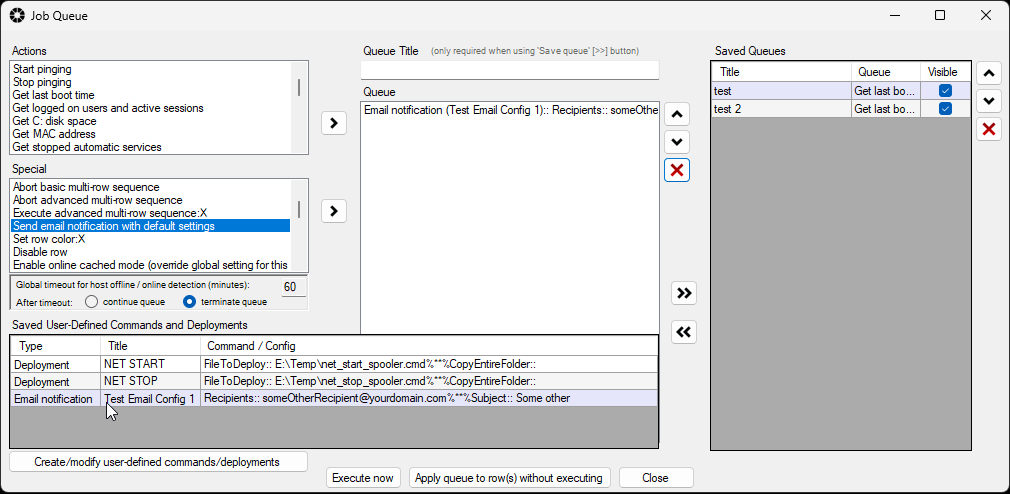
- Now you can add any other desired steps to your job queue and save it with the double-right arrow button.

- Once saved, you’ll be able to launch the job queue at any time for a given host/row on-demand by selecting the desired host/row and clicking Actions > Job Queue > Execute saved job queues > Your custom job queue title
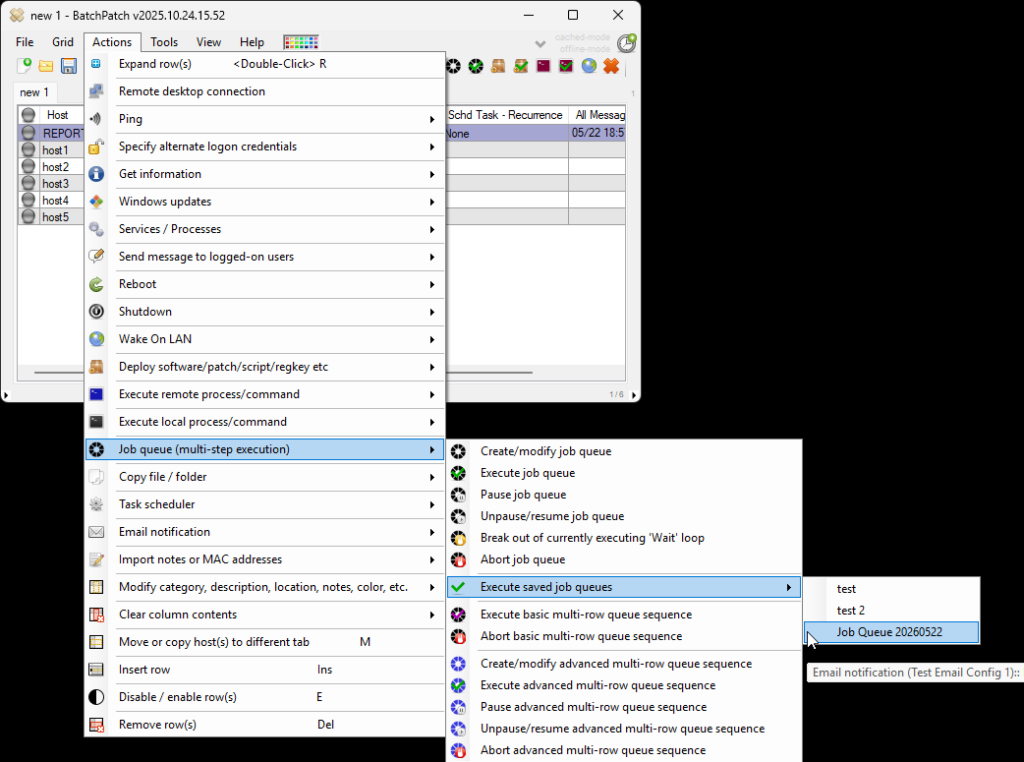
- Alternatively, you can schedule the job queue to run for a given row by selecting the desired row and then clicking Actions > Task scheduler > Create/modify scheduled task. Select your custom job queue in the task drop-down menu, and set the desired run time.
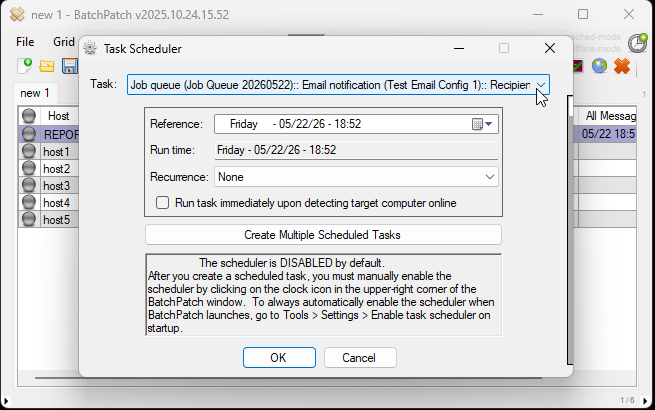
- Finally, as illustrated in previous steps, make sure to enable the scheduler by clicking the clock icon in the upper-right part of the main BatchPatch window. Green is enabled. Red is disabled. Make sure it’s green so that your scheduled job queue task will execute at the run time that you configured for it.
