If you just downloaded BatchPatch for the first time, let’s go through the things that you need to have in place for the software to function properly.
- PsExec: Download PsExec from Microsoft
- PsExec needs to be placed in the Windows PATH of the computer that is running BatchPatch (target computers do *NOT* need psexec). The PATH is an environment variable that controls where Windows searches for an executable that is specified at the command line. We recommend that you simply put PsExec.exe in C:\Windows because the Windows directory is included in the PATH when Windows is installed. You can read more about the PATH here: http://en.wikipedia.org/wiki/PATH_%28variable%29.
If you have trouble you can alternatively specify a custom filepath for PsExec.exe in BatchPatch by going to ‘Tools > Settings > Remote Execution > Use psexec.exe custom filepath’. - Open a command prompt (start > run > cmd) and launch PsExec one time by typing ‘psexec’ without the quotes, and then press enter. Accept the End-User License Agreement for PsExec.
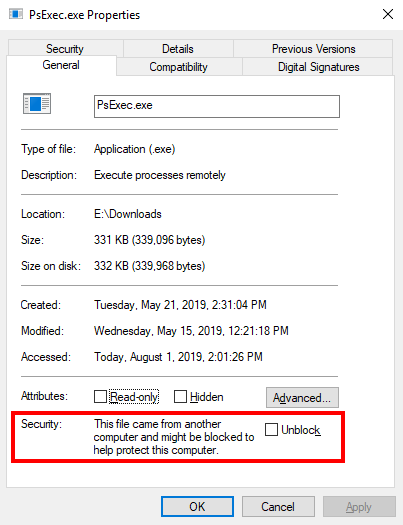
- Make sure the PsExec.exe is not blocked by Windows. Right click on PsExec.exe and select ‘Properties’ and then click on the ‘General’ tab. If you see the ‘Unblock’ checkbox as shown in the image below, check the box and click OK.
- Permissions: In order for BatchPatch to work properly, you must have access to a user account that is in the local administrators group on the target computers that you will be working with. In your environment, this might be as simple as logging on to your computer as a domain administrator, and then simply running BatchPatch. However, if you’re using local accounts with no domain, there are some additional configuration steps, so if you have any issues whatsoever with authentication with or without a domain, please first consult this link and read through it entirely to make sure you have everything setup properly: BatchPatch Authentication in Domain and Workgroup (Non-Domain) Environments
- Firewalls: In order for BatchPatch to communicate with target computers, firewall software on the target computers either needs to be disabled altogether (not recommended), or it needs to be configured to allow the appropriate services to be able to communicate (recommended). For more information as well as instructions on configuring Windows Firewall for use with BatchPatch, please see this link: Using BatchPatch with Windows Firewall. For specific information about port requirements, please see BatchPatch Port Requirements. After that, verify on target computers that the following items are working:
- The Workstation service is running (check using services.msc by going to start > run > services.msc)
- The Server service is running (check using services.msc)
- The Remote Procedure Call (RPC) service is running (check using services.msc)
- The Windows Management Instrumentation (WMI) service is running (check using services.msc)
- The Admin$ share is available (go to start > run > \\targetComputer\admin$ to test this connection)
- ‘File and Printer Sharing is enabled (no need to actually share anything)
- Lastly, if you are using WSUS, here are some guidelines for Group Policy settings that you might want to incorporate to get the most out of BatchPatch. WSUS is NOT required to use BatchPatch. Additionally, if you DO use WSUS, no special configuration is required. BatchPatch will work with your existing WSUS environment. Additional guidelines for integrating WSUS and Group Policy for BatchPatch
- Once you have everything in place, you can simply launch BatchPatch and add some computers to the grid!
- Troubleshooting Common Errors: If you run into any problems, this link explains how to resolve the most common errors that might occur: Troubleshooting Common Errors in BatchPatch