

At the time of this writing Microsoft does not currently enable/allow remote silent deployment of Windows 10 feature upgrades (like the ‘Anniversary Update’ version 1607 or the ‘Creators Update’ version 1703) through the normal channel that BatchPatch uses to apply Windows updates. It’s true that if you use the normal Windows Update control panel interface to manually apply updates on an individual computer without the use of BatchPatch, then you will be able to successfully install the Windows 10 feature upgrades this way. However, using this method you would have to go to each target computer individually to manually apply the available updates through the control panel, which of course is far from optimal. If you want to use BatchPatch to remotely deploy Windows 10 feature upgrades, then you may use the method outlined below. EDIT: Starting with the April 2020 release of BatchPatch, feature updates can also now also be installed using the normal Windows update actions, though cached mode must be disabled in order for that to be successful.
Deploying Windows 10 Feature Upgrades Remotely with BatchPatch
- The first thing that we need to do is obtain the installation media, ideally in ISO format. We accomplished this by running the Windows 10 Media Creation Tool, but if you have a volume licensing agreement with Microsoft then you ought to be able to obtain the ISO media through that channel, and then you can skip down a few steps in this tutorial for deployment instructions. With the Windows 10 Media Creation Tool you cannot select the specific version of Windows for which you want to obtain media. It seems that when you use the Media Creation Tool to create Windows 10 media you will always get the latest version of Windows 10 available, so keep that in mind. The Windows 10 Media Creation Tool is available here.
- To run the media creation tool you must be logged on to the computer as a local administrator. It is not sufficient to be logged on as a normal user and use ‘run-as’ to run the tool as an admin user. For whatever reason if you try to do that, the tool will not let you proceed until you actually log on to the computer as the admin user.
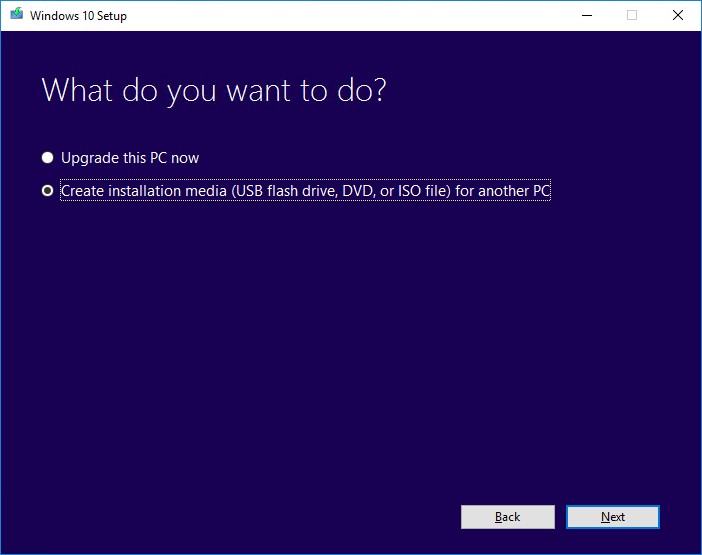
- When you run the tool you will have the option to either Upgrade this PC now or Create installation media (USB flash drive, DVD, or ISO file) for another PC. Select the Create installation media option, and then click Next.
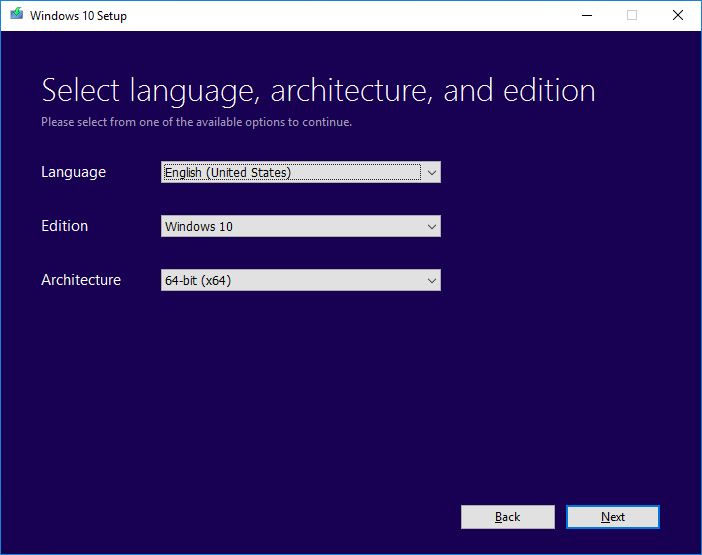
- At the next prompt you will be able to select the language, edition, and architecture. Then click Next.
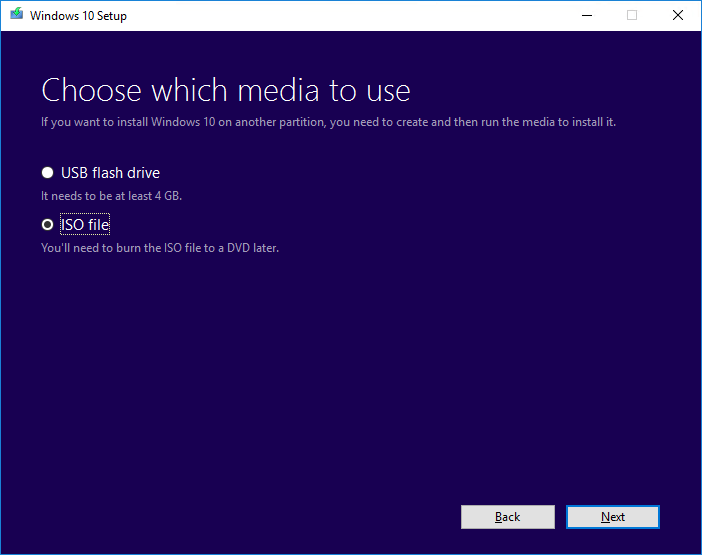
- Finally, select the option for ISO file and click Next.
- At this point you will be prompted to choose a location on disk to save the ISO file. Do that and then wait until the download has completed.
- Once the ISO file has been obtained, the next step is to extract its contents to a directory that you specify. I used 7-zip to accomplish this, but you can use whichever extraction tool you prefer.
- After you have extracted the ISO you should have a directory that contains the required installation files.

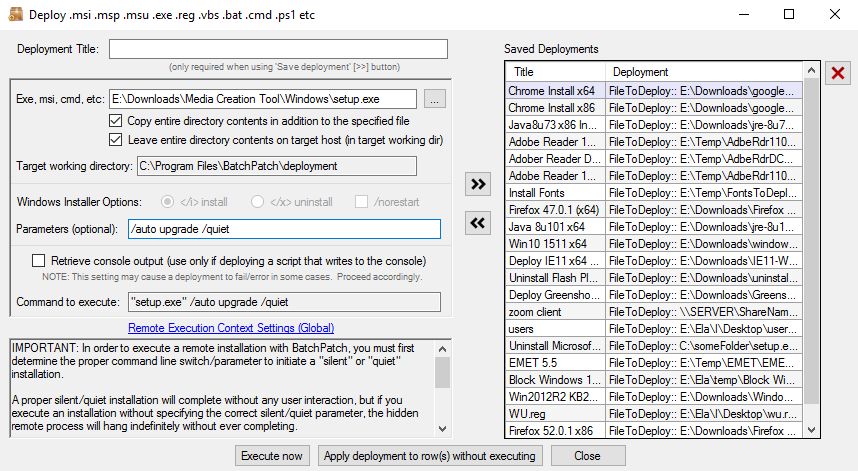
- At this point we can setup the BatchPatch Deployment. Select Actions > Deploy > Create/modify. In the Deployment interface, select the setup.exe (from the extracted contents of the ISO) as the file to deploy, and make sure to check the ‘Copy entire directory’ box and the ‘Leave entire directory’ box, so that when the target computer is rebooted multiple times during the upgrade/installation, it still has access to all of the files required for the upgrade. Additionally you need to add the following parameters:
/auto upgrade /quiet
- When you are ready you can either save the deployment to execute later by using the double-right-arrow ‘>>’ button, or you can execute the deployment now for the currently selected rows in the BatchPatch grid by clicking the Execute now button. The deployment will take some time because BatchPatch has to copy multiple GBs of data to the target computers before it can execute the upgrade. When BatchPatch shows Exit Code: 0 (SUCCESS) for a given target computer you should expect that the target will still be working and will still reboot at least one time but possibly multiple times while Windows is upgraded and configured on the target, so be patient and let it do its thing!
NOTE: We have had two reports where a user received the following error:
Deployment: Error: Access to the path '\\TargetComputer\C$\Program Files\BatchPatch\deployment\autorun.inf' is denied.
It’s unclear why these two users experienced this error while many others, including us, have executed the deployment successfully without encountering the error. My guess is it might have something to do with the application used to extract the .ISO file. Nonetheless, if you encounter the error it can be resolved by simply deleting the autorun.inf file from the source directory before beginning the deployment.